
To mic a classical guitar, aim a small-diaphragm condenser microphone at the 12th fret from a distance of 6-12 inches. The sweet spot often resides around the bridge and body intersection for a fuller sound.
Capturing the delicate nuances of a classical guitar requires understanding its unique sound profile. By strategically placing your microphone, you can preserve the guitar’s natural tone and resonance. Experimentation with mic placement is crucial to find the balance between the strings’ articulation and the body’s resonance.
Remember to consider room acoustics, as they significantly contribute to the recorded sound quality. It’s also essential to use a microphone that accurately reflects the classical guitar’s wide dynamic range and frequency response. With these tips in mind, recording a classical guitar can yield a pure, authentic sound that resonates with listeners.
Credit: classicalguitarnstuff.com
Introduction To Classical Guitar Recording
Recording classical guitar presents a unique set of challenges and rewards, setting it apart in the world of music production. While capturing the nuances of this intimate instrument, it’s crucial to understand the aspects that contribute to outstanding audio fidelity. In this section, we delve deep into the world of classical guitar recording, highlighting the pivotal role of microphone techniques to preserve the guitar’s soul-stirring sound.
Understanding The Fundamentals Of Classical Guitar
A classical guitar is distinguished by its rich harmonics, dynamic range, and delicate timbre. Capturing its true essence requires an appreciation of its construction and the way sound resonates from the nylon strings through the wooden body. The instrument’s subtleties make recording both a technical and artistic endeavor. To create a refined recording, audio technicians must combine their technical knowledge with a deep understanding of the classical guitar’s characteristics.
The Importance Of Proper Microphone Placement
Microphone placement is paramount when recording a classical guitar. Even slight variations in position can drastically affect the captured sound. The placement determines the balance between the bass and treble notes, the level of detail, and the overall warmth and presence of the recording. Proper positioning captures the guitar’s full tonal spectrum, ensuring a clear and authentic reproduction of the performance.
Overview Of Various Mic Types And Their Characteristics
- Condenser Microphones: Known for their detailed and crisp sound, they are ideal for capturing the subtle nuances of a classical guitar.
- Dynamic Microphones: Less sensitive than condensers but sturdy and reliable, these can be used in a live setting.
- Ribbon Microphones: With their figure-eight pattern and warm sound, ribbon mics can add a vintage tone to your recording.
Each microphone type brings its unique color to the sound. Selecting the right mic and understanding how its characteristics mesh with the classical guitar’s sound is crucial for a successful recording.
Microphone Placement Techniques
When it comes to emotion and butterscotch-warm tones, nothing captures the essence of a classical guitar performance quite like the artful placement of microphones. Discovering the correct microphone placement can be akin to uncovering a secret path to audio nirvana. This section delves into various techniques that audio engineers and musicians can use to ensure their classical guitar recordings are pristine and powerful.
Standard Placement Approach And Its Variations
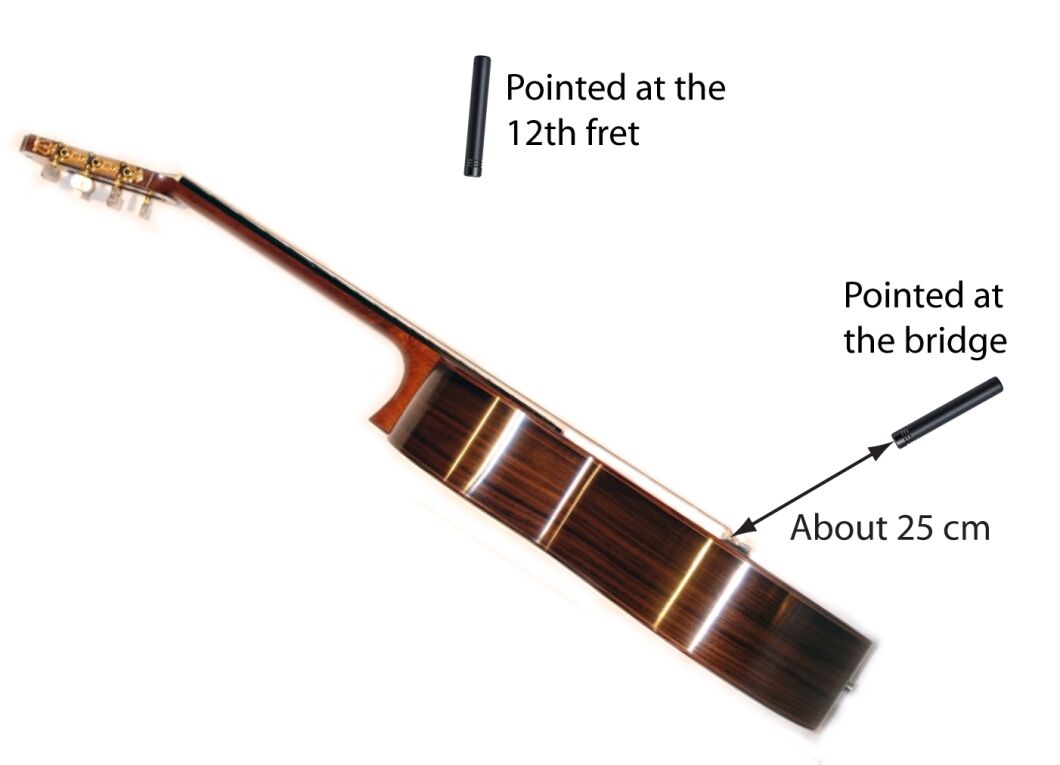
The Standard Placement Approach is the tried-and-true method that often begins with a single microphone positioned at arm’s length from the 12th fret, the so-called sweet spot of the classical guitar. But, much like a painter’s nuanced strokes, variations come into play depending on the desired sound. By moving the microphone slightly toward the sound hole, a richer, bassier tone emerges, while positioning it closer to the bridge brightens the articulation.
- Sweet Spot Focus: Arm’s length from 12th fret
- Bass Emphasis: Adjust towards the sound hole
- Brighter Tones: Move nearer to the bridge
The Close Mic Technique: Pros And Cons
The Close Mic Technique involves positioning the microphone a few inches away from the guitar. This technique has several advantages:
- Pros:
- Heightened detail and clarity of notes
- Less room noise and reverberation
- Greater control over the recorded sound
- Cons:
- Can capture finger noise and fret squeaks
- Might lose some natural resonance
- Increased risk of audio peaks from proximity effect
The Stereo Miking Method: Capturing A More Ambient Sound
The Stereo Miking Method is a dual approach that often yields a more authentic, live-feel recording. By using two microphones, this technique captures the classical guitar in a spatial context, reflecting how sound waves travel through the environment.
It might include:
- XY Configuration: Two cardioid mics at a 90-degree angle for a focused but natural sound
- ORTF Configuration: Mics space apart at an angle simulating human ear separation for superior stereo imaging
- AB Configuration: Two omnidirectional mics several feet apart providing a wider, more ambient capture
Each configuration offers a different stereo image and atmospheric depth, making the method suited for those seeking to paint a more vivid acoustic picture.
Advanced Mic Placement Considerations
When recording a classical guitar, achieving a sublime sound isn’t just about the musician’s skill or the quality of the instrument. The magic often lies in the subtleties of mic placement. Advanced mic techniques can significantly enhance the tonal qualities captured, transforming a good recording into a great one. Let’s delve into sophisticated strategies for placing your microphone to capture the classical guitar’s nuances flawlessly.
Room Acoustics And Their Influence On Mic Placement
Room acoustics play a pivotal role in the recording quality of a classical guitar. Not only does the sound emanate from the guitar itself, but reflections and absorptions within the room create a complex soundscape. Understanding these interactions helps us position mics in places that will capture both direct and ambient sounds harmoniously.
- A live room with reflective surfaces might necessitate careful mic placement to avoid excessive reverb.
- A dead room, with more absorbent materials, could benefit from a mic position that enhances the guitar’s natural reverberation.
What matters most is finding a balance that complements the guitar’s natural sound without introducing unwanted coloration from the room.
Dealing With Phase Issues In Multiple Mic Setups
Implementing multiple mic setups can provide a richer sound but also introduces the risk of phase issues, which can weaken the guitar’s presence. To avoid phase cancellation:
- Ensure mics are positioned at calculated distances, adhering to the 3:1 rule to minimize phase interference.
- Regularly check the phase coherence between the mics by listening and adjusting in real-time.
- Consider using a phase alignment tool during mixing to correct any remaining discrepancies.
Proper attention to phase alignment ensures that the mics work together to enhance the guitar’s sound, not detract from it.
Experimenting With Off-axis Mic Placement
Off-axis mic placement can unearth a myriad of tonal choices. Unlike the conventional on-axis approach, orienting the mic slightly away from the sound source can capture a more nuanced sound profile, emphasizing different overtones and reducing the shrillness of higher frequencies.
Consider these techniques:
- Angle the mic slightly off the neck or the sound hole to emphasize the lower frequencies or to achieve a milder high-end.
- Use a cardioid pattern mic to exploit its off-axis coloration for a more distinct timbral character.
Off-axis techniques often require trial-and-error but can yield an exquisite sound that sets your recording apart.

Credit: classicalguitarmagazine.com
Post-recording Processes
Capturing the intricate sounds of a classical guitar requires a delicate balance of technique and equipment, but the journey to sonic perfection doesn’t stop at recording. Post-recording processes play a crucial role in polishing the raw audio to achieve a resonant, clear, and pleasing final product. These processes, including equalization, mixing, and the application of reverb, refine the guitar’s sound, ensuring it complements the intended sonic landscape. Let’s dive into each post-recording aspects that can elevate your classical guitar recording from good to outstanding.
Eq Tips For Classical Guitar
Applying EQ (equalization) is essential to bring out the best in your classical guitar tracks. Focus on these key points:
- Low-End Roll Off: To avoid muddiness, apply a high-pass filter to cut off the unnecessary rumble below 80 Hz.
- Body and Warmth: Boost gently around 100-200 Hz to enhance the guitar’s body.
- Presence: Find the sweet spot between 2-5 kHz for clarity without harshness, highlighting the guitar’s subtleties.
- Sparkle: A slight lift above 10 kHz adds an airy brightness to the sound.
Common Mixing Techniques
The mix should ensure each element within a piece can be heard and appreciated. Common mixing techniques include:
- Panning: Use subtle panning to give a sense of space and mimic a natural listening environment.
- Volume Balancing: Adjust volumes to bring forward the key parts or melodies.
- Compression: Sparingly use compression to control dynamics but retain the instrument’s expressiveness.
- Automation: Employ automation for volume, panning, and effects to enhance musical emotion and dynamics throughout the track.
Adding Reverb: Quantity And Quality
Reverb can provide a sense of space and depth, but quantity and quality are paramount. Follow these guidelines:
- Size and Decay: Select reverb types that mimic real-world spaces appropriate for classical guitar, and adjust the decay time to match the tempo and mood of the piece.
- Wet/Dry Mix: Balance the wet (effect) and dry (original) signal to maintain the guitar’s natural tone while adding the desired ambiance.
- EQing Reverb: Apply EQ to the reverb return to avoid muddiness, often cutting the low-end and taming the highs.
Conclusion: Best Practices And Final Thoughts
Throughout our exploration of classical guitar mic placement, we’ve uncovered a wealth of strategies for capturing the instrument’s intricate nuances. Let’s distill this knowledge into a coherent set of guidelines, peppered with encouragement for personal experimentation, to ensure each recording shines with the fullest expression of the classical guitar’s tonal beauty.
Recap Of Key Mic Placement Strategies
Here’s a brief recap of the most effective mic placement techniques:
- 12th Fret Positioning: For a balanced sound that combines string clarity with resonance.
- Near the Soundhole: To capture the guitar’s full-body resonance, but with caution to avoid boominess.
- Blending Microphones: Using a combination of mic positions to create a richer, fuller sound.
- Environmental Considerations: Taking room acoustics into account to enhance or mitigate certain tonal qualities.
Maintaining consistency between sessions is key for a cohesive sound, especially within multi-track recordings.
Personal Experimentation And Listening
While following general guidelines can set you on the right path, the unique voice of each classical guitar calls for personal experimentation. Trust your ears and take the time to listen to the subtleties each mic position brings to the recording.
Diving into experimentation may involve:
- Testing various microphones to find the best match for your instrument.
- Exploring unconventional mic placements for creative sound textures.
- Recording and analyzing the impact of changes in the room’s setup.
Document your findings methodically to build a repertoire of techniques tailored to your specific requirements.
Resources For Further Learning
Embarking on a journey towards mastery of classical guitar recording continues beyond this guide. Seek out resources to deepen your understanding and craft. A few suggestions include:
- Comprehensive books on audio recording techniques.
- Online courses specific to classical guitar recording.
- Video tutorials from seasoned recording engineers and musicians.
- Professional workshops and masterclasses on the subject.
Connecting with a community of fellow classical guitar enthusiasts and recording professionals can provide invaluable insights, fostering a collective growth in the art of capturing the true essence of this time-honored instrument.
Frequently Asked Questions For Where To Mic Classical Guitar
Where Should The Mic Be On A Classical Guitar?
Place the mic near the 12th fret of the classical guitar to capture a balanced sound, combining bass and treble notes effectively. Avoid positioning directly in front of the soundhole to prevent an overly boomy quality.
Where Is The Best Place To Mic A Guitar?
The optimal spot to mic a guitar is near the 12th fret, a few inches away, aimed toward the soundhole for acoustic guitars. For electric guitar amps, place the mic close to the speaker grille, either center or off-center, accounting for desired tone.
What Is The Best Mic For Classical Guitar?
The best mic for classical guitar is often a small-diaphragm condenser, like the Neumann KM 184, known for capturing detailed acoustic sounds.
Is Classical Guitar Quiet?
Yes, classical guitars produce a softer sound compared to steel-string acoustic or electric guitars, making them relatively quiet.
Conclusion
Capturing the true essence of a classical guitar’s sound hinges on microphone placement. From experimenting with distance to picking the right mic, every choice matters. Remember, nuanced subtleties define the best recordings. Embrace these tips and your guitar will resonate with clarity and depth on every track.

Happy recording!
As an Amazon Associate, Cleanestor earns from qualifying purchases at no additional cost to you.