Tuning a violin can seem tricky. It’s essential for good sound.
Learning to tune a violin is crucial for every violinist. A well-tuned violin produces beautiful and accurate music. Whether you’re a beginner or experienced, tuning your instrument properly is a must. Without proper tuning, even the best player will struggle to sound good.
This guide will help you understand the steps and tools needed to tune your violin correctly. With practice, tuning will become second nature. Let’s dive into the basics of tuning your violin and ensure you always play in harmony.
Credit: store.fisherviolins.com
Introduction To Violin Tuning
Tuning a violin is a crucial skill for every violinist. Proper tuning ensures that your instrument produces beautiful, harmonious sounds. This task might seem challenging at first. But with practice, it becomes easier and more intuitive.
In this guide, we will explore the importance of proper tuning. We will also discuss the essential tools needed for tuning a violin. By the end, you will have a clear understanding of how to tune your violin effectively.
Importance Of Proper Tuning
Proper tuning is essential for producing accurate notes. It helps maintain the violin’s sound quality. A well-tuned violin allows for better practice sessions. It ensures that your music sounds pleasant to the ears. Tuning your violin regularly also helps in developing your musical ear. This skill is vital for recognizing correct pitches and tones.
Tools Needed
Several tools can help you tune your violin. The most common tool is a tuner. Tuners come in various forms, including digital tuners and tuning apps. These tools provide accurate pitch references for each string. A tuning fork is another useful tool. It produces a specific pitch when struck. You can also use a piano or keyboard to match the pitches. Peg compound is a handy tool for adjusting the tuning pegs. It helps prevent the pegs from slipping or sticking. Lastly, a fine tuner can provide precise adjustments to the strings.
Understanding Violin Strings
Learning to tune a violin begins with understanding its strings. Each string has a unique name and note. The material of the strings also affects the sound. This guide will walk you through these basics.
String Names And Notes
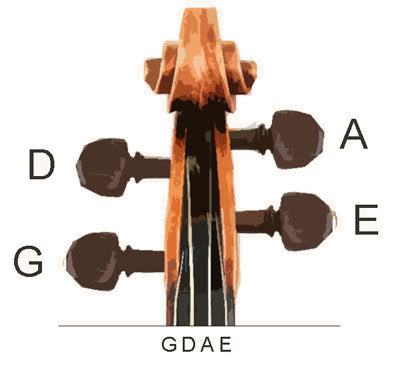
A violin has four strings. Each string is tuned to a specific note. Here are the names and notes:
| String | Note |
|---|---|
| G | G |
| D | D |
| A | A |
| E | E |
The G string is the thickest and has the lowest pitch. The E string is the thinnest and has the highest pitch. Knowing these names and notes helps in tuning the violin correctly.
String Materials
Violin strings come in different materials. Each material has a unique sound quality. Here are the common types:
- Gut Strings: Made from sheep intestine. These give a warm, rich tone. They are often used in baroque music.
- Steel Strings: Made from steel. These offer a bright, clear sound. They are durable and stay in tune longer.
- Synthetic Strings: Made from nylon or composite materials. These provide a balance between gut and steel strings. They are stable and versatile.
Choosing the right string material affects the sound and playability of your violin. Beginners may prefer synthetic strings for their ease of use. Advanced players might choose gut or steel strings based on their music style.
Pre-tuning Preparations
Before you start tuning your violin, there are a few essential preparations to ensure a smooth process. These steps will help you achieve the best sound from your instrument. Let’s dive into the pre-tuning preparations.
Checking The Instrument
First, examine your violin for any visible damage. Look for cracks, loose parts, or worn-out strings. If you find any issues, consider fixing them before tuning. This will help you get a clearer sound.
| Inspection Area | What to Look For |
|---|---|
| Body | Cracks or scratches |
| Pegs | Loose or tight pegs |
| Strings | Frayed or broken strings |
| Bridge | Proper alignment |
Setting Up In A Quiet Space
Find a quiet space to tune your violin. Background noise can interfere with your ability to hear the instrument clearly. A calm environment helps you focus better on the tuning process.
Ensure the space is well-lit and comfortable. A good lighting helps you see the strings and pegs clearly. Sit in a comfortable position, as tuning can take a few minutes.
Here are some tips for choosing the right space:
- Avoid rooms with loud appliances
- Close windows to block outside noise
- Choose a room with minimal echo
By following these pre-tuning preparations, you set yourself up for a successful tuning session. Happy tuning!
Using A Tuner
Tuning a violin can seem challenging, especially for beginners. Using a tuner simplifies the process. A tuner helps you adjust each string to the correct pitch. It ensures your violin sounds great. Let’s explore different types of tuners and a step-by-step guide on how to use them.
Types Of Tuners
There are various tuners available for tuning a violin. Each type offers unique benefits. Choosing the right one depends on your needs and preferences.
1. Clip-on Tuners: These attach to the violin. They detect vibrations directly from the instrument. They are accurate and easy to use. Ideal for noisy environments.
2. Chromatic Tuners: These detect all pitches. They work for multiple instruments. Place it near the violin, and it picks up the sound. Suitable for quiet surroundings.
3. App-based Tuners: Available on smartphones. Convenient and often free. They use the phone’s microphone to detect sound. Great for quick tuning sessions.
Step-by-step Guide
Follow these simple steps to tune your violin using a tuner.
1. Turn on the tuner: Ensure it is ready to use. If using an app, open it on your phone.
2. Attach the tuner: For clip-on tuners, clip it to the violin’s headstock. For other tuners, place them near the instrument.
3. Tune the A string: Play the A string. Adjust the peg until the tuner shows the correct pitch. The needle should be centered.
4. Repeat for other strings: Tune the D, G, and E strings. Follow the same process. Play each string and adjust until the pitch is correct.
5. Fine-tune: Use the fine tuners for small adjustments. Ensure each string is perfectly in tune.
6. Check all strings: Play each string again. Confirm the tuning. Make any final adjustments if needed.
With these steps, tuning your violin becomes easy and accurate. Practice regularly to develop your ear for the correct pitch.
Tuning By Ear
Learning how to tune a violin by ear can be a rewarding experience. It helps you develop a better musical ear and deepens your connection with your instrument. In this section, we will explore two key methods: matching pitches and using harmonics.
Matching Pitches
Matching pitches is a fundamental method in tuning by ear. Start by listening to a reference pitch, such as an ‘A’ from a tuning fork or piano. Play the ‘A’ string on your violin. Adjust the peg until the pitch matches the reference. Repeat this for the ‘D,’ ‘G,’ and ‘E’ strings.
Play each string and listen carefully. The goal is to match the pitch exactly. It may take some practice. Be patient and listen closely.
Using Harmonics
Using harmonics is another effective method. Lightly place your finger on the ‘A’ string at the halfway point. This creates a harmonic note. Do the same on the ‘D’ string. These harmonics should sound the same.
If they do not match, adjust the ‘D’ string. This technique helps ensure your strings are in perfect fifths. Repeat for the other strings.
Harmonics can be tricky at first. But with practice, you will find it easier. This method offers a more precise way to tune your violin.

Credit: violinspiration.com
Fine-tuning Techniques
Fine-tuning a violin is an essential skill for every violinist. It ensures your instrument sounds its best. This section will guide you through the techniques for fine-tuning your violin.
Using Fine Tuners
Fine tuners are small screws located on the tailpiece of the violin. They allow for precise adjustments. To use them:
- Pluck the string you want to tune.
- Turn the fine tuner clockwise to tighten the string and raise the pitch.
- Turn the fine tuner counterclockwise to loosen the string and lower the pitch.
Repeat these steps until the string is in tune. Fine tuners provide accurate control over the pitch.
Adjusting Pegs
Pegs are found in the scroll of the violin. They are used for larger adjustments. To adjust the pegs:
- Gently pull the peg outward to loosen it.
- Turn the peg slightly to change the pitch.
- Push the peg back in while turning it to secure it.
Use pegs for major tuning changes. Fine tuners can then be used for smaller adjustments. Be careful not to turn the pegs too much. This can break the string.
Common Tuning Issues
Tuning a violin often involves common issues like slipping pegs or strings stretching. Ensuring the pegs are properly fitted can help. Regularly check the string tension to maintain the correct pitch.
Tuning a violin can be tricky. Many players face common issues. These problems can affect sound quality. Let’s explore some common tuning issues.
String Slippage
Strings can slip out of tune. This happens if the peg isn’t secure. Always make sure the peg is properly set. Apply gentle pressure when turning. If this doesn’t help, try using peg compound. It can improve grip. Check the string’s winding. Ensure it is tight and even.
Peg Sticking
Pegs can stick and become hard to turn. This makes tuning difficult. Peg compound can also help here. Apply a small amount to the peg. Turn it to spread the compound. Don’t use too much. Too much can cause slippage. If the peg still sticks, it may need to be refitted. Consult a professional for this.
Maintaining Tuning Stability
Keeping your violin in tune is essential for a beautiful sound. But, tuning stability can be tricky. It involves more than just the correct notes. Proper care and regular checks help keep your violin in tune longer. Here are some tips to help you maintain tuning stability.
Proper Storage
Proper storage is crucial for maintaining tuning stability. Store your violin in a cool, dry place. Avoid areas with high humidity or direct sunlight. These conditions can cause wood to expand or contract, affecting the strings and pegs.
Use a good-quality case. It protects your violin from temperature changes and physical damage. Always place your violin in the case when not in use. It keeps it safe and maintains its tuning stability.
Regular Maintenance
Regular maintenance is key to keeping your violin in tune. Check the tuning pegs often. They must be tight and fit well. Loose pegs can cause the strings to slip, making your violin go out of tune.
Lubricate the pegs with peg compound. It helps them move smoothly and hold their position. Also, inspect the strings regularly. Worn or old strings lose tension and affect tuning stability. Replace them as needed.
Bridge placement is also important. Ensure it is straight and properly aligned. A misaligned bridge can affect the sound and tuning.

Credit: www.violinist.com
Frequently Asked Questions
How Do I Start Tuning A Violin?
Begin by tuning the A string to 440 Hz. Use a digital tuner for accuracy.
What Is The Standard Violin Tuning?
The standard tuning is G, D, A, and E. Tune each string to these notes.
Can I Use A Piano To Tune My Violin?
Yes, you can match each violin string to the corresponding piano key for tuning.
How Often Should I Tune My Violin?
Tune your violin before each practice or performance. Regular tuning ensures optimal sound quality.
Conclusion
Tuning a violin may seem challenging, but it gets easier with practice. Start with the right tools: a tuner and fine tuners. Listen closely to each string’s pitch. Make small adjustments. Be patient. Over time, your ear will develop. Consistent tuning ensures your violin sounds its best.

Regular practice helps maintain this skill. Enjoy your musical journey. Happy playing!
As an Amazon Associate, Cleanestor earns from qualifying purchases at no additional cost to you.