Changing a violin string might seem daunting. But with a bit of guidance, it’s simple.
If you’re a violinist, knowing how to change a string is essential. It saves time and keeps your instrument in top shape. Strings can break or wear out, affecting your sound quality. Learning to replace them ensures you’re always ready to play.
In this guide, we will walk you through the steps to change a violin string. Whether you’re a beginner or an experienced player, you’ll find these tips helpful. Follow along to keep your violin sounding its best.

Credit: www.youtube.com
Gather Necessary Tools
Changing a violin string can be a simple task with the right tools. Having everything ready saves time and ensures a smoother process. Below, we’ll cover the essential supplies and how to choose the right strings for your violin.
Required Supplies
Before you begin, gather the necessary supplies. Here’s a list of what you’ll need:
- New Violin Strings – Ensure you have the right type.
- String Winder – Makes winding strings easier.
- Tuning Peg Compound – Helps pegs stay in place.
- Soft Cloth – Keeps the violin clean.
- Fine Tuner – Assists in precise tuning.
Choosing The Right Strings
Selecting the correct strings is crucial. Different strings affect the sound and playability of your violin. Here’s how to choose:
| String Type | Characteristics |
|---|---|
| Steel Core Strings | Bright tone, durable, and stable pitch. |
| Synthetic Core Strings | Warm tone, flexible, and responsive. |
| Gut Core Strings | Rich tone, sensitive to humidity, and traditional. |
Consider your playing style and preferences. Beginners may prefer steel core strings for their durability and stable pitch. Intermediate players might enjoy synthetic core strings for their warm tone and flexibility. Advanced players often choose gut core strings for their rich, traditional sound.
Prepare The Violin
Before you start changing the violin string, you must prepare the violin. Preparing the violin ensures that the process goes smoothly and prevents any damage. Here are the steps to follow:
Loosen The Pegs
First, you need to loosen the pegs. This will make it easier to remove the old string. Follow these steps:
- Find the peg that corresponds to the string you want to change.
- Turn the peg gently to the left to loosen it.
- Do not force the peg. It should turn easily.
Loosening the pegs reduces tension on the string. This makes it safer to remove.
Remove The Old String
Next, you need to remove the old string. Follow these steps:
- Once the peg is loose, unwind the string.
- Carefully pull the string from the peg and tailpiece.
- Discard the old string properly.
Removing the old string allows you to prepare for the new string. Be gentle to avoid damaging the violin.
Install The New String
Changing a violin string can seem challenging. But with a little patience, it becomes easy. After removing the old string, you need to install the new one. This step is crucial for a clear, beautiful sound.
Attach To Tailpiece
First, take the new string. Locate the ball end. Insert this ball end into the hole of the tailpiece. Ensure it is secure but not too tight. This keeps the string in place during tuning.
Thread Through Peg
Next, thread the other end of the string through the peg hole. Turn the peg to wind the string. Make sure the string coils evenly around the peg. This prevents slipping and helps with tuning.
Keep some tension on the string. This helps it stay in place. Continue winding until the string is snug but not too tight. You can adjust the tension later.
Now, your string is ready for tuning. With practice, this process becomes second nature. Enjoy the fresh sound of your newly installed string.
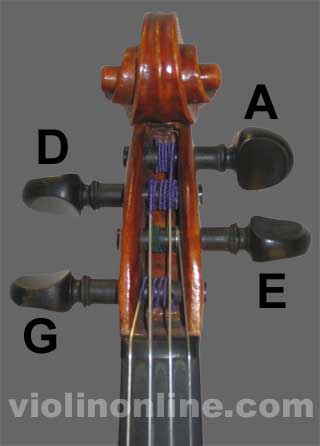
Credit: www.violinonline.com
Tune The String
Tuning a violin string is essential for producing the best sound. It’s a delicate process that requires patience and practice. A properly tuned string ensures harmony and precision in your music. Let’s explore the steps to tune your violin string effectively.
Initial Tuning Steps
Start by using a tuning device or a piano. Pluck the string you need to tune. Listen carefully to the pitch. Turn the fine tuner or peg slightly. Match the string’s sound with the reference note. Be gentle to avoid breaking the string.
Fine-tuning Techniques
Once you reach close to the right pitch, use fine tuners. These small adjustments help achieve perfect tuning. Turn the fine tuner clockwise to tighten. Turn it counterclockwise to loosen. Listen closely and make minor tweaks.
To ensure accuracy, use a digital tuner. Play the string and watch the tuner display. Adjust until the tuner shows the correct note. Practice these steps regularly to improve your tuning skills.
Stretch The String
Changing a violin string can seem daunting. One essential step is stretching the new string. This helps to stabilize it and ensures it stays in tune. Stretching the string properly is key to a good sound.
Why It’s Important
Stretching the string is crucial. New strings tend to stretch over time. This can cause your violin to go out of tune often. By stretching the string, you reduce the risk of frequent tuning.
It also helps the string settle into its correct position. This ensures a better playing experience. A well-stretched string sounds better and lasts longer.
How To Stretch Properly
First, make sure the string is securely attached. Tune it to the correct pitch. Then, gently pull the string away from the fingerboard. Do this several times, but be gentle. You don’t want to break the string.
After stretching, retune the string. It might go flat, so tune it again to the correct pitch. Repeat the stretching and tuning process a few times. This helps the string settle faster.
Remember, patience is key. Stretching a string takes time. But it’s worth it for a stable, well-tuned violin.

Credit: violinspiration.com
Check The Bridge
Changing a violin string requires careful attention to detail. One essential step is checking the bridge. The bridge holds the strings in place and transfers their vibrations to the body of the violin. Ensuring it is properly aligned is crucial for sound quality and playability.
Bridge Alignment
First, inspect the bridge’s position. It should stand upright and not lean. Both feet of the bridge must touch the violin’s surface completely. Check if the bridge is centered between the F-holes on the violin’s body.
Adjust If Necessary
If the bridge is not aligned, adjustments are needed. Gently hold the violin in a secure position. Carefully nudge the bridge until it stands straight. Ensure both feet remain flat on the violin’s surface. Make small adjustments to avoid damage.
Maintenance Tips
Regular maintenance of your violin strings is essential for optimal performance. Follow these maintenance tips to keep your instrument in excellent condition. Consistent care ensures your violin produces the best sound and remains in good shape.
Regular Inspection
Inspect your violin strings regularly. Look for signs of wear, such as fraying or discoloration. Check if the strings are stretching or losing tension. These issues can affect the sound quality of your violin.
Use a magnifying glass for a closer look. This helps identify small nicks or scratches. Early detection of problems prevents larger issues from developing.
Cleaning The Strings
Cleaning your strings is vital. Dust and rosin can build up, affecting the sound.
- Use a soft cloth to wipe the strings after each use. This removes surface dirt.
- For a deeper clean, dampen the cloth slightly with alcohol. Avoid touching the violin’s body with the damp cloth.
- Dry the strings thoroughly after cleaning. Moisture can damage them.
Regular cleaning prolongs the life of your strings. It also maintains the clarity of your sound.
| Task | Frequency |
|---|---|
| Inspect strings | Weekly |
| Wipe strings | After each use |
| Deep clean | Monthly |
Common Mistakes
Changing a violin string can seem simple. Yet, many make common mistakes. These errors can lead to poor sound quality or even damage to the violin. Knowing what to avoid ensures a smoother process and keeps your violin in good shape.
Avoiding Over-tightening
One common mistake is over-tightening the string. This can damage the string or the violin itself. When tightening, turn the peg slowly. Stop and check the tension often. The string should feel snug but not too tight.
Here are some tips:
- Turn the peg slowly.
- Check the tension regularly.
- Ensure the string is snug, not overly tight.
Remember, a well-tuned string should produce a clear, pleasant sound.
Preventing String Breakage
Another mistake is not preventing string breakage. Strings break for various reasons. Over-tightening is one. Poor-quality strings or improper installation can also cause breakage.
To prevent this:
- Use high-quality strings.
- Avoid over-tightening.
- Install strings correctly.
Inspect strings regularly for wear and tear. Replace them before they break.
By avoiding these common mistakes, you ensure your violin stays in great condition. Proper care and attention to detail make all the difference.
Frequently Asked Questions
How Do I Know When To Change A Violin String?
You should change your violin string when it sounds dull, has visible wear, or breaks. Regular players may need to change strings every three to six months.
What Tools Do I Need To Change A Violin String?
To change a violin string, you need new strings, a tuner, and peg compound. These tools help ensure proper string installation and tuning.
How Do I Remove An Old Violin String?
First, loosen the peg until the string can be easily removed. Then, gently unwind the string from the fine tuner or tailpiece.
How Do I Install A New Violin String?
Insert the new string through the peg hole, wind it, and attach it to the fine tuner or tailpiece. Ensure it’s secure and in place.
Conclusion
Changing a violin string can be simple with practice. Follow these steps carefully. Soon, you’ll do it quickly and confidently. Always keep extra strings on hand. Regularly check for wear and tear. Your violin will sound great with new strings.

Enjoy the beautiful music you create. Happy playing!
As an Amazon Associate, Cleanestor earns from qualifying purchases at no additional cost to you.