
Recording a drum set can seem tricky, but it doesn’t have to be. With the right steps, you can capture great drum sounds.
Drum recording is an art and science. Many elements influence the final sound, from the room’s acoustics to the microphone placement. Understanding these factors can transform your recordings. Whether you’re a beginner or have some experience, this guide will help you.
We’ll cover the basics and offer some tips to make the process smoother. By the end, you’ll know how to set up and record your drum set effectively. Ready to dive in? Let’s get started!
Credit: www.waves.com
Preparation
Preparation is key to recording a great drum set sound. Proper preparation ensures a smooth recording process and high-quality results. Let’s explore two crucial aspects of preparation: choosing the right space and selecting your equipment.
Choosing The Right Space
The space where you record affects the sound quality. Choose a room with good acoustics. Avoid rooms with too much echo or background noise. Carpeted rooms and spaces with curtains can help reduce unwanted noise.
Consider the size of the room. A larger room allows the sound to spread out, creating a natural reverb. A smaller room may need soundproofing to avoid unwanted reflections. Think about the environment. Ensure it is comfortable and free from interruptions.
Selecting Your Equipment
Selecting the right equipment is essential. Start with good quality microphones. Use different types for different parts of the drum set. Condenser mics work well for cymbals. Dynamic mics are great for the snare and kick drum.
Invest in a reliable audio interface. It connects your mics to your recording software. Ensure it has enough inputs for all your mics. Choose quality cables to avoid noise interference. A good pair of headphones is also vital for monitoring your recordings.
Think about your recording software. Choose one that fits your needs and budget. Many free options are available. Ensure it is easy to use and compatible with your equipment.
Drum Set Setup
Recording a drum set can be challenging. The first step is setting up the drum set correctly. This involves positioning the drums and tuning them. Proper setup ensures you capture the best sound possible.
Positioning The Drums
Correct positioning is crucial. Start by placing the bass drum in the center. Make sure it is stable. Next, position the snare drum to the left of the bass drum. Adjust the height so it is comfortable to play.
Now, add the toms. Place the high tom above the bass drum. The mid and floor toms should be to the right. Ensure they are easy to reach. Lastly, place the hi-hat and cymbals. The hi-hat should be to the left of the snare. Cymbals can be placed around the set for easy access.
Tuning The Drums
Tuning the drums is essential for a good recording. Start with the bass drum. Tighten the lugs evenly. Tap the drumhead near each lug to check the pitch. Adjust until the sound is deep and resonant.
Next, tune the snare drum. Tighten the top head first. Follow the same process as the bass drum. Then, tune the bottom head. The snare should have a sharp and crisp sound.
Finally, tune the toms. Start with the high tom. Tighten the lugs evenly. Tap and adjust until you get a clear tone. Repeat for the mid and floor toms.
Microphone Selection
Recording a drum set requires careful microphone selection. The right microphones capture the true essence of each drum. This section will help you understand how to choose the best microphones for your drum recording.
Types Of Microphones
Microphones come in different types. Each type has its own strengths. The main types are dynamic, condenser, and ribbon microphones. Dynamic mics handle high sound levels well. They are durable and affordable. Condenser mics are more sensitive. They capture detailed sounds. Ribbon mics offer a warm, natural sound. They are delicate and often pricey.
Choosing Microphones For Each Drum
Each drum in the set needs a specific microphone. For the kick drum, use a large-diaphragm dynamic mic. It handles low frequencies well. The snare drum benefits from a small-diaphragm dynamic mic. It captures the sharp, crisp sound of the snare.
Toms also need dynamic mics. Large-diaphragm dynamics work great for their deep tones. For overheads, use condenser mics. They capture the overall sound of the drum set. Hi-hats need a small-diaphragm condenser mic. It captures the high frequencies clearly.
Consider the room’s acoustics as well. The right microphone placement makes a big difference. Experiment with different positions to find the best sound. Happy recording!
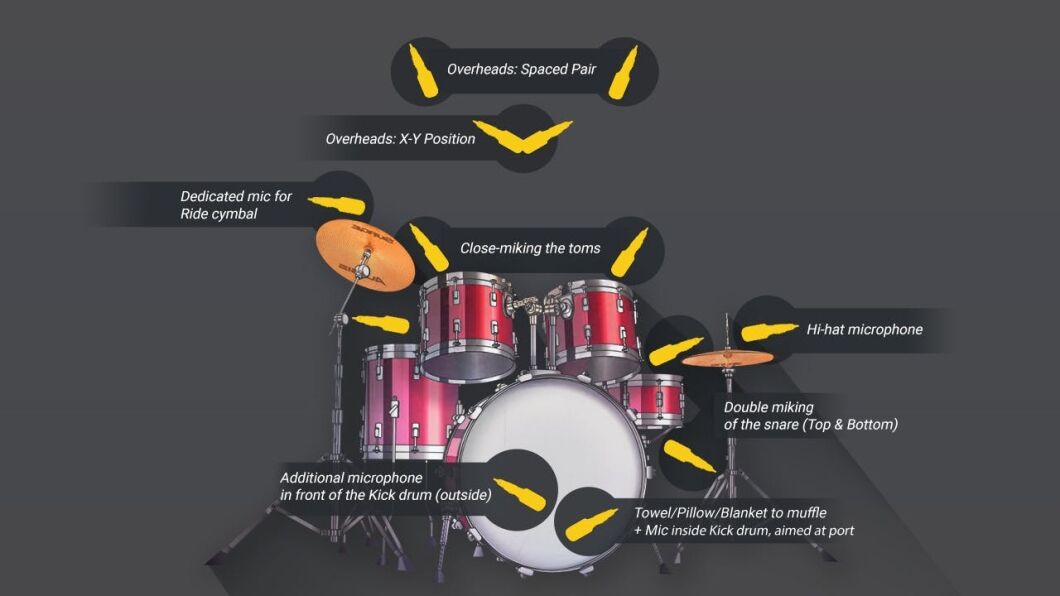
Microphone Placement
Recording a drum set requires precision and understanding of microphone placement. Proper mic placement captures the best sound from each drum and cymbal. Let’s explore two key types of mics: overhead mics and close mics.
Overhead Mics
Overhead mics capture the overall sound of the drum set. They pick up cymbals and provide a balanced stereo image. Place the overhead mics above the drum set. Ensure they are an equal distance from the snare drum. This helps to avoid phase issues. Use a spacing of about 3 to 4 feet apart. Adjust the height to capture the desired amount of room sound. Experiment with positioning until you find the best sound.
Close Mics
Close mics focus on individual drums and cymbals. Place a mic near each drum. Position a mic close to the snare and kick drum. Angle the mic slightly to avoid direct hits. Place tom mics at the edge of each drumhead. Point them towards the center. Use a clip-on mic for the hi-hat. Ensure it is close but not too close. Check the sound levels and adjust as needed. Close mics provide clarity and detail.
Recording Techniques
Recording a drum set can be challenging. The right techniques make a huge difference. Different methods capture distinct sounds and tones. Here, we explore two popular techniques.
Glyn Johns Method
The Glyn Johns method is well-known. It uses only four microphones. Place one above the snare drum. Another goes near the floor tom. Put one mic on the bass drum. Lastly, place one to the side. This method captures a balanced sound. It gives a natural stereo image.
Recorderman Technique
The Recorderman technique is simple. It uses two overhead microphones. Place one directly above the snare. The other should be over the drummer’s shoulder. Ensure both mics are equidistant from the snare. This technique captures the whole kit. It provides a tight, focused sound.

Credit: www.drumeo.com
Soundproofing
Soundproofing your drum set recording space is crucial. It helps you achieve clean, professional-quality recordings. Without proper soundproofing, unwanted noise and echoes can ruin your tracks. This section will guide you through effective soundproofing techniques.
Isolating The Room
Isolating the room is the first step in soundproofing. Use thick, heavy doors to block sound from escaping. Seal any gaps in windows and doors with weather stripping. This reduces the amount of sound that leaks out. You can also use door sweeps to block the gap under doors. These steps help keep your sound contained.
Using Acoustic Panels
Using acoustic panels can significantly improve your room’s sound quality. Place panels on the walls to absorb sound reflections. This minimizes echoes and reverberation. Acoustic panels are available in various sizes and materials. Choose ones that fit your room’s aesthetic and acoustic needs. Installing panels on the ceiling can also help. Consider using bass traps in corners to manage low-frequency sounds. This creates a balanced, professional sound.
Mixing The Tracks
Mixing the tracks is a crucial step in recording a drum set. This process involves blending all the recorded elements to create a cohesive sound. The goal is to make each drum element audible and balanced. Proper mixing ensures the drum set fits well within the entire song.
Balancing Levels
Start by adjusting the volume levels of each drum track. Ensure that the kick, snare, hi-hats, toms, and cymbals are balanced. The kick drum should be prominent but not overpowering. The snare should be sharp and clear. Hi-hats and cymbals add brightness, so they should be noticeable but not too loud.
- Kick Drum: Set to a strong, consistent level.
- Snare Drum: Ensure it has a crisp presence.
- Hi-Hats and Cymbals: Keep them bright but not overwhelming.
- Toms: Pan them slightly to give space.
Adding Effects
Effects enhance the drum sound and add depth. Consider using reverb to give a sense of space. A slight amount of reverb on the snare can make it sound fuller. The kick drum might benefit from a subtle compression to ensure it remains punchy.
| Effect | Purpose |
|---|---|
| Reverb | Adds space and depth. |
| Compression | Controls dynamics. |
| EQ | Shapes the tonal balance. |
Use EQ to shape the frequencies of each drum track. Boost the low end of the kick drum. Enhance the midrange of the snare. Tweak the high frequencies of the cymbals. These adjustments help each element find its place in the mix.
Final Touches
After recording your drum set, the final touches are crucial. These steps will polish your recording. They ensure it sounds professional and clean. Two important steps are editing the recording and mastering the track.
Editing The Recording
Begin editing by listening to the entire recording. Identify any mistakes or unwanted noises. Remove these parts carefully. Ensure transitions are smooth. Adjust the timing if needed. This makes the drum beat consistent.
Next, balance the volume levels. Each drum piece should be audible. Use a digital audio workstation (DAW) for precise control. Add effects like reverb or compression. This enhances the overall sound. Remember, less is more. Don’t overdo the effects.
Mastering The Track
Mastering is the final step. It prepares your track for distribution. Start by equalizing the track. This balances the frequencies. Ensure no frequency is overpowering. Adjust the overall volume. The track should be loud but not distorted.
Use a limiter to prevent clipping. This ensures the track stays within a safe volume range. Add a final layer of compression. This evens out the dynamic range. Finally, listen to the track on different devices. Ensure it sounds good everywhere. This step is essential for a polished, professional sound.

Credit: adamsaudio.wordpress.com
Frequently Asked Questions
What Equipment Do I Need To Record Drums?
To record drums, you need microphones, an audio interface, a computer, and recording software. Proper mic placement and quality cables are also essential.
How Many Microphones Are Needed For Drum Recording?
Typically, you need at least four microphones: kick, snare, and two overheads. More mics can capture a fuller sound.
What Is The Best Room For Drum Recording?
A well-treated room with minimal reflections is best. Use soundproofing materials to control acoustics and avoid unwanted noise.
How Do I Set Mic Levels For Drums?
Set mic levels by hitting each drum and adjusting the gain. Ensure levels peak below 0 dB to avoid distortion.
Conclusion
Recording a drum set can be a rewarding experience. Follow these steps and practice often. Pay attention to mic placement and room acoustics. Experiment with different techniques. Trust your ears and make adjustments. Enjoy the process and have fun. Soon, you will capture great drum sounds.

Keep learning and improving. Happy recording!
As an Amazon Associate, Cleanestor earns from qualifying purchases at no additional cost to you.