Drawing a flute can be both fun and educational. It’s a simple process anyone can learn.
Flutes are beautiful musical instruments known for their soothing sound. Learning to draw a flute not only enhances your artistic skills but also deepens your appreciation for music. This guide will show you easy steps to create a realistic flute drawing.
Whether you’re an art enthusiast or a beginner, this tutorial will help you capture the essence of a flute on paper. With a few basic tools and some patience, you will have a beautiful flute drawing to display. Let’s get started and bring your flute drawing to life!

Credit: www.youtube.com
Materials Needed
When learning to draw a flute, having the right materials is crucial. This section will guide you through the essential tools and resources you need. Let’s start with the drawing tools and reference images.
Drawing Tools
To begin your flute drawing, gather these drawing tools:
- Pencils: Use different grades (HB, 2B, 4B) for various lines and shading.
- Erasers: A kneaded eraser is perfect for lightening lines without smudging.
- Paper: Choose smooth, high-quality drawing paper.
- Ruler: Ensures precise, straight lines for the flute’s body.
- Sharpener: Keep your pencils sharp for fine details.
These tools help you create clean, accurate drawings. Let’s move to the next important resource: reference images.
Reference Images
Reference images are vital for an accurate flute drawing. They help you understand the instrument’s details and proportions. Here are a few tips on finding good reference images:
- Search Online: Use search engines to find high-quality photos of flutes.
- Music Stores: Visit local music stores and take photos of real flutes.
- Books: Check out books on musical instruments for detailed drawings.
Having multiple reference images ensures you capture the flute’s intricate details. Remember, the more references you have, the better your drawing will be.
Credit: www.drawingforall.net
Basic Shapes
Drawing a flute can seem challenging. It becomes easier when broken down into basic shapes. This approach helps create a strong foundation. You can build detail on top of this foundation. Follow these steps to draw the flute’s body and headjoint.
Outline The Body
Start by drawing a long, narrow rectangle. This shape will form the body of the flute. Ensure the rectangle is straight. The body of a flute is sleek and even.
Next, add small circles along the rectangle. These circles represent the keys of the flute. Place them in a straight line. Keep them evenly spaced for accuracy.
Draw The Headjoint
To draw the headjoint, create a small, curved shape. This shape looks like a sideways ‘D’. Attach this to one end of the rectangle.
Then, add a small oval near the curved end. This oval represents the embouchure hole. It is where the player blows air into the flute.
Review your shapes. Ensure they are proportionate and aligned. Your basic outline of a flute is now complete.
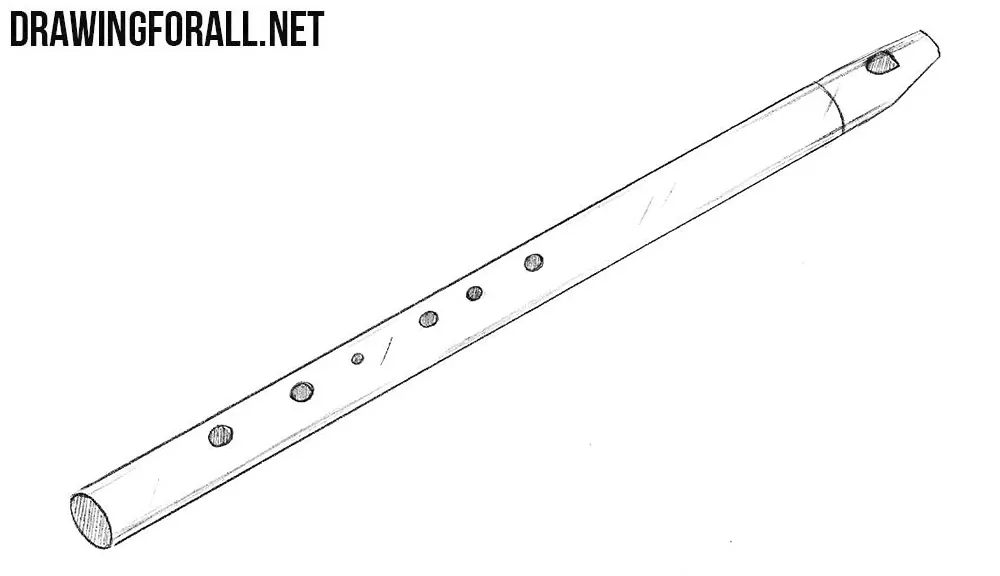
Adding Details
Adding details to your flute drawing brings it to life. Attention to small elements makes your drawing more realistic. Focus on the key mechanisms and embouchure hole.
Key Mechanisms
The key mechanisms are vital parts of the flute. They help in producing different notes. Start by drawing small circles along the flute’s body. These circles represent the keys. Connect the circles with short lines. These lines represent the rods that hold the keys in place. Ensure the keys are evenly spaced. This spacing mimics a real flute’s design.
Next, add the pads under each key. Pads are tiny circles inside the keys. They seal the flute’s holes when pressed. Draw small circles inside the larger circles. This detail adds depth to your drawing. Finally, add the springs. Springs help the keys move. Draw tiny curved lines near each key. These lines show the springs’ positions. Your flute now looks more complete.
Embouchure Hole
The embouchure hole is where you blow into the flute. It’s a crucial detail. Draw a small oval near the head joint. This oval represents the embouchure hole. Ensure it is centered and proportional. Add shading to give it depth. This shading makes it look realistic. Lightly shade the top and bottom of the oval. This creates a 3D effect.
Next, draw the lip plate around the embouchure hole. The lip plate is a small raised area. Outline a slightly larger oval around the embouchure hole. Add gentle shading around the edges. This shading highlights the lip plate’s raised surface. Your flute drawing now has intricate details. These details make your drawing stand out.
Refining The Shape
After sketching the basic outline of your flute, refining its shape is crucial. This step ensures your drawing looks polished and realistic. Focus on smoothing the edges and adding curves to give the flute its final form.
Smooth The Edges
To smooth the edges of your flute drawing, use light, steady strokes. Erase any rough or jagged lines. Replace them with smooth, continuous lines. Pay attention to the body of the flute. Ensure it looks sleek and even.
Check the mouthpiece and end of the flute. These areas should have clean, rounded edges. Use an eraser to fix any uneven parts. This will make your flute look more realistic and professional.
Add Curves
Next, focus on adding curves to your flute. Flutes are not straight; they have gentle curves. Start by adding a slight curve to the body. This makes it look more natural.
Work on the mouthpiece. It should have a rounded shape. Ensure the flute’s holes are also slightly curved. This detail adds depth to your drawing.
Finally, review your work. Make any final adjustments to the curves. Your flute should now have a refined, realistic shape. Congratulations! You’ve completed an important step in drawing a flute.
Enhancing With Shading
Enhancing your flute drawing with shading can add depth and realism. Shading makes your artwork look more three-dimensional and lifelike. This section will guide you through the process of shading your flute drawing. It will focus on the light source and shadow placement.
Light Source
The first step in shading is deciding where the light is coming from. This will affect how the shadows and highlights appear on your flute. Imagine a lamp shining on your flute. The part closest to the light will be the brightest.
To illustrate this, draw a small circle or arrow on your paper showing the direction of the light. This will help you remember where to place the highlights and shadows as you shade.
- Decide the direction of the light.
- Draw a small arrow indicating the light source.
- Highlight the areas closest to the light.
Shadow Placement
Once you have the light source, it’s time to place the shadows. Shadows are the darkest areas of your drawing. They are usually opposite to the light source. If the light is from the top left, the shadows will be on the bottom right.
Use a soft pencil to lightly shade the shadow areas. Blend the shading to make it smooth. You can use a blending tool or your finger. The aim is to create a gradual transition from light to dark.
- Identify areas opposite the light source.
- Use a soft pencil to shade these areas.
- Blend the shading for a smooth transition.
| Light Source | Shadow Placement |
|---|---|
| Top Left | Bottom Right |
| Top Right | Bottom Left |
| Front | Back |
Remember, practice makes perfect. Experiment with different light sources and shadow placements. This will improve your shading skills and make your flute drawings look more realistic.
Texturing Techniques
Texturing techniques can bring your flute drawing to life. They add depth and realism. Whether you’re aiming for a wooden flute or a shiny metallic one, textures make a difference. This section will explore two key texturing techniques: Wood Grain and Metallic Finish.
Wood Grain
To create a wood grain texture, start with a light pencil outline. Draw long, uneven lines along the body of the flute. These lines should mimic the natural patterns found in wood. Vary the pressure on your pencil to create light and dark areas. This adds a sense of depth.
Next, use a blending stump to soften some of the lines. This will give the wood a more realistic look. Remember, wood is not uniform. Add some tiny knots and imperfections. These details make the texture convincing. Lastly, consider shading. Lightly shade around the edges to give the flute a rounded appearance.
Metallic Finish
For a metallic finish, start with a smooth, even base. Use a ruler to draw straight lines. This will help keep the flute’s surface sleek. Shading is crucial here. Use a pencil to create gradients. The light should reflect off the flute’s surface. Focus on where the light source hits the flute.
To enhance the metallic look, add highlights. Use an eraser to create small, bright spots. These mimic light reflections. Also, add some fine lines to indicate the flute’s joints and buttons. These details make it look like real metal. Finally, smooth out any rough areas with a blending stump. This gives the flute a polished finish.
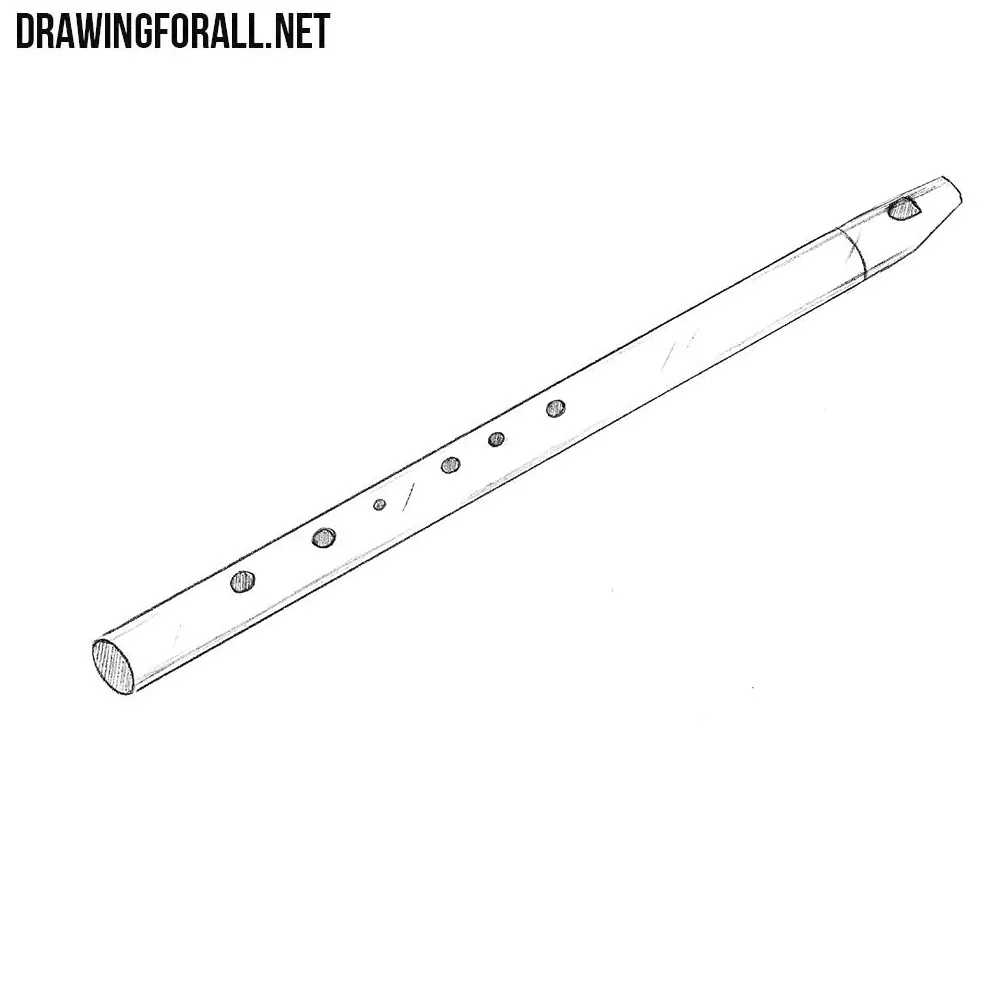
Final Touches
Adding the final touches is crucial to making your flute drawing look realistic. Use light shading to highlight details. Pay attention to the keys and the mouthpiece for an accurate finish.
Drawing a flute can be both fun and rewarding. After sketching the basic shape and details, you reach the final touches. This stage brings your flute drawing to life. It adds depth and realism to your artwork.
Highlighting
Highlighting is key to make your flute shine. Use a white pencil or eraser to add highlights. Focus on the edges and curves of the flute. These areas catch the light more. Highlights create a three-dimensional effect. They make your flute look realistic. Be gentle and subtle with highlights. Too much can look unnatural.
Final Review
Now, it’s time for the final review. Check your drawing for any missed details. Look at the keys and holes. Ensure they are accurate. Examine the proportions. Make sure everything is balanced. Take a step back and view your drawing from a distance. This helps spot any mistakes. Make small adjustments if needed. Your flute drawing is now complete!
Credit: www.drawingforall.net
Common Mistakes
Drawing a flute can seem simple, but there are common mistakes many artists make. Understanding these mistakes can help improve your drawing skills. This section will highlight some of the most frequent errors.
Proportion Issues
A common mistake is getting the proportions wrong. The flute is a long, thin instrument. Ensure the body of the flute is not too short or too wide.
Measure the length and width carefully. Use a ruler or a straight edge to keep lines straight. This helps to maintain the correct proportions.
Also, pay attention to the placement of the keys. They should be evenly spaced along the length of the flute. Uneven key placement can make the flute look unrealistic.
Overcomplicating Details
Another mistake is overcomplicating the details. The flute has many small parts, but it is easy to overdo them.
Focus on the main shapes and forms first. Draw the body and keys in basic shapes before adding details. This keeps the drawing clear and simple.
Avoid adding unnecessary lines or decorations. Extra details can make the drawing look cluttered and confusing.
Keep the drawing clean and focused on the essential parts of the flute. This makes the final image more accurate and pleasing to the eye.
Frequently Asked Questions
What Materials Do I Need To Draw A Flute?
To draw a flute, you need paper, pencils, erasers, and a ruler. Optional items include colored pencils or markers.
How Can I Sketch A Flute’s Basic Shape?
Start by drawing a long, straight line as the flute’s body. Then, add the mouthpiece and keyholes.
What Are The Steps To Draw Flute Details?
First, outline the flute’s body. Next, add keyholes and other small details. Finally, erase guidelines.
Can Beginners Draw A Realistic Flute?
Yes, beginners can draw a realistic flute by following step-by-step tutorials. Practice makes perfect.
Conclusion
Drawing a flute can be a fun and rewarding experience. Start with basic shapes. Then, add details to make it look realistic. Practice makes perfect. Keep trying and you’ll improve. Share your drawings with friends and get feedback. Enjoy the process and don’t stress.

Happy drawing!
As an Amazon Associate, Cleanestor earns from qualifying purchases at no additional cost to you.