To reinstall Garageband on your Mac, follow these steps. First, delete the current app.
Then, download it again from the App Store. Garageband is a popular music creation software for Mac users. Sometimes, issues arise that require a fresh installation. This guide will walk you through the process. It’s easy and ensures your software runs smoothly.
Whether you’re facing bugs or just want a clean slate, reinstalling can help. Let’s explore the steps to get Garageband back on your Mac.
Preparing For Reinstallation
Reinstalling GarageBand on your Mac can seem like a daunting task. But with a bit of preparation, it can be straightforward. Before you start, there are a few important steps to take. These steps will ensure a smooth reinstallation process.
Backing Up Projects
Your GarageBand projects are precious. You don’t want to lose your hard work. First, locate your projects. They are usually in the “Music” folder under “GarageBand.” Copy these files to an external drive or a cloud service. This way, your projects are safe. You can access them after reinstalling GarageBand.
Checking System Requirements
Make sure your Mac can run the latest version of GarageBand. Check your macOS version. Go to the Apple menu and select “About This Mac.” Compare your macOS version to the GarageBand requirements. If needed, update your macOS. This ensures compatibility with the new GarageBand.
Uninstalling Garageband
Uninstalling Garageband from your Mac might seem like a daunting task. But with clear steps, you can do it easily. Here, we’ll guide you through the process of removing Garageband and its associated files.
Removing The Application
First, you need to remove the Garageband application itself. Open the Finder and navigate to the Applications folder. Locate Garageband in the list of applications. Click and drag the Garageband icon to the Trash in your Dock. You can also right-click on the icon and select ‘Move to Trash’. This action removes the main application, but some files may still be on your Mac.
Deleting Associated Files
To completely uninstall Garageband, you must delete its associated files. These files are stored in different locations on your Mac. Open Finder and click on ‘Go’ in the top menu bar. Select ‘Go to Folder’ from the dropdown menu. Type ~/Library and press Enter. In the Library folder, look for the following folders and delete any Garageband files within them:
- Application Support
- Preferences
- Caches
Check each folder for files related to Garageband. Drag these files to the Trash. Empty the Trash to free up space on your Mac. By following these steps, you ensure that all Garageband files are removed.
Downloading Garageband
Downloading Garageband on your Mac is a straightforward process. This guide will help you navigate through the steps seamlessly. Follow these instructions to reinstall Garageband efficiently.
Accessing The App Store
To begin, open the App Store on your Mac. You can find the App Store in your Dock or by using Spotlight search. Simply click on the magnifying glass icon in the top-right corner of your screen and type “App Store”. Press Enter to open it.
Finding Garageband
Once the App Store is open, use the search bar at the top of the window. Type “Garageband” and press Enter. This will display a list of results related to your search.
Look for the official Garageband app in the search results. It will have an icon featuring a guitar. Click on the app to view more details.
Click the “Get” button to start the download. If prompted, enter your Apple ID and password. The download will begin, and Garageband will be installed on your Mac.
After the installation is complete, you can find Garageband in your Applications folder. Open it and start creating your music.
Credit: discussions.apple.com
Reinstalling Garageband
Garageband is a fantastic music creation software. Over time, it may need reinstallation to fix errors or update features. Reinstalling Garageband on your Mac can sound tricky, but it is simple. Follow this guide to get Garageband back on your device.
Initiating The Installation
First, open the App Store on your Mac. Use the search bar to find “Garageband”. Click the “Garageband” app in the search results. Then, click the “Get” button to start the download.
Following Installation Prompts
After clicking “Get”, wait for the download to finish. Once done, the installation process begins automatically. Follow the on-screen prompts. Accept the terms and conditions. Then, choose the installation location. Usually, it defaults to your Applications folder.
After the installation, open Garageband. Check if everything works correctly. If needed, restart your Mac to ensure everything is set up properly.
Restoring Backed Up Projects
Restoring your backed up Garageband projects can seem challenging. But with clear instructions, it becomes simple. You need to locate your backup files and import them into Garageband. Follow these steps to ensure your projects are restored and ready to use.
Locating Backup Files
First, find where your backup files are stored. They could be on an external drive or a cloud storage service. Common places include iCloud, Google Drive, or an external hard disk. Check these locations and ensure you have access to them. If your files are in iCloud, open the iCloud Drive folder on your Mac. You can do this through Finder. Look for a folder named “Garageband” or your project’s name.
Importing Projects Into Garageband
Now, import your projects into Garageband. Open Garageband on your Mac. Select “File” from the top menu and click on “Open”. Navigate to the location of your backup files. Select the file you need to restore and click “Open”. Your project should now load in Garageband.
Save your project once it loads. This ensures you do not lose any changes. Use the “Save As” option to create a new version if needed. This way, your original backup remains untouched.

Credit: www.reddit.com
Troubleshooting Installation Issues
Reinstalling GarageBand on your Mac can sometimes be tricky. You may face several issues during the installation process. This section will help you troubleshoot common errors and get the necessary support.
Common Errors And Fixes
One common error is insufficient storage space. Ensure your Mac has enough free space. You need at least 2GB of disk space for GarageBand.
Another issue could be a slow internet connection. A stable and fast connection is necessary. Restart your router and try again.
If you see a “damaged file” error, delete the downloaded file. Then, download a fresh copy from the App Store.
Sometimes, your macOS version may be outdated. GarageBand requires the latest macOS update. Update your system and retry the installation.
Getting Help From Apple Support
If the problem persists, you can contact Apple Support. They offer various ways to get help. You can visit their website and start a chat with a representative.
Another option is to call Apple Support directly. They can guide you through the installation process. You may also visit an Apple Store for in-person assistance.
Always have your Mac’s details ready. This information helps the support team assist you better.
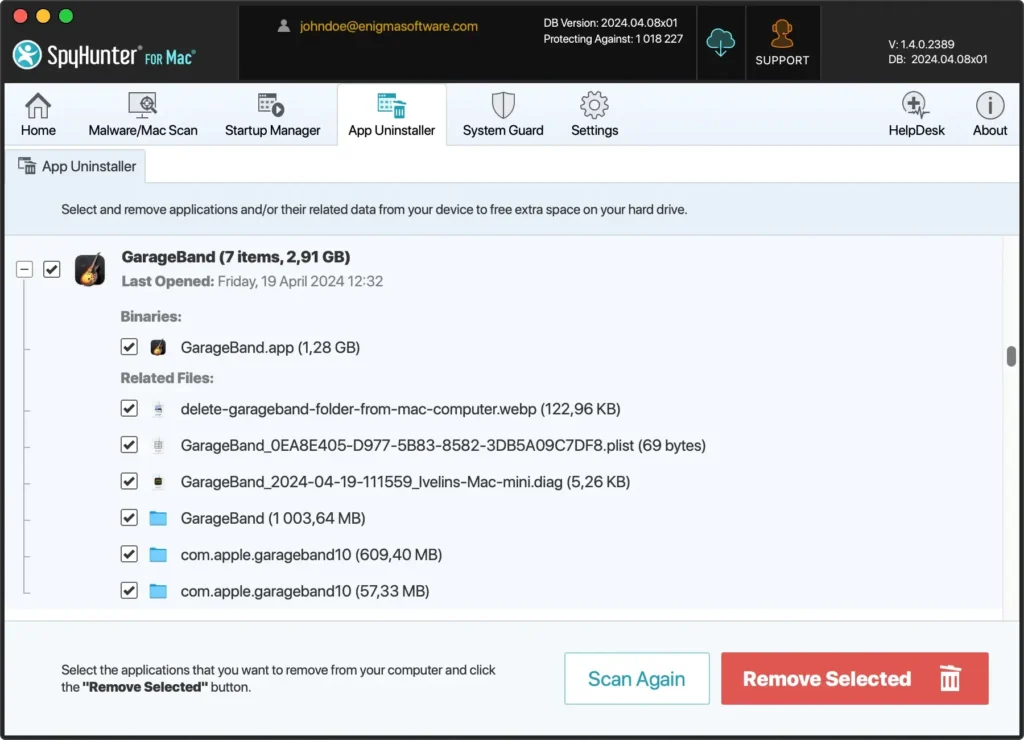
Credit: www.spyhunter.com
Frequently Asked Questions
How Do I Reinstall Garageband On My Mac?
To reinstall Garageband, open the App Store, search for Garageband, and click the download button. Ensure you are logged into your Apple ID.
Why Can’t I Find Garageband In The App Store?
If Garageband is missing, it may be due to regional restrictions or compatibility issues. Ensure your macOS is up-to-date.
Will Reinstalling Garageband Delete My Projects?
Reinstalling Garageband won’t delete your projects. However, it’s always a good idea to back up your files before reinstalling.
How Do I Uninstall Garageband On My Mac?
To uninstall Garageband, drag the app from the Applications folder to the Trash. Empty the Trash to complete the removal.
Conclusion
Reinstalling Garageband on your Mac is simple. Follow the steps mentioned. First, uninstall the current version. Then, download Garageband from the Mac App Store. Finally, install it and enjoy making music again. These steps ensure a smooth process. Now, you can create and edit your tracks without issues.

If problems arise, refer back to this guide. Happy music-making!
As an Amazon Associate, Cleanestor earns from qualifying purchases at no additional cost to you.