Is your audio interface too quiet? You’re not alone.
Many people face this issue. Understanding why your audio interface is quiet can be frustrating. But don’t worry, we have answers for you. An audio interface can be quiet for several reasons. It might be a simple setting or a technical problem.
Knowing the cause can help you fix it. In this blog post, we will explore common reasons for a quiet audio interface. We’ll also provide tips to help you troubleshoot and solve the issue. Whether you’re new to audio gear or an experienced user, this guide will help you get your audio levels back to normal. Stay with us to learn more.
Common Causes Of Low Audio Levels
Experiencing low audio levels with your audio interface can be frustrating. Many factors can contribute to this issue. Understanding these common causes can help you identify and fix the problem. This section will explore two frequent culprits: incorrect settings and faulty cables.
Incorrect Settings
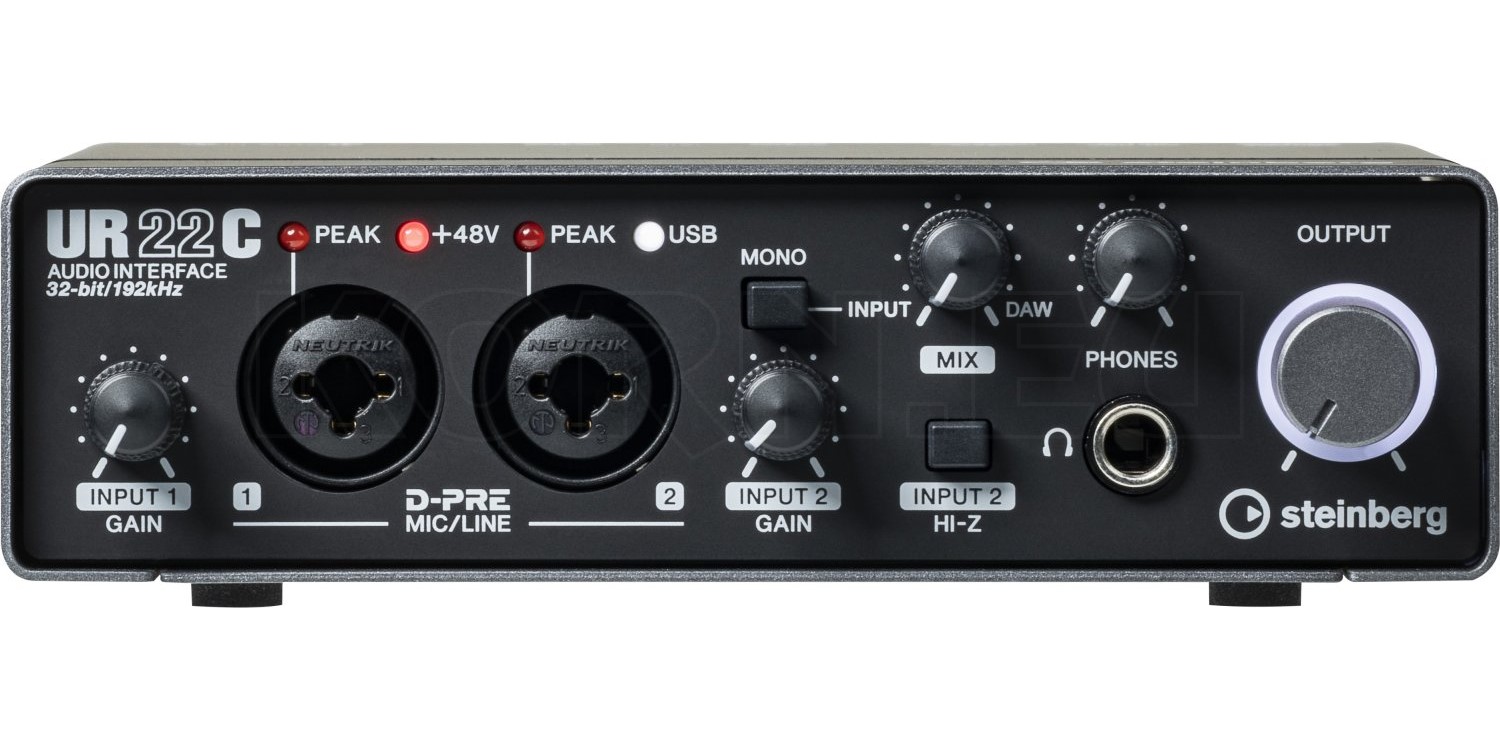
One of the most common causes of low audio levels is incorrect settings. Check your audio interface settings first. Ensure the gain knob is set correctly. If the gain is too low, your audio will be quiet. Also, verify the input and output levels in your audio software. These settings can significantly affect your audio levels. Incorrect settings in the software can make your audio interface seem quieter than it is.
Faulty Cables
Faulty cables can also lead to low audio levels. Damaged or worn-out cables can disrupt the signal flow. This results in a weak audio signal. Inspect your cables for any visible damage. Replace any cables that look worn or broken. Sometimes, the issue may be as simple as a loose connection. Ensure all cables are securely plugged in. This simple check can often resolve low audio level problems.
Adjusting Input Gain
Experiencing low output from your audio interface can be frustrating. One common solution is adjusting the input gain. Let’s dive into the details to ensure your audio levels are just right.
Setting Optimal Levels
To achieve the best sound quality, you must set the input gain to the optimal level. Here are some steps to guide you:
- Turn the gain knob down before connecting your instrument or microphone.
- Gradually increase the gain while playing or speaking at your usual volume.
- Watch the level meter on your audio interface. Aim for a signal peak around -12 dB to -6 dB.
Pro tip: Keep the levels consistent. Sudden changes can cause unwanted noise or distortion.
Avoiding Clipping
Clipping occurs when the input signal is too strong. This results in distortion, making your audio sound unpleasant. Here’s how to avoid it:
- Monitor the level meter. Ensure it stays in the green zone.
- If the meter hits red, lower the gain immediately.
- Use a compressor to manage dynamic range and prevent sudden spikes.
Here’s a quick reference table to help you understand the ideal levels:
| Signal Level | Meter Reading |
|---|---|
| Optimal Level | -12 dB to -6 dB |
| Clipping Zone | 0 dB or higher |
Maintain these levels to ensure clear, distortion-free audio.
Monitoring Output Volume
Struggling with low audio levels from your audio interface? Don’t worry. One common issue is the monitoring output volume. Understanding and adjusting this can often solve the problem. Let’s delve into two key areas: headphone level and monitor speaker volume.
Headphone Level
Check your headphone level first. Many audio interfaces have a dedicated headphone volume knob. Make sure it’s turned up. Also, check your headphones’ compatibility. Some headphones require more power. Your interface might not provide enough. This could result in low volume. Try using headphones with lower impedance. These usually work better with most interfaces.
Monitor Speaker Volume
Next, look at your monitor speaker volume. Like headphones, monitors have their own volume controls. Ensure these are set correctly. Check the connection between your interface and speakers. Loose or poor connections can cause low sound levels. Also, check your interface’s output settings. Sometimes these are set too low. Adjusting these can make a big difference. Lastly, room acoustics play a role. Poor acoustics can make your monitors sound quieter than they are. Consider soundproofing your space for better results.
Audio Interface Software Settings
Struggling with low volume levels on your audio interface? You might need to tweak some software settings. These settings can greatly impact your audio output. Understanding and adjusting them can solve many volume issues.
Driver Configuration
Your audio interface’s driver configuration plays a critical role. The driver is the software that allows your computer to communicate with the audio interface. Incorrect settings can lead to low volume levels.
Ensure that you have the latest driver version installed. Visit the manufacturer’s website to download it. Also, check the sample rate and buffer size. These settings should match your project’s requirements.
| Setting | Recommendation |
|---|---|
| Sample Rate | 44.1 kHz or 48 kHz |
| Buffer Size | 256 or 512 samples |
Software Mixer
Most audio interfaces come with a software mixer. This mixer allows you to control the input and output levels. If the levels are set too low, the output will be quiet.
Open the software mixer and check the input gain and output levels. Make sure they are set to appropriate levels. Adjust the faders and knobs until you get the desired volume.
- Check the input gain
- Adjust the output levels
- Ensure no channels are muted
Using the software mixer effectively can significantly enhance your audio experience.
Proper Microphone Placement
Proper microphone placement can significantly impact the quality of your audio. The right positioning ensures that your audio interface captures sound clearly and at the right volume. Let’s explore two critical aspects of microphone placement.
Distance From Source
The distance between the microphone and the sound source is crucial. If the mic is too far, the sound will be quiet and may pick up background noise. Placing the mic too close can cause distortion and sound imbalances. Aim for a distance of 6 to 12 inches from the source. This range helps capture clear and balanced audio.
Angle And Position
The angle of the microphone also affects the audio quality. Point the mic directly at the sound source for the best results. This reduces unwanted noise and ensures the sound is captured accurately. Experiment with slight adjustments in angle to find the best position. Sometimes, a small tilt can make a big difference.
Preamp Usage And Settings
Your audio interface might be quiet due to preamp settings. Preamps boost weak audio signals. Understanding preamp usage helps in achieving the desired audio levels. Let’s explore built-in and external preamps.
Built-in Preamps
Most audio interfaces have built-in preamps. These preamps amplify the signal from your microphone. Check your interface’s gain knob. It controls the preamp’s level. Start with the gain at a low level. Then gradually increase it while monitoring the audio level. Avoid setting the gain too high. It can cause distortion and unwanted noise.
Refer to your audio interface manual. It often provides specific instructions on setting the gain. Ensure that the phantom power is enabled for condenser microphones. This setting is essential for proper microphone functionality. Built-in preamps usually suffice for simple setups. For advanced needs, external preamps can enhance the audio quality.
External Preamps
External preamps offer more control and better quality. They connect to your audio interface, boosting the signal before it reaches the interface. External preamps come with various features, including high-pass filters, pad switches, and phase invert. These features help in refining the audio signal.
When using an external preamp, set your audio interface’s gain to a minimum. Let the external preamp handle the amplification. This setup minimizes the noise and improves the signal quality. Ensure proper connection between the preamp and the interface. Use high-quality cables to maintain signal integrity.
| Feature | Built-in Preamps | External Preamps |
|---|---|---|
| Control | Basic | Advanced |
| Quality | Sufficient for simple setups | Enhanced for professional use |
| Noise Reduction | Moderate | High |
| Features | Limited | Multiple options |
In summary, both built-in and external preamps play crucial roles. Choosing the right one depends on your specific needs. Proper usage and settings ensure optimal audio levels. This helps in achieving clear and high-quality sound.
Troubleshooting Hardware Issues
If your audio interface is too quiet, it can be frustrating. Before you assume it’s broken, let’s explore some common hardware issues that might be causing the problem. Proper troubleshooting can help you find and fix the issue quickly.
Checking Connections
First, check all cable connections. Ensure your audio interface is securely connected to your computer. Loose or damaged cables can cause a weak or intermittent signal.
- Check the USB or FireWire cable. Ensure it’s properly connected.
- Inspect the power cable. A faulty power connection can affect performance.
- Look at your input and output cables. Ensure they’re in the correct ports.
Sometimes, simply reconnecting the cables can solve the issue. If the cables appear fine, move on to the next step.
Testing With Different Devices
Next, test your audio interface with different devices. This helps identify if the issue is with the interface or your computer.
- Connect the audio interface to another computer.
- Test it with a different set of headphones or speakers.
- Use another USB or FireWire port.
If the audio interface works fine with other devices, the issue is likely with your computer. If it remains quiet, your audio interface might be the problem.
| Device | Test Result |
|---|---|
| Another Computer | Works/Doesn’t Work |
| Different Headphones | Works/Doesn’t Work |
| Another USB Port | Works/Doesn’t Work |
By following these steps, you can narrow down the source of the problem. This will help you determine if your audio interface needs repair or replacement.
Credit: vi-control.net
Optimizing Your Recording Environment
Experiencing low volume from your audio interface can be frustrating. One key factor often overlooked is the recording environment. Optimizing your recording environment can significantly improve audio quality and volume levels. Let’s explore some essential steps to enhance your recording space.
Acoustic Treatment
Acoustic treatment helps control sound reflections in your room. This process involves adding materials to absorb and diffuse sound waves.
- Absorption panels: Place these panels on walls to reduce echo.
- Bass traps: Install these in corners to manage low-frequency sounds.
- Diffusers: Use these to scatter sound waves, creating a balanced sound field.
Proper acoustic treatment ensures that your recordings are clear and free from unwanted reverb.
Minimizing Background Noise
Background noise can interfere with your recordings. Minimizing these noises helps achieve a cleaner sound.
- Identify noise sources: Find out what causes the noise in your room.
- Seal windows and doors: Use weatherstrips to reduce external noise.
- Turn off noisy equipment: Switch off devices like fans and air conditioners during recording.
Reducing background noise allows your audio interface to capture only the intended sounds.
| Step | Description |
|---|---|
| 1 | Identify noise sources |
| 2 | Seal windows and doors |
| 3 | Turn off noisy equipment |
Following these steps creates a quiet, professional recording environment, improving your audio interface’s performance.

Credit: www.homebrewaudio.com
Frequently Asked Questions
Why Is My Audio Interface Volume So Low?
Low volume can be due to improper gain settings or faulty cables. Check your input and output levels. Ensure your device drivers are up to date.
How Do I Fix Quiet Audio Interface?
Adjust the gain levels and check connections. Use high-quality cables. Update drivers and firmware. Ensure proper power supply.
Why Is My Audio Interface Output Quiet?
Check the output settings on your audio interface. Ensure cables are properly connected and not damaged. Adjust your software settings.
Can Low Power Affect Audio Interface Volume?
Yes, inadequate power can cause low volume. Ensure your audio interface receives sufficient power from your computer or external source.
Conclusion
Fixing a quiet audio interface requires understanding the basics. Check all connections first. Ensure cables are secure and not damaged. Adjust the gain settings properly. Test different microphones and instruments. Update drivers and software. If problems persist, consider consulting a professional.

Regular maintenance helps prevent issues. With these tips, you can enjoy clear, strong audio. Happy recording!
As an Amazon Associate, Cleanestor earns from qualifying purchases at no additional cost to you.