Mounting an audio interface under your desk can save space and reduce clutter. It also keeps your workspace neat and organized.
An audio interface is essential for quality sound production. But, it can be bulky and take up valuable desk space. Mounting it under your desk is a smart solution. This setup keeps your interface within reach yet out of the way.
It also protects it from accidental spills and bumps. In this guide, you will learn step-by-step how to mount your audio interface securely. We’ll cover tools needed, mounting options, and some handy tips. By the end, your workspace will be more efficient and cleaner. Let’s get started!
Choosing The Right Audio Interface
Choosing the right audio interface is crucial for your recording setup. It ensures smooth operation and high-quality sound. This section helps you pick the perfect audio interface for mounting under your desk.
Compatibility With Devices
First, check if the audio interface is compatible with your devices. This includes your computer, software, and any other recording equipment. Compatibility ensures seamless integration and fewer technical issues. Always read the product specifications carefully.
Features To Consider
Next, think about the features you need. Some audio interfaces offer multiple input and output options. Others come with built-in preamps, which enhance sound quality. Look for interfaces with low latency for real-time monitoring. Portability might also be a key factor, depending on your setup.
Consider the build quality of the audio interface. A sturdy design ensures longevity and reliability. An audio interface with easy-to-use controls can make your recording process smoother. Finally, check for customer reviews to gauge user satisfaction.
Preparing Your Workspace
Before you can mount your audio interface under your desk, it’s important to have a well-prepared workspace. This ensures a smooth installation process and avoids any potential mishaps. Let’s break down the steps into manageable chunks.
Clearing The Area
Start by clearing the area under your desk. Remove any items that might obstruct your work. This includes wires, boxes, or any other clutter.
Make sure you have enough space to move around comfortably. A clean and organized workspace will make the installation process much easier.
Gathering Necessary Tools
Having the right tools on hand is crucial. Here’s a list of tools you might need:
- Screwdriver (Phillips and flathead)
- Drill (if necessary)
- Measuring tape
- Level
- Mounting brackets (specific to your audio interface)
- Screws (that come with the mounting brackets)
- Cable ties (to manage cables)
Place these tools within easy reach. This helps you avoid interruptions during the installation.
Below is a simple table outlining the tools and their purposes:
| Tool | Purpose |
|---|---|
| Screwdriver | For securing screws |
| Drill | For drilling holes if needed |
| Measuring tape | To measure distances accurately |
| Level | To ensure the interface is straight |
| Mounting brackets | To hold the audio interface in place |
| Screws | To attach brackets |
| Cable ties | To organize cables neatly |
Now that your workspace is prepared, you’re ready to proceed with mounting your audio interface.
Selecting Mounting Hardware
Mounting an audio interface under your desk can save space and keep your setup tidy. To do this effectively, you need the right mounting hardware. Selecting the appropriate hardware ensures your audio interface is secure and easily accessible.
Types Of Brackets
Different brackets serve various purposes. L-shaped brackets are common for under-desk mounting. They offer strong support and are easy to install. You can also use U-shaped brackets for a more snug fit. These brackets wrap around your audio interface, providing extra security.
Screws And Fasteners
The right screws and fasteners are essential. Use screws that match the size of your brackets. For wood desks, wood screws work best. Metal desks require metal screws. Always check the weight rating of the screws. Your audio interface must stay secure.
Fasteners like washers and nuts add stability. Washers distribute the screw’s pressure evenly, preventing damage. Nuts secure the screws in place, reducing the risk of loosening.
Planning The Mounting Position
Mounting your audio interface under your desk can save space and enhance your workspace. But, proper planning is key to ensure it is both practical and efficient. In this section, we will explore how to choose the best mounting position. We will focus on accessibility, convenience, and cable management.
Accessibility And Convenience
Consider how often you use your audio interface. If you adjust settings frequently, mount it within easy reach. Avoid placing it too far back or in a spot where you need to stretch or strain. A comfortable position makes your workflow smoother. It also reduces the risk of accidental damage.
Cable Management
Good cable management is essential for a tidy workspace. Plan where your cables will run before mounting your audio interface. Ensure there is enough slack to connect and disconnect devices easily. Secure cables with clips or ties to prevent tangling. This not only looks neat but also protects your equipment.
Marking Drill Points
Mounting an audio interface under your desk is a great way to keep your workspace tidy. The first step is marking drill points accurately. This ensures your audio interface is secure and properly aligned.
Measuring Accurately
Before you start marking drill points, take careful measurements. Use a tape measure to find the exact distance between the mounting holes on your audio interface. Write these measurements down.
Next, decide where under your desk you want to mount the interface. Measure the same distances under your desk. Mark these points lightly with a pencil. Double-check your measurements to avoid mistakes.
Using A Template
Creating a template can make the job easier. Cut a piece of paper or cardboard to match the size of your audio interface. Mark the mounting holes on the template.
Place the template under your desk where you want to mount the interface. Use a pencil to mark the drill points through the template. This ensures the points are accurately positioned.
Using a template is helpful for maintaining alignment. It reduces the chances of errors.
Credit: www.ebay.com
Drilling Holes
Drilling Holes is a crucial step in mounting your audio interface under the desk. Properly drilled holes ensure a secure and stable installation. This section will guide you through the necessary steps to drill holes safely and effectively.
Safety Precautions
Before starting, consider these safety precautions:
- Wear safety goggles to protect your eyes.
- Use ear protection if drilling for long periods.
- Ensure the workspace is well-lit.
- Keep the area free of clutter and debris.
- Secure the desk to prevent it from moving.
Choosing The Right Drill Bit
Choosing the right drill bit is essential for a clean and precise hole. Follow these tips:
- Use a drill bit suitable for the desk material (wood, metal).
- For wood, a brad point bit works well.
- For metal, use a high-speed steel (HSS) bit.
- Match the drill bit size to the screws you will use.
- Start with a smaller pilot hole to guide the larger bit.
By following these steps, you can drill holes safely and accurately, ensuring your audio interface is securely mounted under your desk. Remember, safety comes first, and the right tools make the job easier.
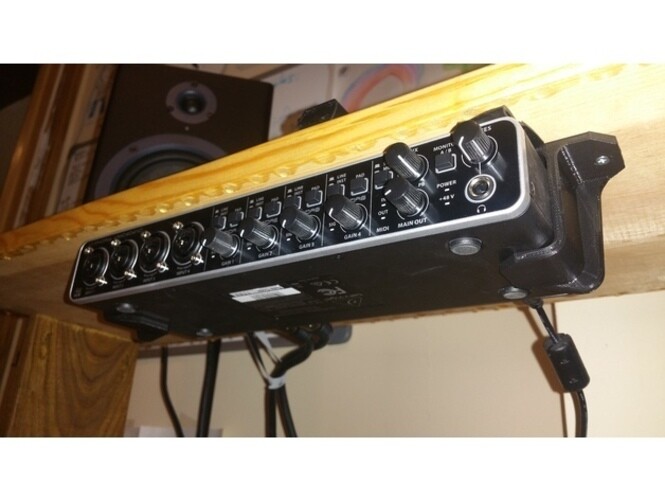
Attaching The Mounting Brackets
Mounting an audio interface under your desk can keep your workspace tidy. The first step is attaching the mounting brackets. This ensures your audio interface stays secure and easily accessible.
Aligning Brackets
Place the brackets in the desired location under your desk. Make sure they are level. Use a ruler or a straight edge. Mark the spots where screws will go.
Securing With Screws
Once the brackets are aligned, it’s time to secure them. Use a drill or screwdriver to insert the screws. Ensure the brackets are tightly attached. Check for any wobbling or movement.
Credit: www.reddit.com
Installing The Audio Interface
Mounting an audio interface under your desk can save space and keep your setup clean. This section will guide you through the process of installing the audio interface. Follow these simple steps to ensure your audio interface is securely mounted and ready to use.
Connecting Cables
Before mounting the audio interface, organize and connect all necessary cables. This step will make it easier to manage the cables later.
- Power Cable: Connect the power cable to the audio interface.
- USB or Thunderbolt Cable: Connect the data cable to your computer.
- Audio Cables: Attach your speakers or headphones to the audio outputs.
Make sure the cables are long enough to reach your devices without stretching.
Testing The Setup
Once all cables are connected, power on the audio interface and your computer. Check if the device is recognized by your computer.
- Open your computer’s sound settings.
- Select the audio interface as the input and output device.
- Play a test sound to ensure audio is coming through the speakers or headphones.
If the audio interface is not recognized, double-check the connections. Ensure the cables are securely plugged in.
If you encounter issues, consult the user manual or support website for troubleshooting tips.
Final Adjustments
After mounting your audio interface under the desk, it’s time to make final adjustments. These steps ensure everything is stable and your workspace looks clean and tidy.
Ensuring Stability
Check all screws and fasteners. Make sure they are tight. This prevents the audio interface from moving. If you used adhesive mounts, press down on them firmly. This ensures a strong bond.
Test the stability by gently pushing the audio interface. It should not wobble. If it does, re-tighten the screws or adjust the adhesive mounts.
Use a level tool. This helps you make sure the audio interface is even. If it is not level, you may need to adjust the mounting brackets or the adhesive strips.
Tidying Up The Workspace
Now, take a look at the cables. Use cable ties or clips to bundle them together. This makes your workspace look neat. It also prevents cables from getting tangled.
Consider using a cable management box. This hides the cables and keeps them off the floor. It reduces the risk of tripping and makes cleaning easier.
Label your cables. This helps you identify each one quickly. You can use colored tape or write on small labels. This is especially helpful if you have many devices connected.
Organize your desk. Remove any unnecessary items. This gives you more space to work and keeps your setup looking professional.
Credit: www.reddit.com
Frequently Asked Questions
How Do I Mount An Audio Interface Under A Desk?
Use brackets or a mounting tray to attach the interface under the desk. Ensure it’s secure and easily accessible.
What Tools Do I Need To Mount An Audio Interface?
You’ll need screws, a drill, brackets or a mounting tray, and possibly a screwdriver. Follow the manufacturer’s instructions.
Can I Mount Any Audio Interface Under A Desk?
Most audio interfaces can be mounted under a desk. Check the specifications and compatibility with mounting hardware.
Does Mounting Affect Audio Interface Performance?
Mounting does not affect performance if done correctly. Ensure proper ventilation and easy access to controls.
Conclusion
Mounting your audio interface under the desk saves space. It keeps your workspace tidy. Follow the steps carefully for a secure setup. Use strong brackets for stability. Ensure all cables are accessible. A neat setup enhances efficiency and workflow. Enjoy a clutter-free, organized workspace.

Your audio interface remains safe and easy to reach. Happy recording!
As an Amazon Associate, Cleanestor earns from qualifying purchases at no additional cost to you.