The compressor in Audacity controls audio volume. It evens out loud and soft sounds.
This tool is essential for clear, professional recordings. Audacity is a popular, free audio editing software. It offers many tools to enhance audio quality. One key tool is the compressor. This tool adjusts audio levels, making quiet sounds louder and loud sounds softer.
The result is a more balanced and pleasant listening experience. Whether you are a podcaster, musician, or voice-over artist, understanding the compressor can greatly improve your audio projects. In this blog post, we will explore how the compressor works in Audacity, why it is important, and how you can use it to achieve the best possible sound for your recordings.
Introduction To Audacity
Audacity is a free, open-source audio editing software. It is popular among podcasters, musicians, and content creators. This powerful tool offers a range of features to edit and produce high-quality audio.
Brief Overview
Audacity provides a user-friendly interface. It supports multiple tracks, making it easy to layer sounds. Users can record live audio, import, and export various file formats, and much more. Beginners and professionals alike find it useful.
Key Features
Here are some key features that make Audacity stand out:
- Multi-Track Editing: Edit multiple tracks simultaneously.
- Noise Reduction: Remove background noise with ease.
- Effects: Apply various effects like reverb, echo, and distortion.
- Analysis: Use tools to analyze frequencies and other audio properties.
- Accessibility: Keyboard shortcuts and screen reader support for better accessibility.
Audacity also supports various plugins. This allows users to enhance its functionality even further.
The compressor is one of the most important tools in Audacity. It helps balance the audio levels. This makes the sound more consistent and professional. Let’s dive into how it works and why you should use it.
A compressor reduces the volume of loud sounds. It also raises the volume of softer sounds. This creates a more balanced audio track. It is especially useful for podcasts, interviews, and music production. Using a compressor can make a big difference in audio quality.
Credit: forum.audacityteam.org
Understanding Audio Compression
Audio compression is a crucial part of editing sound files. It helps in balancing different audio levels. This section will explain what a compressor does in Audacity.
Basics Of Compression
Compression reduces the volume of loud sounds. It also increases the volume of soft sounds. The goal is to achieve a balanced audio output.
In Audacity, the compressor tool is easy to use. It has several parameters that control how the compression is applied.
- Threshold: Sets the level at which the compressor starts to act.
- Ratio: Determines how much compression is applied.
- Attack: Controls how quickly the compressor responds to loud sounds.
- Release: Controls how quickly the compressor stops affecting the sound.
- Make-up Gain: Boosts the overall volume after compression.
Importance In Audio Editing
Compression is important for several reasons. It makes quiet sounds louder, ensuring they are heard. It also prevents loud sounds from distorting.
Without compression, audio tracks can sound unbalanced. Some parts may be too loud while others are too soft.
Here are key benefits of using a compressor in Audacity:
- Improves the clarity of dialogue.
- Balances background music and sound effects.
- Enhances overall listening experience.
Using compression properly can transform your audio projects. It makes them sound more professional and polished.
How Compressor Works
The compressor in Audacity is an essential tool for audio editing. It helps to balance the volume of your recordings, making them sound more professional. Understanding how the compressor works can help you enhance your audio projects significantly.
Functionality Explained
The compressor works by reducing the volume of loud sounds and amplifying quieter sounds. This process is called dynamic range compression. It ensures that the audio levels stay within a specific range. This makes the audio more consistent and easier to listen to.
In Audacity, you can adjust various settings of the compressor. These settings include threshold, ratio, attack time, and release time. Each setting influences how the compressor affects your audio. By tweaking these settings, you can achieve the desired sound quality.
Technical Aspects
The threshold setting determines the level at which the compressor starts to work. Sounds above this level will be compressed. The ratio setting controls the amount of compression applied. A higher ratio means more compression.
Attack time refers to how quickly the compressor starts to work after the audio exceeds the threshold. Short attack times are useful for capturing sudden loud sounds. Release time indicates how long the compressor continues to work after the sound falls below the threshold. Longer release times result in smoother sound transitions.
Understanding these technical aspects helps you use the compressor effectively. Experiment with these settings to find the best balance for your audio tracks.
Accessing Compressor In Audacity
Accessing the Compressor in Audacity can be a simple task if you know where to look. This tool is essential for balancing the volume levels in your audio tracks. Let’s explore how to find and use it effectively.
Navigating The Interface
First, open Audacity and load your audio project. Look at the top of the screen. You will see the main menu bar. This bar has various options such as File, Edit, and View.
Click on the Effects menu. A dropdown list will appear. This list contains many audio effects.
Finding The Tool
Scroll down the Effects menu. Look for the Compressor option. Click on it to open the Compressor dialog box.
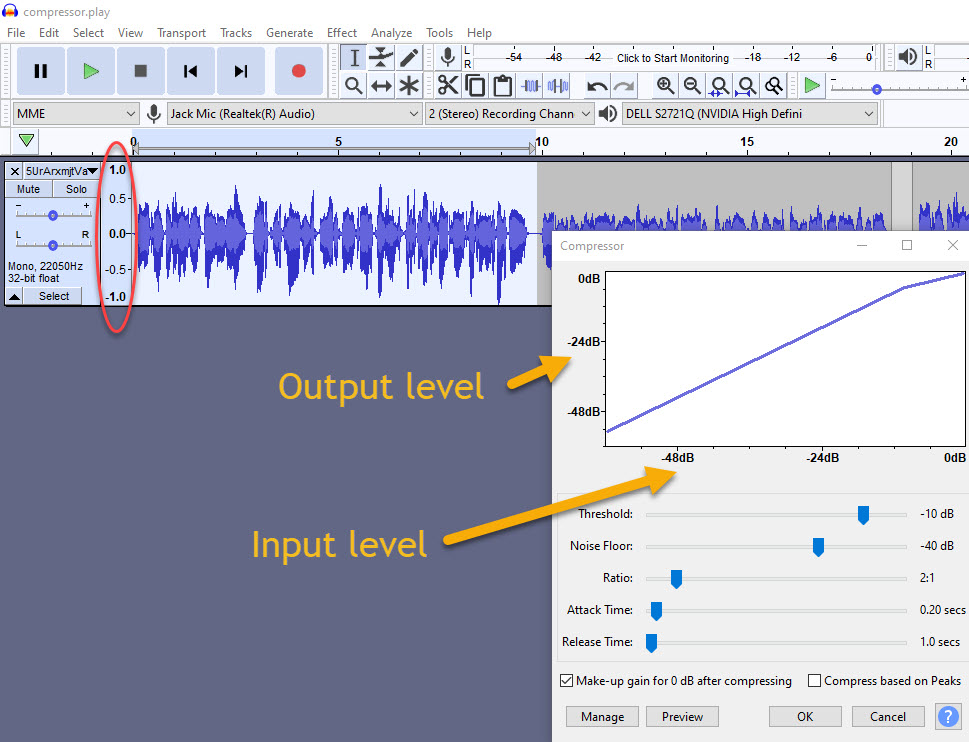
In the Compressor dialog box, you can see different settings. These settings include Threshold, Noise Floor, and Ratio.
| Setting | Description |
|---|---|
| Threshold | The level above which compression occurs. |
| Noise Floor | The level below which everything is considered noise. |
| Ratio | The amount of compression applied. |
Adjust these settings to suit your audio needs. The default settings often work well for most projects. Click OK to apply the Compressor effect to your audio.
Setting Up The Compressor
The compressor in Audacity is a powerful tool. It evens out the volume of your audio tracks. This makes quiet sounds louder and loud sounds quieter. Setting up the compressor correctly is important for a balanced sound. Let’s explore how to adjust the parameters and the recommended settings.
Adjusting Parameters
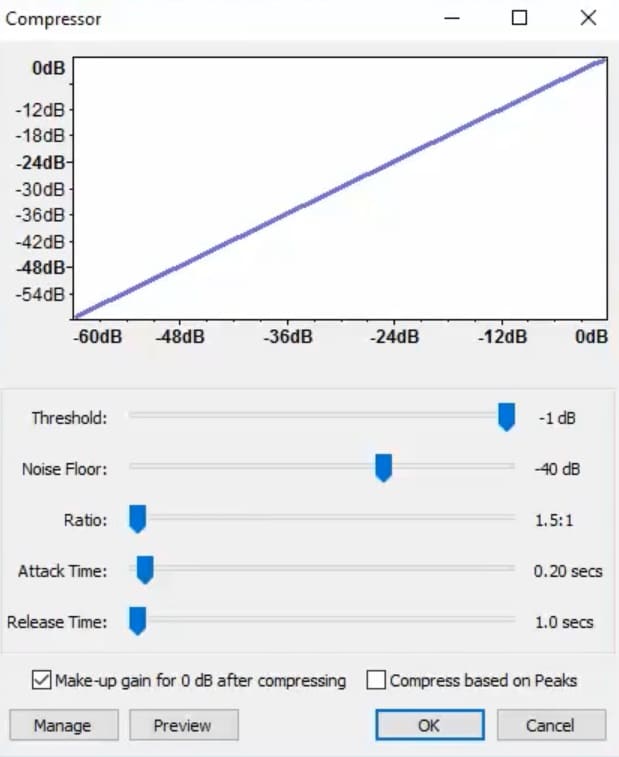
To start, open your audio track in Audacity. Click on “Effect” in the top menu. Then select “Compressor” from the drop-down list. A new window will appear with several settings. Here’s what each parameter does:
- Threshold: This controls the level at which the compressor starts working. Set it lower to compress more of the audio.
- Noise Floor: This setting determines the quietest part of the audio that will not be compressed.
- Ratio: This is the amount of compression applied. A higher ratio means more compression.
- Attack Time: This is how quickly the compressor starts to work once the threshold is reached.
- Release Time: This is how quickly the compressor stops working after the audio drops below the threshold.
- Makeup Gain: This boosts the overall volume after compression. It ensures the audio levels are consistent.
Recommended Settings
Choosing the right settings depends on your audio needs. Here are some recommended settings for a balanced sound:
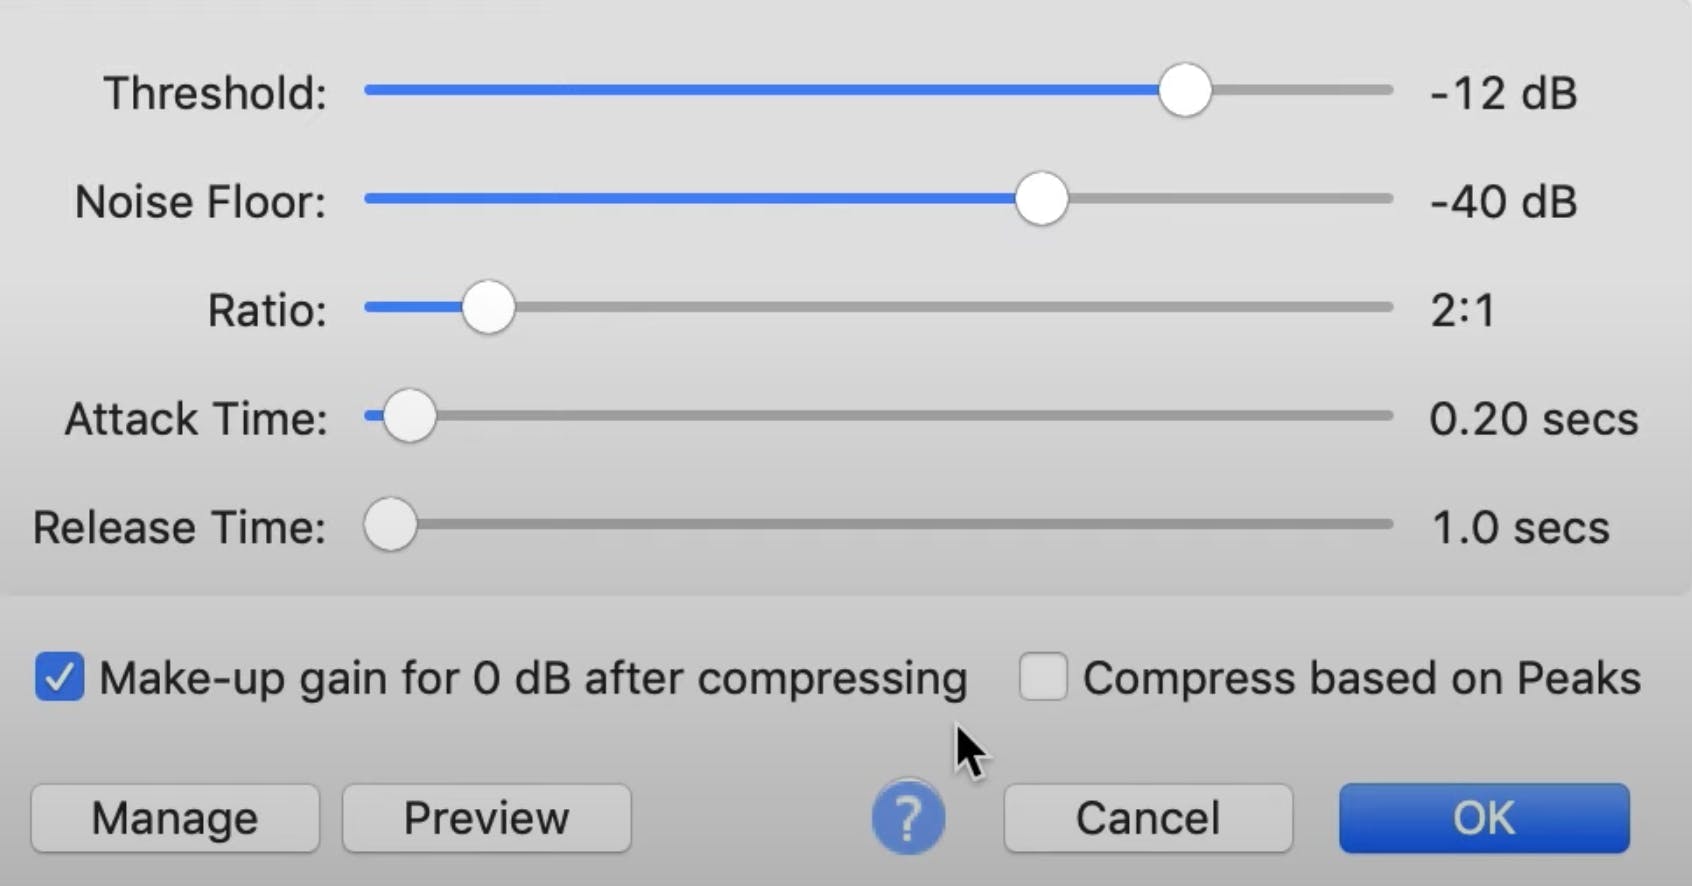
| Parameter | Recommended Setting |
|---|---|
| Threshold | -12 dB |
| Noise Floor | -40 dB |
| Ratio | 2:1 |
| Attack Time | 0.2 seconds |
| Release Time | 1.0 seconds |
| Makeup Gain | 0 dB |
These settings work well for most audio tracks. Adjust them based on your specific needs. Remember, less is more with compression. Over-compressing can make your audio sound unnatural.
Credit: www.buzzsprout.com
Practical Applications
Audacity’s compressor tool is essential for audio editing. It reduces the volume of loud sounds and amplifies quieter ones. This creates a balanced and professional audio output. The compressor is useful in several practical applications. Let’s explore two key areas: enhancing vocals and balancing music tracks.
Enhancing Vocals
Clear vocals make a significant difference in any audio project. The compressor helps to achieve this clarity. It ensures that the vocal track maintains a consistent volume. This is especially useful for podcasts, voiceovers, and singing. The compressor smooths out peaks and valleys in the vocal recording. This makes the voice sound polished and professional. It also helps in reducing background noise, making the main voice stand out.
Balancing Music Tracks
Music tracks often have varying volumes. This can make the listening experience uneven. The compressor helps balance these differences. It ensures that no single instrument overpowers the others. This creates a harmonious blend. The compressor also helps in maintaining the overall loudness of the track. It ensures that the music is enjoyable and consistent. This is crucial for DJs, music producers, and anyone working with multiple audio tracks.
Tips And Tricks
Audacity is a powerful and versatile audio editing tool. The compressor function in Audacity helps manage the dynamic range of your audio. Below are some tips and tricks to help you make the most of this feature.
Avoiding Common Mistakes
Using the compressor correctly is crucial for achieving professional-sounding audio. Here are some common mistakes to avoid:
- Over-compression: Applying too much compression can make your audio sound flat and lifeless.
- Incorrect threshold settings: Setting the threshold too high or too low can either compress too much or not enough.
- Ignoring the noise floor: Compressing audio with a lot of background noise can amplify the noise.
By understanding these common pitfalls, you can avoid them and achieve better results.
Optimizing Output
To get the best results from the compressor in Audacity, follow these tips:
- Set the threshold to the level where the loudest parts of your audio are just below the threshold.
- Adjust the ratio to control how much compression is applied. A ratio of 2:1 is a good starting point.
- Use the attack and release settings to fine-tune how quickly the compression starts and stops.
Experiment with these settings to find what works best for your specific audio.
Credit: www.thepodcasthost.com
Frequently Asked Questions
What Is The Compressor Effect In Audacity?
The compressor effect in Audacity reduces the volume of loud sounds. It makes quiet sounds louder. This helps balance the audio levels.
How Does Audacity Compressor Improve Audio Quality?
The Audacity compressor smooths out volume fluctuations. It enhances the overall clarity and consistency. This results in a more professional sound.
When Should I Use A Compressor In Audacity?
Use a compressor when your audio has varying volumes. It helps even out loud and quiet parts. This makes the audio more consistent.
Can Compressor Fix Distorted Audio In Audacity?
A compressor can help with slight distortions by balancing volumes. However, it won’t fix severely distorted audio. Proper recording techniques are essential.
Conclusion
Mastering the compressor in Audacity can greatly improve your audio quality. It levels out volume differences and enhances clarity. Understanding its functions helps you achieve professional sound. Experiment with settings to find what works best for your recordings. Practice makes perfect, so keep refining your skills.

This tool is essential for podcasters, musicians, and anyone who values clear audio. Make the most of Audacity’s compressor and elevate your sound. Happy editing!
As an Amazon Associate, Cleanestor earns from qualifying purchases at no additional cost to you.