Serum is a powerful synth plugin used in FL Studio. It offers high-quality sounds and intuitive features.
But, locating it can be tricky if you are new to FL Studio. FL Studio is a popular digital audio workstation known for its user-friendly interface and versatility. For beginners and experienced producers alike, finding plugins like Serum can sometimes be confusing.
Serum, known for its wavetable synthesis, is a favorite among music producers. To get the most out of it, you need to know where to find it within FL Studio. In this guide, we will help you locate Serum in FL Studio, ensuring you can start creating amazing sounds in no time. Keep reading to discover the steps to find and use Serum effectively.

Credit: www.youtube.com
Introduction To Serum In Fl Studio
Serum is a popular software synthesizer used in FL Studio. It is known for its high-quality sound and versatility. This introduction will help you understand what Serum is and why it’s important in music production.
Brief Overview
Serum is a wavetable synthesizer plugin created by Xfer Records. It integrates seamlessly with FL Studio, making it a favorite among producers. It offers a wide range of sounds, from lush pads to gritty basslines.
Serum is user-friendly and powerful. It provides an intuitive interface with visual feedback. This makes sound design more accessible and enjoyable.
| Feature | Description |
|---|---|
| Wavetable Synthesis | Allows creating complex sounds with ease. |
| High-quality Oscillators | Produce clean and rich sound. |
| Visual Feedback | Makes sound design intuitive. |
Importance Of Serum
Serum plays a crucial role in modern music production. Its flexibility allows producers to create unique sounds. This adaptability is key for various genres, from EDM to hip-hop.
Serum’s quality and ease of use make it an essential tool. New producers can quickly learn and create impressive sounds. Experienced producers can delve deeper into its advanced features.
- Versatility: Suitable for many music styles.
- User-friendly: Easy for beginners to start.
- Powerful: Advanced features for experienced users.
In summary, Serum is an indispensable plugin in FL Studio. Its sound quality, ease of use, and versatility make it a top choice for producers.
Installing Serum Plugin
Installing the Serum plugin in FL Studio is a straightforward process. It involves downloading the plugin, setting it up, and integrating it with FL Studio. Follow these steps to get started with Serum in your music production journey.
Download And Setup
To begin, you need to download Serum from the official Xfer Records website. Follow these steps:
- Visit the Xfer Records website.
- Locate the Serum plugin and click on the Download button.
- Choose the version compatible with your operating system (Windows or Mac).
- Once downloaded, open the installation file.
- Follow the on-screen instructions to complete the installation.
After installation, Serum will be available on your computer. The next step is to integrate it with FL Studio.
Integration With Fl Studio
To integrate Serum with FL Studio, follow these steps:
- Open FL Studio on your computer.
- Navigate to the Options menu and select Manage Plugins.
- Click on the Plugin search paths tab.
- Click the Add path button and locate the folder where Serum is installed.
- Click Verify to scan for new plugins.
- Once the scan is complete, find Serum in the plugin list and enable it.
Now, Serum is integrated with FL Studio and ready for use. You can access it from the Plugin Database and start creating music.
Accessing Serum In Fl Studio
Accessing Serum in FL Studio can seem daunting for beginners. However, it’s a straightforward process. By following a few simple steps, you can easily locate and use Serum in your projects. Let’s dive into the details.
Locating Plugins Folder
First, you need to locate the Plugins folder. Open FL Studio and go to the ‘Options’ menu. Next, select ‘File Settings’. You’ll see a section labeled ‘VST plugins extra search folder. Click the folder icon next to it.
Navigate to the folder where you installed Serum. This folder contains all the necessary plugin files. Make sure you select the correct folder to avoid any issues.
Adding Serum To Channel Rack
Now, let’s add Serum to the Channel Rack. Go to the Channel Rack in FL Studio. Click the plus icon to add a new channel. A list of plugins will appear.
Scroll through the list until you find Serum. Click on it to add it to your project. Serum is now ready to use.
Open Serum by clicking on its name in the Channel Rack. You can now start creating sounds and experimenting with its features. Enjoy creating music with Serum in FL Studio!
Loading Serum Presets
Serum is a powerful synth plugin in FL Studio. It offers a wide range of sounds. To get the most out of Serum, loading presets is essential. Presets are pre-made settings that give you instant sounds. They save time and help you create music faster. In this section, we will explore how to load Serum presets in FL Studio.
Preset Management
First, open FL Studio and load Serum on a track. Click the menu icon at the top of Serum. This opens the preset browser. You will see many folders and files. These are your presets. You can explore them by clicking on each one. Double-click to load a preset. The sound will change instantly.
Organize your presets for easy access. Create folders for different types of sounds. For example, leads, basses, and pads. This helps you find the right sound quickly. You can also rename presets. Right-click a preset and choose “Rename.”
Customizing Presets
Loading presets is just the beginning. Customizing presets makes them unique. After loading a preset, tweak the knobs and sliders. Change the oscillators, filters, and effects. This gives you a fresh sound that fits your track.
Save your customized preset for future use. Click the menu icon again. Choose “Save Preset As.” Give it a name and save it in your custom folder. Now, you have a personalized sound ready for any project.
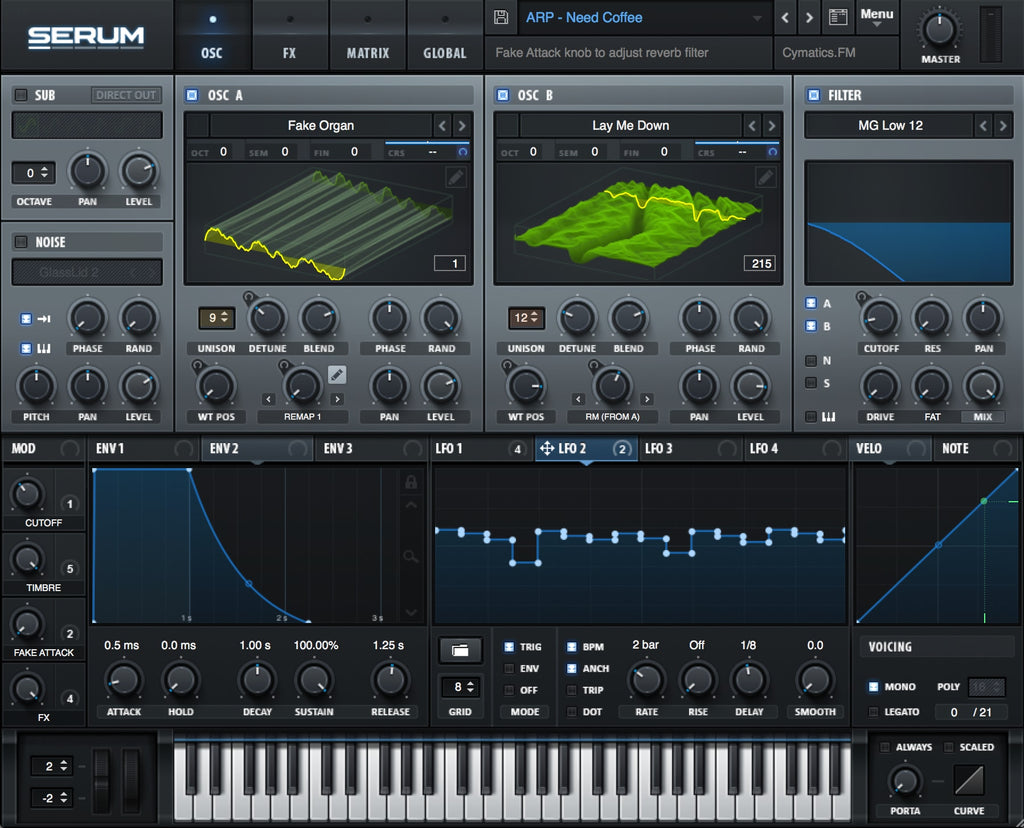
Using Serum’s Interface
Using Serum’s interface can be a rewarding experience for music producers. The layout is user-friendly and packed with features. In this section, you’ll learn how to navigate Serum’s interface and understand its key features and controls.
Navigating The Interface
The interface of Serum is intuitive. It has a clean design, which helps beginners. The main window displays oscillators, filters, and effects. You can easily switch between different sections. The top bar includes essential options like menu, preset browser, and save options. The middle section is where most of the action happens. Here, you can shape and tweak your sounds.
Key Features And Controls
Serum offers many controls to shape your sound. The oscillators are the heart of Serum. They generate the initial waveforms. You can choose from a wide range of waveforms. The filter section allows you to cut and shape frequencies. You can select from different filter types. The modulation panel helps you add movement to your sounds. Use LFOs and envelopes to create dynamic changes.
The effects section is powerful. It includes reverb, delay, and distortion. These effects can enhance your sound. The matrix tab is where you manage all modulations. It shows you which parameters are modulated. You can adjust the depth and direction of each modulation. Serum’s interface makes sound design easy and fun.
Creating Sounds With Serum
Creating sounds with Serum in FL Studio can be an exciting journey. This powerful synthesizer plugin allows users to craft unique, professional-quality sounds. Whether you are new to sound design or have some experience, this guide will help you get started.
Basic Sound Design
Start with the basics. Open Serum in FL Studio. You’ll see an interface with several sections.
- Oscillators: These generate the raw sound. Serum has two main oscillators.
- Filter: This shapes the sound by cutting or boosting frequencies.
- Envelopes: They control how the sound evolves over time.
To create a simple sound, follow these steps:
- Select an oscillator and choose a waveform. Sine, square, and saw are popular choices.
- Adjust the filter to shape the sound. Experiment with different types and settings.
- Use the envelope to control the attack, decay, sustain, and release (ADSR).
Save your preset and use it in your project.
Advanced Techniques
Once comfortable with the basics, move on to advanced techniques.
- Modulation: Use LFOs to add movement. Assign an LFO to parameters like pitch or filter cutoff.
- Wavetable Editing: Create custom waveforms. Draw or import your own shapes.
- FX Rack: Add effects like reverb, delay, and distortion. Serum has built-in effects to enhance your sound.
Let’s look at an example:
| Technique | Description |
|---|---|
| FM Synthesis | Use FM from B to modulate Oscillator A with Oscillator B. Create complex sounds. |
| Noise Oscillator | Add texture. Layer noise with your main sound. |
| Warp Modes | Use warp modes like Bend, Sync, and Mirror. Change the waveform shape. |
Experiment with these techniques. Discover endless sound design possibilities.
Tips And Tricks For Serum
Serum is one of the most powerful and versatile synthesizers in FL Studio. It offers an array of features for sound design and music production. Here are some tips and tricks to help you get the most out of Serum.
Optimizing Performance
Serum can be CPU intensive. Here are a few ways to optimize its performance:
- Reduce Polyphony: Lowering the number of voices can reduce CPU usage.
- Use Quality Settings: Adjust the render quality. Use lower settings while composing.
- Freeze Tracks: Render tracks to audio to save CPU power.
- Disable Unused Effects: Turn off effects that are not in use.
Creative Sound Manipulation
Serum offers many ways to create unique sounds. Here are some creative tips:
- Modulation: Use LFOs and envelopes to modulate parameters for dynamic sounds.
- Wavetable Editing: Edit or create custom wavetables for unique timbres.
- Effects Rack: Apply built-in effects like reverb, distortion, and delay.
- Noise Oscillator: Add texture and grit with the noise oscillator.
- Filter Types: Experiment with different filter types for varied tones.
These tips will help you maximize Serum’s potential and create stunning sounds in your music projects.

Credit: cymatics.fm
Troubleshooting Common Issues
Working with Serum in FL Studio can be a joy, but sometimes things go wrong.
Common issues can disrupt your workflow and cause frustration.
Let’s explore some frequent problems and their effective solutions.
Common Problems
- Serum not showing up: You can’t find Serum in the plugin list.
- No sound: Serum loads, but no sound comes out.
- Crashing: Serum causes FL Studio to crash.
Effective Solutions
| Problem | Solution |
|---|---|
| Serum not showing up |
|
| No sound |
|
| Crashing |
|
Credit: cymatics.fm
Frequently Asked Questions
Where To Find Serum In FL Studio?
You can find Serum in FL Studio by navigating to the Plugin Database. Look under the “Synths” section. If you’ve installed Serum correctly, it should appear there.
How To Add Serum To FL Studio?
To add Serum, open the Plugin Manager in FL Studio. Click “Find Plugins” and ensure Serum is installed. Refresh the list if needed.
Is Serum Compatible With FL Studio?
Yes, Serum is compatible with FL Studio. It works seamlessly as a VST plugin within the software, providing a rich sound design experience.
Why Can’t I See Serum In FL Studio?
If you can’t see Serum, ensure it’s correctly installed. Use the Plugin Manager to rescan your plugins and add it manually.
Conclusion
Finding Serum in FL Studio can be simple with the right steps. Just navigate to the Plugins Database and select Installed. Next, choose Generators and then VST. You’ll see Serum there. Now, you can start creating amazing sounds with Serum in your projects.

Remember, practice makes perfect. Explore and have fun with the features. You’ll get more comfortable each time you use it. Happy producing!
As an Amazon Associate, Cleanestor earns from qualifying purchases at no additional cost to you.