Connecting a USB mic to an audio interface can be confusing. But it’s doable with the right steps.
Many people find themselves needing to connect a USB mic to an audio interface. This may be due to the need for better sound quality or compatibility with other equipment. Despite seeming straightforward, the process involves a few key steps and considerations.
Understanding these steps can make your recording setup much more efficient. Whether you’re a podcaster, musician, or content creator, knowing how to connect these devices can improve your audio experience. This guide will walk you through each step, ensuring a seamless connection between your USB mic and audio interface. Let’s dive in and simplify this process for you.
Choosing The Right Usb Mic
Choosing the right USB mic is crucial for quality sound. Not all mics are created equal. Some are better suited for specific tasks. Understanding the types and brands helps you make an informed decision.
Types Of Usb Mics
There are different types of USB mics. Condenser mics are popular for studio recording. They capture clear and detailed sound. Dynamic mics are robust and can handle high sound pressure. They’re great for live performances.
Popular Brands
Several brands stand out in the market. Blue Yeti offers reliable and high-quality mics. Audio-Technica is known for its clear and natural sound. Rode mics are perfect for professional recordings. Each brand has unique features and strengths.
Credit: www.youtube.com
Understanding Audio Interfaces
Audio interfaces are essential for anyone serious about recording. They act as a bridge between your computer and your microphones, instruments, or other audio sources. They improve sound quality and allow more control over your recordings.
Functions Of An Audio Interface
An audio interface performs several key functions that enhance your recording experience:
- Conversion: It converts analog signals to digital so your computer can process them.
- Quality improvement: It often provides higher sound quality compared to your computer’s built-in sound card.
- Connectivity: It offers multiple inputs and outputs, allowing you to connect various audio equipment.
- Phantom power: It supplies power to condenser microphones, which need external power.
- Latency reduction: It reduces the delay between input and output, making real-time monitoring more accurate.
Top Audio Interface Models
Here are some of the top audio interface models that are popular among users:
| Model | Key Features |
|---|---|
| Focusrite Scarlett 2i2 | 2 inputs, 2 outputs, USB connectivity, 24-bit/192kHz |
| PreSonus AudioBox USB 96 | 2 inputs, MIDI I/O, USB connectivity, 24-bit/96kHz |
| Behringer UMC22 | 1 input, 1 output, USB connectivity, 48kHz |
| Universal Audio Apollo Twin MKII | 2 inputs, 6 outputs, Thunderbolt connectivity, 24-bit/192kHz |
Each of these models has its own strengths. Choose based on your specific needs. Remember, the right audio interface can make a significant difference in your recordings.
Necessary Equipment
Connecting a USB mic to an audio interface requires specific equipment. Ensuring you have the right tools will make the process smooth. Below is a detailed list of what you’ll need.
Cables And Adapters
To connect your USB mic to an audio interface, you will need the following:
- USB to XLR cable: This cable converts the USB output of your mic to an XLR input. Ensure the cable is of high quality to maintain audio integrity.
- Adapter: Depending on your mic and interface, you might need a specific adapter. Check the compatibility before purchasing.
Using the right cables and adapters ensures a stable connection. This minimizes any potential audio issues.
Power Supply Considerations
Power supply is crucial for your audio setup. Here are some points to consider:
- Phantom power: Some microphones require phantom power. Check if your audio interface can provide this power.
- External power sources: If your mic or interface needs external power, ensure you have a reliable power source. This prevents interruptions during recordings.
Proper power supply ensures consistent performance. It protects your equipment from damage.
By having the right equipment, you’ll connect your USB mic to the audio interface efficiently. This setup will help you achieve high-quality audio recordings.
Connecting Usb Mic To Computer
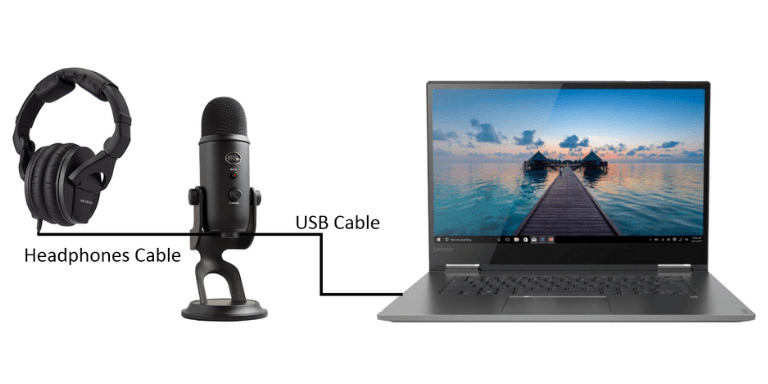
Connecting a USB mic to your computer is easy and straightforward. USB mics are popular for their plug-and-play convenience. They are suitable for podcasting, gaming, and recording at home. To get started, you need to follow a few simple steps to ensure your mic is working perfectly.
Installing Drivers
First, plug your USB mic into an available USB port on your computer. Some USB mics require specific drivers to function properly. Check the manufacturer’s website for the latest drivers. Download and install these drivers if needed.
Most modern operating systems recognize USB mics automatically. If your computer does not, follow the installation prompts provided by the driver software. Restart your computer after the installation completes to ensure everything is set up correctly.
Testing The Connection
After installing the drivers, test the connection. Open your computer’s sound settings. Select the USB mic as your input device. Speak into the mic and observe the input levels on your screen. If the levels move, your mic is working.
If you do not see any movement, check the mic’s physical connection. Ensure it is securely plugged in. Also, check the mic’s mute button if it has one. Sometimes, a simple restart of your computer can resolve issues.
For additional testing, use recording software or a simple voice recorder app. Record a short clip and play it back to check the sound quality. This helps you ensure the mic is capturing audio clearly and without distortion.
Setting Up The Audio Interface
Setting up your audio interface properly is crucial for a smooth recording experience. This guide will help you connect your USB mic to your audio interface effectively. Let’s explore the key steps involved.
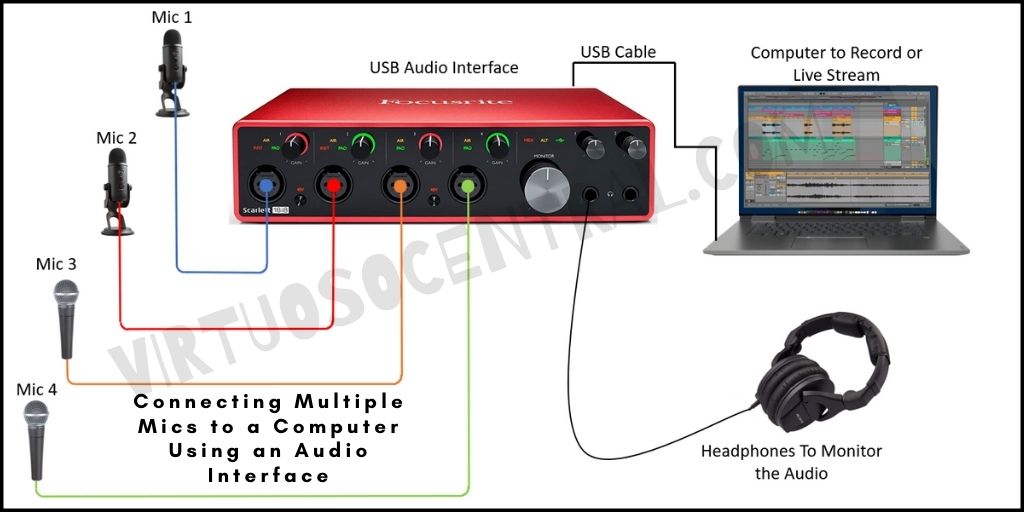
Input And Output Ports
First, identify the input and output ports on your audio interface. These ports are essential for connecting your microphone and other equipment.
- Input Ports: Usually found on the front or back of the interface. These are for connecting microphones, instruments, or other audio sources.
- Output Ports: Typically located at the back. These connect to your speakers or headphones.
Ensure you use the correct ports to avoid any connection issues. Most audio interfaces have XLR or 1/4-inch input ports, so you might need an adapter for your USB mic.
Configuring Settings
After connecting your mic, you need to configure the settings on your audio interface and computer.
- Install Drivers: Many audio interfaces require specific drivers. Check the manufacturer’s website for the latest versions.
- Set Sample Rate: Choose a sample rate in your audio interface software. Common rates are 44.1 kHz or 48 kHz.
- Adjust Gain: Set the gain level using the knobs on your interface. Ensure the signal is strong but not clipping.
- Select Input Source: In your recording software, select the audio interface as the input source. This ensures the mic signal is captured correctly.
Proper configuration ensures the best audio quality and performance. Always double-check your settings before starting a recording session.
Connecting Usb Mic To Audio Interface
Connecting a USB microphone to an audio interface can seem tricky. It’s not a common setup, but it’s doable. Using the right adapters and connections is key. This guide will help you through the process.
Using Usb To Xlr Adapter
One way to connect your USB mic is by using a USB to XLR adapter. These adapters convert the USB signal to XLR, which is compatible with most audio interfaces.
- First, plug the USB end of the adapter into your mic.
- Next, connect the XLR end to your audio interface.
- Ensure the audio interface is powered on and connected to your computer.
This setup allows the USB mic to work like a standard XLR mic. It’s simple and effective.
Connecting Via Line Input
Another method is connecting through the line input of your audio interface. This method uses a USB audio interface with a line-in option. Follow these steps:
- Connect your USB mic to the computer.
- Use an auxiliary cable to connect the mic’s headphone output to the audio interface’s line input.
- Adjust the levels on your audio interface to ensure clear sound.
This method can be more flexible. It uses the mic’s built-in audio processing for a cleaner signal.
| Method | Advantages | Disadvantages |
|---|---|---|
| USB to XLR Adapter | Simple setup | May require additional power |
| Line Input | Flexible, clean signal | More complex |
Both methods have their benefits. Choose the one that suits your needs best.
Configuring Software Settings
Configuring software settings is a crucial step when connecting your USB mic to an audio interface. This ensures optimal sound quality and proper functionality. Let’s dive into the specifics to help you achieve the best results.
Selecting Input Source
First, open your recording software. Navigate to the preferences or settings menu. Look for the audio input section. Select your USB mic from the list of available devices. Make sure it is set as the primary input source. This step ensures that your mic is recognized by the software.
Adjusting Gain Levels
Next, focus on adjusting the gain levels. Begin by finding the gain control in your software. This is usually a slider or a knob icon. Start with a lower gain setting. Gradually increase it while speaking into your mic. You want the level to be high enough to capture your voice clearly.
Watch the input level meter as you adjust the gain. Aim to keep the levels within the optimal range. Avoid peaking, which is indicated by red levels on the meter. Peaking can cause distortion in your recordings. This step helps you achieve a clean and professional sound.
Credit: virtuosocentral.com
Troubleshooting Common Issues
Connecting a USB mic to an audio interface can be tricky. Sometimes, things don’t work as expected. Understanding common issues helps you troubleshoot them effectively.
No Sound Output
First, check the physical connections. Ensure the USB mic is securely plugged into the audio interface. Verify that the interface is connected to your computer. Look for any loose cables. Next, check the mic settings on your computer. Select the correct input device. Sometimes, the computer defaults to another mic. Make sure the interface’s gain knob is turned up. The mic signal may be too low to hear. Lastly, test the mic on another device. This helps identify if the issue is with the mic or the interface.
Latency Problems
Latency can be frustrating. It causes a delay between speaking and hearing your voice. Start by adjusting the buffer size in your audio interface software. Smaller buffer sizes reduce latency. Ensure your computer’s CPU is not overloaded. Close unnecessary programs. They might use resources needed for audio processing. Update your audio interface drivers. Old drivers can cause latency issues. Use a direct monitoring feature, if available. It allows you to hear the mic input directly without delay.
Credit: virtuosocentral.com
Frequently Asked Questions
How Do I Connect A Usb Mic To An Audio Interface?
To connect a USB mic to an audio interface, use a USB-to-XLR adapter. Plug the USB mic into the adapter, then connect the adapter’s XLR output to the audio interface’s XLR input. Ensure your audio interface is properly configured.
Can I Use A Usb Mic With An Audio Interface?
Yes, you can use a USB mic with an audio interface. Use a USB-to-XLR adapter to connect the USB mic to the audio interface. Ensure your audio interface is compatible with the adapter.
What Adapter Do I Need For A Usb Mic?
You need a USB-to-XLR adapter for connecting a USB mic to an audio interface. This adapter allows the USB mic to connect to the XLR input on the audio interface.
Is It Possible To Improve Usb Mic Sound Quality?
Yes, connecting a USB mic to an audio interface can improve sound quality. The audio interface provides better preamps and converters, enhancing the audio signal.
Conclusion
Connecting a USB mic to an audio interface is straightforward. Follow the steps carefully. First, ensure both devices are compatible. Next, use the right cables and settings. This setup enhances sound quality. Your recordings will sound professional. Troubleshooting is simple with these guidelines.

Enjoy better audio performance. Experiment with different configurations. Practice makes perfect. With patience, you’ll get great results. Now, get started and elevate your audio game!
As an Amazon Associate, Cleanestor earns from qualifying purchases at no additional cost to you.