Connecting a Blue Yeti to an audio interface can be simple. This guide will show you how step-by-step.
Many podcasters and musicians use the Blue Yeti mic for its great sound quality. Yet, some want to connect it to an audio interface for better control. This setup can improve your recording quality and offer more features. You don’t need to be an audio expert to do this.
With the right tools and instructions, anyone can connect their Blue Yeti to an audio interface. Follow this guide, and you will be ready to enhance your recordings in no time.

Credit: www.youtube.com
Introduction To Blue Yeti
Connecting a Blue Yeti to an audio interface can improve your sound quality. The Blue Yeti is a popular choice for podcasters, musicians, and streamers. Its ease of use and high-quality sound makes it a top pick. Let’s start with an introduction to the Blue Yeti.
Features And Specifications
The Blue Yeti is a versatile USB microphone. It offers multiple polar patterns. You can choose cardioid, omnidirectional, bidirectional, or stereo. Each pattern suits different recording needs. The microphone has a frequency response of 20Hz to 20kHz. This range captures a wide spectrum of sounds.
It also includes a built-in headphone jack. This feature allows for zero-latency monitoring. You can hear your voice in real-time without delay. The Blue Yeti has a sturdy build. Its metal body ensures durability. The microphone also features simple controls. You can easily adjust gain, mute, and pattern selection.
Benefits Of Using Blue Yeti
The Blue Yeti provides clear and professional sound. This is ideal for podcasts and voiceovers. The multiple polar patterns offer flexibility. You can use it in various recording scenarios. The plug-and-play setup is user-friendly. No need for complex installations.
It also has a built-in stand. This makes it easy to set up on any desk. The Blue Yeti is compatible with most recording software. You can use it with both Mac and Windows. Its affordability makes it accessible to many users. You get great quality without breaking the bank.
Why Use An Audio Interface
Connecting your Blue Yeti to an audio interface can elevate your recording game. You might wonder why use an audio interface in the first place. The answer lies in the benefits it brings to your sound quality and recording process.
Improved Sound Quality
One of the main advantages of using an audio interface is the improved sound quality. The Blue Yeti is already a great microphone. Yet, connecting it to an audio interface can take it to the next level. An audio interface converts the analog signal from your mic into a digital signal. This process ensures that the sound is as clear and precise as possible.
Audio interfaces often come with better preamps. These preamps enhance the sound further. They make sure that your recordings are free from noise and distortion. The result is a crisp and professional sound that makes a difference.
Enhanced Control And Flexibility
Another benefit of using an audio interface is the enhanced control and flexibility it offers. With an audio interface, you can adjust various settings to suit your needs. For instance, you can control the gain levels with more precision. This means you can fine-tune the input signal to avoid clipping or distortion.
Audio interfaces also allow you to connect multiple devices. This feature is useful if you want to use other instruments or microphones. It provides you with more options for your recording setup. You can even monitor your recordings in real-time through headphones, ensuring everything sounds perfect.
| Feature | Benefit |
|---|---|
| Improved Sound Quality | Clear and precise recordings |
| Enhanced Control | Adjust gain levels with precision |
| Flexibility | Connect multiple devices |
Necessary Equipment
Connecting your Blue Yeti to an audio interface requires a few essential items. Knowing the necessary equipment ensures a smooth setup and optimal performance. This section will guide you through the key components you need.
Cables And Adapters
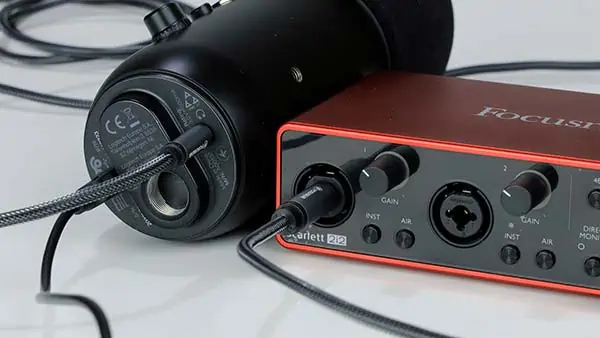
To connect your Blue Yeti to an audio interface, you need the right cables and adapters. The Blue Yeti uses a USB connection. However, audio interfaces typically use XLR connections. Therefore, you will need a USB to XLR adapter cable. This cable allows the Blue Yeti to connect directly to the audio interface.
Additionally, ensure you have a high-quality USB cable. The USB cable should connect the Blue Yeti to the adapter. Quality cables help maintain sound quality. They also reduce interference during recording.
Audio Interface Options
Choosing the right audio interface is crucial. The audio interface is the bridge between your microphone and computer. It converts analog signals to digital format. This ensures clear and high-quality audio recordings.
Popular audio interface brands include Focusrite, Behringer, and PreSonus. These brands offer reliable and user-friendly options. Look for an interface with at least one XLR input. This will allow you to connect the Blue Yeti using the adapter.
Also, consider the interface’s compatibility with your computer. Check for USB or Thunderbolt connections. Ensure the interface supports your operating system. This will help avoid compatibility issues.
Setting Up The Blue Yeti
Connecting your Blue Yeti to an audio interface enhances sound quality. Use a USB to XLR converter for a seamless setup. Ensure proper cable connections and adjust input levels for optimal performance.
Setting up the Blue Yeti with an audio interface can seem tricky. But with the right steps, you’ll be ready in no time. This section will guide you through the process, ensuring you get the best sound.
Positioning And Mounting
Place your Blue Yeti on a sturdy surface. Ideally, use a desk or table. Attach the microphone to a shock mount if you have one. This helps reduce vibrations. Position the mic about 6-12 inches from your mouth. Ensure the front of the mic faces you. This side captures the best sound. Angle the mic slightly upwards. This helps capture your voice clearly.
Configuring Settings
Connect the Blue Yeti to your computer using a USB cable. Open your audio settings on the computer. Select the Blue Yeti as your input device. Adjust the gain control on the mic. Start with a low setting. Gradually increase it until your voice sounds clear. Test different settings to find the best one. Use headphones to monitor your sound quality. This helps ensure there is no background noise.
“`
Connecting To The Audio Interface
Connecting your Blue Yeti to an audio interface can improve sound quality. It allows more control over your recordings. This section will guide you through the process step-by-step.
Wiring And Connections
First, gather the necessary cables. You need a USB to XLR cable. Connect the USB end to the Blue Yeti. Then, plug the XLR end into the audio interface. Ensure the connections are secure.
Check the audio interface’s input settings. Choose the correct input channel. This ensures the Blue Yeti’s signal goes through the interface properly.
Powering The Devices
Ensure both devices have power. Connect the Blue Yeti to your computer via USB. This provides power to the microphone. Next, plug in the audio interface to a power source. Follow the manufacturer’s instructions.
Turn on the audio interface. Adjust the gain settings to avoid clipping. Test the microphone to check sound levels. Make adjustments as needed.
Configuring The Audio Interface
Configuring the audio interface is a crucial step in connecting your Blue Yeti microphone. This ensures that the sound quality is optimal and everything works smoothly. Let’s dive into the key aspects of this configuration process.
Software Installation
First, you need to install the software that came with your audio interface. This is often available on the manufacturer’s website. Download and run the installer. Follow the on-screen instructions to complete the installation. Ensure your computer recognizes the audio interface once the software is installed. Restart your computer to finalize the installation process.
Adjusting Input Levels
After installing the software, it’s time to adjust the input levels. Open the audio interface control panel. Locate the input settings for your Blue Yeti. Set the input gain to a moderate level. Speak into the microphone and monitor the levels. Ensure the levels stay within the green zone. Avoid clipping by not allowing the levels to reach the red zone. This ensures clear and distortion-free audio.
Testing The Setup
After connecting your Blue Yeti to an audio interface, testing the setup is crucial. This ensures that everything works perfectly. Follow these steps to test the setup and make any necessary adjustments.
Checking Sound Quality
Start by recording a short audio clip. Speak into the Blue Yeti microphone at a normal volume. Play back the recording to check the sound quality. Listen for any static, echo, or unwanted noise. The audio should be clear and crisp.
If the sound quality is not good, try adjusting the gain on the audio interface. Lowering the gain can reduce background noise. Adjust the volume settings on your computer. Ensure they are not too high or too low. Experiment with different settings until you find the best sound quality.
Troubleshooting Common Issues
Sometimes, issues arise even after careful setup. Here are common problems and their solutions:
No Sound: Check if the audio interface is connected properly. Ensure the Blue Yeti is selected as the input device on your computer.
Low Volume: Increase the gain on the audio interface. Make sure the microphone is not too far from your mouth.
Background Noise: Use a pop filter to reduce noise. Position the microphone away from noisy areas.
If issues persist, consult the user manuals for both the Blue Yeti and the audio interface. Sometimes, a simple reset can fix many problems. Ensure all software and drivers are up to date.
Credit: ortopediamoderna.com.br
Optimizing Audio Performance
Connecting a Blue Yeti to an audio interface can improve your recordings. But, to get the best sound, you need to optimize your audio performance. This involves using tools and adjusting settings to enhance quality. Here, we will discuss key steps to achieve this.
Using Pop Filters And Shock Mounts
A pop filter reduces plosive sounds. These occur when you pronounce words with strong ‘p’ or ‘b’ sounds. Place the pop filter between the microphone and your mouth. This simple tool can make your recordings clearer.
A shock mount can help minimize vibrations. Vibrations can come from desk movements or other sources. By using a shock mount, you isolate the microphone. This results in cleaner audio without unwanted noise.
Fine-tuning Audio Settings
Fine-tuning audio settings is crucial. Start by setting the gain on your audio interface. Adjust it so your voice is clear, but not too loud. Too much gain can cause distortion. Too little can make your voice too soft.
Next, explore the equalizer (EQ) settings. Adjust the bass, midrange, and treble to suit your voice. This can help balance your sound. You may need to experiment to find the right settings.
Finally, use the compressor setting. A compressor balances the loud and soft parts of your recording. This can make your audio more consistent. Set it to a level where your voice remains clear throughout.
Recording Tips
Connecting your Blue Yeti to an audio interface can enhance your recordings. Here are some essential recording tips to help you achieve the best sound quality.
Microphone Techniques
Proper microphone techniques are crucial for clear recordings. Position the Blue Yeti about 6-12 inches from your mouth. This distance helps capture a balanced sound.
Use a pop filter to reduce plosive sounds. Plosives are the harsh sounds made by letters like “P” and “B”. A pop filter softens these sounds.
Experiment with the Blue Yeti’s gain settings. Adjust the gain until your voice sounds clear without distortion. Too much gain can cause clipping and distortion.
Choose the right pickup pattern for your recording. The Blue Yeti offers four options: Cardioid, Omnidirectional, Bidirectional, and Stereo. For vocals or podcasts, use the Cardioid pattern. It focuses on sound from the front and reduces background noise.
Post-production Advice
Post-production is essential for polished recordings. After recording, use software like Audacity or Adobe Audition for editing.
First, remove any background noise. Most software has noise reduction tools. Highlight a section of background noise, then apply noise reduction to the entire track.
Next, adjust the EQ (equalization) settings. Boost the mid and high frequencies to make your voice stand out. But, don’t overdo it. Too much EQ can sound unnatural.
Use compression to even out the volume levels. Compression reduces the volume of loud sounds and increases the volume of soft sounds. This creates a balanced recording.
Lastly, add a touch of reverb. Reverb adds depth to your recording. But, use it sparingly. Too much reverb can make your recording sound muddy.
Credit: www.reddit.com
Frequently Asked Questions
How Do I Connect Blue Yeti To An Audio Interface?
To connect the Blue Yeti to an audio interface, use a TRS to XLR adapter. Ensure the audio interface supports the microphone.
Can I Use Blue Yeti With An Audio Interface?
Yes, you can use the Blue Yeti with an audio interface. Use the correct adapter and settings.
Do I Need An Adapter For Blue Yeti?
Yes, you need a TRS to XLR adapter. This is necessary for connecting the Blue Yeti to an audio interface.
What Settings Should I Use For Blue Yeti?
Set the Blue Yeti to cardioid mode for best results. Adjust the gain on both the microphone and audio interface.
Conclusion
Connecting your Blue Yeti to an audio interface is simple. Follow the steps outlined. Ensure all cables are securely connected. Adjust settings for the best sound quality. This setup improves your audio recordings significantly. Enjoy clearer, professional-quality sound for your projects.

Practice makes perfect, so keep experimenting. Soon, it will feel second nature. Happy recording!
As an Amazon Associate, Cleanestor earns from qualifying purchases at no additional cost to you.