Moving tracks in Audacity is simple and straightforward. It helps organize your audio projects.
Audacity is a popular, free audio editing tool. It’s known for its powerful features and ease of use. Whether you’re a podcaster, musician, or hobbyist, managing tracks is essential. Understanding how to move tracks efficiently can save you time and effort.
In this guide, we’ll walk you through the process step-by-step. By the end, you’ll feel confident rearranging your audio tracks. This skill will enhance your editing workflow and improve your final product. Let’s dive into the details and get started!
Introduction To Audacity
Audacity is a popular, free audio editing software. Many people use it to create, edit, and mix audio tracks. It is especially loved by beginners due to its simple interface. This software is open-source, making it accessible to everyone.
What Is Audacity?
Audacity is a digital audio editor and recording application. It is available for Windows, Mac, and Linux operating systems. People use it for tasks like recording live audio, editing sound files, and converting tapes into digital recordings.
Key Features
Audacity offers many helpful features. It allows users to record live audio through a microphone. You can also import, edit, and combine sound files. The software supports various file formats such as WAV, AIFF, and MP3.
One standout feature is the ability to cut, copy, splice, and mix sounds together. Audacity also provides a range of effects like changing the speed or pitch of a recording. Noise reduction tools help clean up recordings, making them clearer.
Another useful feature is the multi-track editor. This allows you to work on several audio tracks at once. The software also supports plug-ins, which add more functionality.
Audacity has built-in support for various audio analysis features. It includes a spectrogram view mode. This makes visualizing and selecting frequencies easy.
Audacity is great for beginners and experienced users. It’s free and has a strong community for support.
“`
Credit: www.youtube.com
Setting Up Your Project
Setting up your project in Audacity is the first step to moving tracks. This process involves creating a new project and importing audio tracks. Proper setup ensures a smooth workflow and prevents confusion.
Creating A New Project
To start, open Audacity on your computer. Then, follow these steps:
- Click on the File menu at the top.
- Select New from the dropdown menu.
- A new, blank project window will appear.
Now, your new project is ready for audio tracks. Make sure you save your project regularly to avoid losing any work. Use the Ctrl + S shortcut to save quickly.
Importing Audio Tracks
Next, you need to import audio tracks into your project. Here’s how to do it:
- Go to the File menu again.
- Select Import and then Audio.
- Browse your computer for the audio file you want to import.
- Click on the file and then click Open.
The audio track will now appear in your project window. You can import multiple tracks by repeating these steps for each file. Make sure each track is properly aligned for easier editing.
Here is a simple table to summarize the steps:
| Action | Steps |
|---|---|
| Creating a New Project | File > New |
| Importing Audio Tracks | File > Import > Audio |
Setting up your project correctly saves time. It also helps you stay organized. Make sure you follow these steps to start on the right foot.
Understanding The Track Layout
Understanding the track layout in Audacity is essential for efficient audio editing. This section will guide you through the basics of the track panel and waveform display. These elements are fundamental for moving tracks in Audacity.
Track Panel Overview
The track panel is located on the left side of each track. It contains several important controls and information about the track.
- Mute and Solo Buttons: These buttons allow you to mute or solo a track.
- Track Name: The name of the track is displayed here. You can rename it by clicking on it.
- Gain Slider: This slider adjusts the track’s volume.
- Pan Slider: This slider adjusts the stereo position of the track.
- Track Dropdown Menu: Access additional settings and options for the track here.
Waveform Display
The waveform display shows the audio signal as a visual representation. This makes it easy to see where sounds are located in time.
- Peaks and Valleys: The peaks represent loud sounds, and the valleys represent quiet sounds.
- Zooming: You can zoom in and out to see more or less detail.
- Selection: Click and drag to select a part of the audio for editing.
- Scrubbing: Move your cursor over the waveform to hear the audio at that point.
Understanding these components will help you move tracks in Audacity efficiently.
Selecting Tracks For Movement
Moving tracks in Audacity can streamline your audio editing process. Understanding how to select tracks for movement is crucial. This section will guide you through selecting single and multiple tracks. Let’s dive into the details.
Single Track Selection
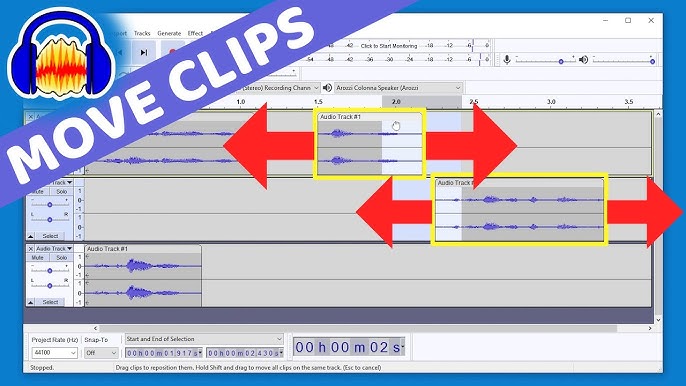
To move a single track in Audacity, first, click on the track. This highlights the track, indicating it is selected. Once selected, use the Time Shift Tool. This tool looks like a double-headed arrow. Click and drag the track to your desired position. It’s that simple.
Multiple Track Selection
Sometimes, you need to move multiple tracks at once. To do this, hold down the Shift key. Then, click on each track you want to move. All selected tracks will be highlighted. Use the Time Shift Tool again. Click and drag to move all selected tracks together. This saves time and keeps your project organized.
Moving Tracks Vertically
Moving tracks vertically in Audacity can help organize your project. It makes the editing process smoother and more efficient. Here, we will look at how to move tracks up or down in your workspace.
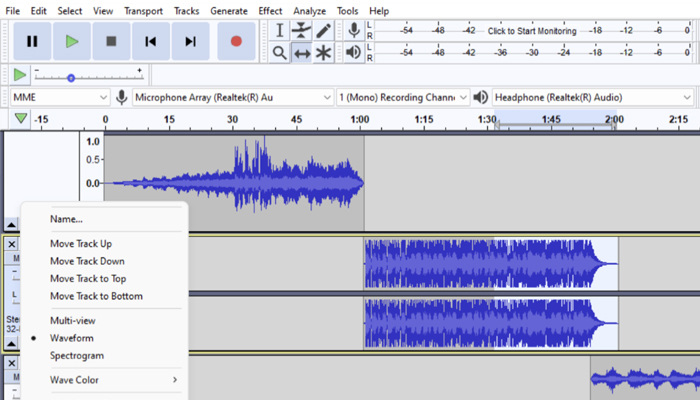
Using The Track Control Panel
The Track Control Panel is the leftmost part of a track. It contains buttons and sliders for track settings. To move a track vertically, click and hold in the Track Control Panel. Then, drag the track up or down to your desired position. Release the mouse button to place the track.
Reordering Tracks
Reordering tracks can help keep your project organized. To change the order of tracks, use the same click-and-drag method. Make sure to click in the Track Control Panel. Drag the track to the new position and release. The track will now be in its new place. This process can be repeated for any track in your project.

Credit: www.youtube.com
Moving Tracks Horizontally
Moving tracks horizontally in Audacity is essential for precise audio editing. It helps in aligning different audio segments for a seamless listening experience. Learn the key tools and techniques to move your tracks horizontally with ease.
Time Shift Tool Usage
The Time Shift Tool in Audacity is your primary tool for moving tracks horizontally. Select the tool from the toolbar, which looks like a double-headed arrow. Click on the track you want to move. Drag it left or right to the desired position. The waveform will follow your movement. Release the mouse button to place the track. This simple tool gives you control over track timing with great precision.
Sync-lock Tracks
Sync-Lock Tracks is another feature to consider. It ensures that related tracks stay in sync while moving. Enable Sync-Lock by clicking on the “Tracks” menu and selecting “Sync-Lock Tracks.” When you move one track, all sync-locked tracks will move together. This feature is helpful when working with multi-track projects. Keeping everything in sync avoids timing issues and maintains the integrity of your audio project.
Adjusting Track Timing
Adjusting track timing is a crucial skill in Audacity. It ensures your audio projects sound professional. Whether you need to sync multiple tracks or correct timing errors, knowing how to adjust track timing is essential. In this section, we will explore how to use the Snap-To feature and manual adjustment for precise track timing.
Snap-to Feature
The Snap-To feature helps you align your tracks perfectly. It makes sure your adjustments stick to specific points. This feature can save time and improve accuracy.
To use the Snap-To feature:
- Open Audacity and load your project.
- Click on View in the top menu.
- Select Snap-To.
- Choose Nearest or Prior option.
The Nearest option snaps your track to the closest point. The Prior option snaps to the last point before your cursor. Both options ensure your tracks align with precision.
Manual Adjustment
Manual adjustment gives you complete control over track timing. This method is useful for fine-tuning and custom adjustments.
To manually adjust track timing:
- Select the Time Shift Tool from the toolbar.
- Click and drag the track to the desired position.
Use the zoom tool for more precision. This helps you see smaller details in your track. You can zoom in by pressing Ctrl + 1 and zoom out with Ctrl + 3.
Manual adjustment is ideal for detailed edits. It allows you to adjust track timing by milliseconds. This can be crucial for achieving perfect synchronization.
Finalizing Your Edits
After moving and editing your tracks in Audacity, it’s time to finalize your work. Finalizing ensures your audio project sounds just right. Let’s go through the steps to wrap up your edits effectively.
Listening To Changes
First, listen to the changes you’ve made. Click the play button to start playback. Pay attention to how the tracks sound together. Ensure there are no unexpected noises. Adjust volumes if needed. Make sure transitions are smooth. Repeat playback as necessary. Make small adjustments to enhance your project.
Saving The Project
Next, save your project. Click on ‘File’ in the top menu. Select ‘Save Project As’ to create a new save. Name your project and choose a location on your computer. This keeps your changes safe. If you want an audio file, select ‘Export’ from the ‘File’ menu. Choose the desired format, like MP3 or WAV. Save the exported file to your chosen location. Now your work is preserved and ready for sharing or further editing.
Common Issues And Solutions
While working with Audacity, you might face some common issues. These problems can disrupt your workflow. Below, we discuss common issues and their solutions.
Track Alignment Problems
Track alignment problems can occur. This happens when tracks don’t line up. To fix this, use the Time Shift Tool. This tool helps move tracks left or right. Select the tool from the toolbar. Click and drag the track to align it. Ensure the tracks are in sync for smooth playback.
Audio Playback Issues
Audio playback issues can be frustrating. Sometimes, you won’t hear any sound. Check your playback device settings first. Ensure the correct device is selected in Audacity. Go to Edit > Preferences > Devices. Choose your playback device. Another issue could be muted tracks. Unmute the tracks by clicking the mute button.
Credit: crumplepop.com
Tips And Tricks
Editing audio tracks in Audacity can be a breeze with the right tips and tricks. You can significantly improve your efficiency and workflow. This section offers valuable advice to help you move tracks in Audacity with ease.
Keyboard Shortcuts
Keyboard shortcuts can save you a lot of time. Use the “Ctrl + X” keys to cut a track. Paste it with “Ctrl + V”. To copy, use “Ctrl + C”. To undo any action, press “Ctrl + Z”. These shortcuts work quickly and smoothly.
For moving tracks up or down, “Ctrl + Alt + Up Arrow” or “Ctrl + Alt + Down Arrow” can be very useful. Shortcuts help you avoid constant mouse clicks. Your hands stay on the keyboard, making the process faster.
Efficient Workflow
Organize your tracks from the start. Label each track clearly. This helps you know what each track contains. You won’t waste time searching.
Use the “Time Shift Tool” to move tracks. It’s the double-headed arrow icon. Click and drag the track to your desired position. This tool is simple and precise.
Plan your edits in advance. Think about which tracks need to be moved. This reduces unnecessary adjustments. You’ll work more efficiently.
Save your project often. Use “Ctrl + S” to save your progress. This prevents losing your work. Regular saving keeps your project safe.
Frequently Asked Questions
How Do I Move Tracks In Audacity?
To move tracks in Audacity, use the Time Shift Tool. Select the tool, then click and drag the track to your desired position.
Can I Rearrange Tracks In Audacity?
Yes, you can rearrange tracks in Audacity. Simply use the Time Shift Tool to drag and move the tracks.
What Is The Time Shift Tool In Audacity?
The Time Shift Tool in Audacity allows you to move and reposition tracks. Select it from the toolbar, then click and drag the track.
How Do I Align Tracks In Audacity?
To align tracks in Audacity, use the Time Shift Tool. Click and drag the track to align it with others.
Conclusion
Moving tracks in Audacity is simple and efficient. Follow the steps outlined to rearrange your audio easily. Practice will make the process quicker. Experiment with different track positions. This helps improve your project quality. Don’t be afraid to try new things.

Audacity offers great tools for audio editing. Keep exploring its features. You will become more confident over time. Happy editing!
As an Amazon Associate, Cleanestor earns from qualifying purchases at no additional cost to you.