You can create, duplicate, and organize songs in Garageband’s user-friendly interface. This powerful software lets you manage your music projects with ease.
Garageband, a favorite among musicians, offers a range of tools for song creation and management. Whether you’re a beginner or a seasoned producer, learning to navigate its features is essential. In this post, we will explore how to efficiently create, duplicate, and organize your songs within Garageband.
By mastering these functions, you can streamline your workflow and focus more on your creativity. Let’s dive into the world of Garageband and unlock its potential for your music projects.
Credit: djtechtools.com
Introduction To Garageband
GarageBand is a powerful tool for music enthusiasts. It allows you to create, edit, and organize your music with ease. Whether you are a beginner or a professional, GarageBand offers a user-friendly interface to bring your musical ideas to life.
What Is Garageband?
GarageBand is a digital audio workstation (DAW) developed by Apple. It is available for macOS and iOS users. This software is designed to help you create and produce music. With GarageBand, you can record vocals, instruments, and even add various effects to your tracks.
Key Features Of Garageband
| Feature | Description |
|---|---|
| Multitrack Recording | Record multiple tracks simultaneously. |
| Virtual Instruments | Use built-in instruments like piano, guitar, and drums. |
| Sound Library | Access a vast library of loops and samples. |
| Audio Effects | Apply effects like reverb, delay, and EQ. |
| MIDI Editing | Edit MIDI data to perfect your performance. |
GarageBand’s user-friendly interface makes it easy to navigate and use. Here are some of the key features that stand out:
- Multitrack Recording: Record multiple instruments or vocals at once.
- Virtual Instruments: Choose from a wide range of instruments like piano, guitar, and drums.
- Sound Library: Use loops and samples to enhance your tracks.
- Audio Effects: Add professional effects to your music.
- MIDI Editing: Edit MIDI files to correct or improve your performance.
With these features, GarageBand provides a complete solution for music creation. You can create professional-sounding tracks without needing expensive equipment.
Getting Started With Garageband
GarageBand is a powerful tool for music creation. It’s user-friendly and great for both beginners and pros. This guide will help you get started with GarageBand. Let’s dive in!
Installing Garageband
First, you need to install GarageBand. Go to the App Store on your Mac. Search for GarageBand. Click the download button. The app will install automatically. Once done, open GarageBand from your Applications folder.
Basic Interface Overview
Now, let’s look at the basic interface. When you open GarageBand, you’ll see the main window. This is where you create and organize your songs. At the top, you’ll find the control bar. It has buttons for play, stop, and record. Below that is the track area. This is where you add and edit your audio tracks. On the left side, there’s the library. Here, you can choose different instruments and loops. Finally, at the bottom, you’ll see the smart controls. These allow you to tweak the sound of your tracks.
By understanding these basic elements, you’re ready to start making music. Happy creating!
Creating Songs In Garageband
GarageBand is a fantastic tool for creating songs. It allows you to create, duplicate, and organize music efficiently. Whether you are a beginner or an experienced musician, GarageBand has features to help you bring your musical ideas to life.
Starting A New Project
Begin by opening GarageBand and selecting ‘New Project’. You will see different project types. Choose one that fits your music style. You can start with a blank project or use a template.
Next, name your project and set the tempo, time signature, and key. These settings can be changed later. But it is good to start with them in mind.
Choosing Instruments
GarageBand offers a wide range of instruments. You can choose from drums, keyboards, guitars, and more. To add an instrument, click on the ‘+’ button. This will open the software instrument library.
Select an instrument that suits your song. You can also customize the sound using the built-in effects and controls. Experiment with different instruments to find the perfect sound for your project.
Organize your instruments in the track area. Drag and drop them to arrange the order. This helps keep your project neat and easy to navigate.
Duplicating Tracks In Garageband
GarageBand is a powerful tool for music creators. One of its key features is the ability to duplicate tracks. This function is useful for experimenting with different effects or arrangements without altering the original track.
Steps To Duplicate A Track
- Open your project in GarageBand.
- Select the track you want to duplicate.
- Click on the track to highlight it.
- Press Command + D on your keyboard.
- The track is now duplicated and appears below the original.
Duplicating tracks is quick and easy. Just a few simple steps and you can work with multiple versions of the same track.
Benefits Of Duplicating Tracks
- Experimentation: Test different effects without changing the original track.
- Layering Sounds: Create richer soundscapes by layering multiple tracks.
- Backup: Keep an original copy while making changes to the duplicate.
Duplicating tracks allows for creative freedom. It ensures your original work remains intact while you explore new ideas.
Organizing Songs In Garageband
Organizing songs in GarageBand can transform your music production process. It allows you to focus on creativity and efficiency. GarageBand offers various tools to help you structure and manage your projects effectively. This section will explore how to use regions and sections, and how to group tracks.
Using Regions And Sections
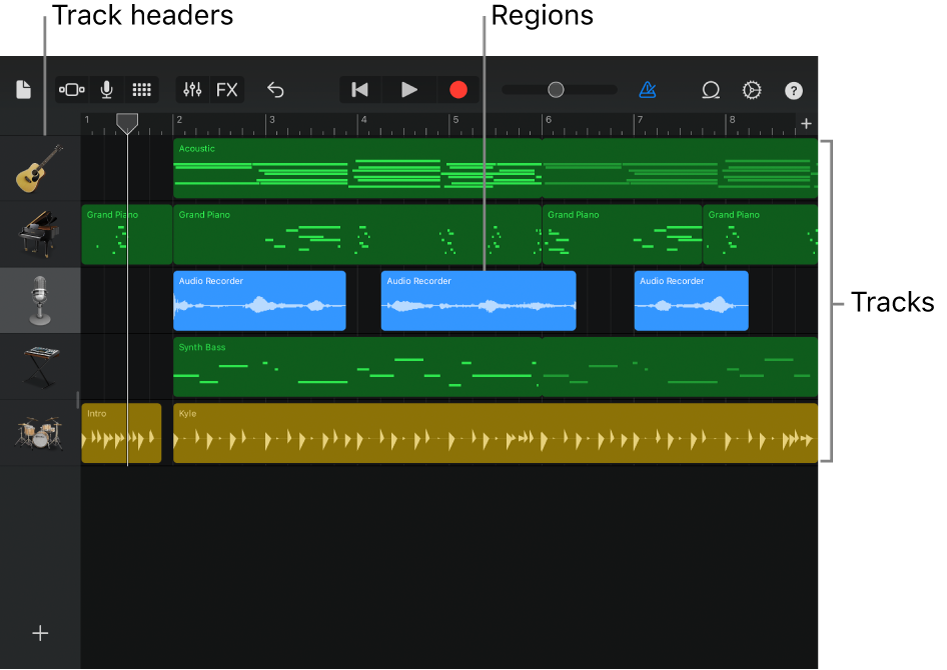
Regions are the building blocks of your song in GarageBand. They represent individual pieces of audio or MIDI data. You can move, copy, and edit regions to arrange your song. Simply click and drag a region to a new position. Use the split tool to divide regions into smaller parts. This helps in organizing different parts of your song.
Sections help you break down your project into manageable parts. Each section can represent a verse, chorus, or bridge. To add a new section, click on the ‘Add Section’ button. You can name each section to keep track of your song’s structure. This makes it easier to navigate and edit your project.
Grouping Tracks
Grouping tracks is another way to organize your song. It helps you manage multiple tracks at once. To group tracks, select the tracks you want to group. Then, right-click and choose ‘Create Track Stack’. This feature allows you to control volume and effects for all grouped tracks together. You can also collapse grouped tracks to save space on your screen.
This makes your workspace cleaner and more organized. Grouping similar tracks, like all drum tracks, makes mixing simpler. You can apply the same effect to all grouped tracks, saving time and effort.

Credit: www.groove3.com
Advanced Song Management
Advanced Song Management in GarageBand can greatly improve your workflow. Proper organization helps you focus on creativity. Knowing where to create duplicates and organize your songs is essential. This section explores advanced methods to keep your projects tidy and accessible.
Using Folders For Organization
Folders are a great way to keep your tracks organized. Create folders to group similar projects together. This method makes it easier to find specific songs. You can also create subfolders for different versions of a song.
Follow these steps to use folders in GarageBand:
- Open GarageBand and go to the project menu.
- Select “New Folder” to create a folder.
- Drag and drop your projects into the folder.
Using folders keeps your workspace clean. It also reduces the time spent searching for files.
Color Coding Tracks
Color coding tracks is another effective way to manage your songs. Assign different colors to different track types. For example, use blue for vocals and green for instruments. This visual method makes it easy to identify tracks at a glance.
Here’s how to color code tracks in GarageBand:
- Select the track you want to color code.
- Right-click and choose “Track Header Color.”
- Pick a color from the palette.
Color coding helps you quickly find and organize your tracks. It also enhances the visual appeal of your workspace.
By using these advanced song management techniques, you can keep your GarageBand projects well-organized and easy to navigate.
Tips And Tricks For Efficient Workflow
GarageBand is a powerful tool for creating and organizing music. To get the most out of it, knowing some tips and tricks can greatly improve your workflow. Efficient workflow means you can focus more on creativity and less on technicalities. Here are some valuable tips to help you work smarter in GarageBand.
Keyboard Shortcuts
Keyboard shortcuts save time and keep you in the flow. For example, use Command + D to duplicate a track quickly. To split a region, use Command + T. These shortcuts can speed up your process significantly.
Learning a few essential shortcuts can make your work more efficient. Use the Spacebar to play and pause your project. Press Command + Z to undo your last action. These simple shortcuts can enhance your productivity.
Customizing The Interface
Customizing the interface makes your workspace more comfortable. You can adjust the track height by clicking and dragging the lower edge of the track header. This allows you to see more details in your tracks.
Organizing your workspace is crucial. You can hide and show different panels according to your needs. Use the View menu to customize what you see. This keeps your screen uncluttered and focused on your work.
Personalizing your toolbar is also helpful. Right-click on the toolbar to add or remove buttons. This ensures you have quick access to your most-used features.
Credit: support.apple.com
Exporting Your Songs
Exporting your songs from GarageBand is a straightforward process. Once you finish your music project, you might want to share it. This can be for various reasons. You might want to share with friends or use it in other projects. This section will guide you through the steps to export and share your songs.
Exporting As Audio Files
First, open your GarageBand project. Click on “Share” in the top menu. Select “Export Song to Disk.” Choose your preferred audio format. The common options are MP3, AAC, and WAV. Select the destination folder for your file. Finally, click “Export.” Your song will be saved as an audio file on your computer.
Sharing With Others
You can share your exported song directly. Open the folder where you saved the file. Attach the file to an email. Send it to your friends or collaborators. You can also use file-sharing services. Dropbox and Google Drive are popular choices. Upload your file and share the link. Your friends can easily download and listen to your music. These steps make sharing your GarageBand projects easy and efficient.
Frequently Asked Questions
How Do You Duplicate A Song In Garageband?
To duplicate a song in Garageband, open the project, select the track, and use the “Duplicate” option from the Edit menu.
Can You Organize Songs Into Folders In Garageband?
Yes, you can organize songs into folders. Create a new folder and drag your projects into it for better organization.
Where Are Garageband Project Files Saved?
Garageband project files are saved in the “Garageband” folder within the “Music” directory on your Mac.
How Do You Rename A Song In Garageband?
To rename a song in Garageband, right-click the project file, select “Rename,” and type the new name.
Conclusion
Garageband makes organizing and duplicating songs easy. Users can quickly arrange tracks. This tool is perfect for beginners and experts alike. It saves time and enhances creativity. Import your favorite tunes and start editing. Garageband is user-friendly and efficient. Explore its features and enjoy making music.
With practice, your skills will grow. Dive in and create amazing songs today. Happy music-making!

As an Amazon Associate, Cleanestor earns from qualifying purchases at no additional cost to you.