Connecting studio monitors to an audio interface is simple. Start by understanding the basic setup.
This guide will help you get started. Studio monitors are essential for accurate sound. They provide a true representation of your audio. Connecting them correctly is crucial. This ensures you hear every detail clearly. Whether you are a beginner or a pro, the right setup makes a big difference.
In this blog, we will walk you through the steps. You will learn what you need and how to connect everything. By the end, your studio will be ready to produce amazing sound. Let’s get started!
Choosing The Right Cables
Connecting studio monitors to an audio interface requires the right cables. The cables you choose impact your sound quality. This section guides you on selecting the best cables for your setup.
Balanced Vs Unbalanced
Balanced cables are best for long cable runs. They reduce noise and interference. These cables have three parts: positive, negative, and ground. Examples include XLR and TRS cables.
Unbalanced cables are suitable for short distances. They have two parts: signal and ground. They are more prone to noise. Examples include TS and RCA cables.
Use balanced cables if you want cleaner sound. They help in reducing unwanted noise. For short runs, unbalanced cables might be enough.
Cable Length Considerations
Cable length affects sound quality. Longer cables can pick up more noise. Choose the shortest cable that fits your needs. This helps maintain sound quality.
For home studios, cables under 20 feet work well. For larger setups, use balanced cables for longer runs. This keeps the sound clean and clear.
Here’s a quick guide:
| Cable Type | Best Use |
|---|---|
| Balanced (XLR, TRS) | Longer runs, noise reduction |
| Unbalanced (TS, RCA) | Short runs, simple connections |

Credit: www.youtube.com
Connecting Balanced Cables
Connecting balanced cables is essential for reducing noise in your audio setup. Balanced cables help in maintaining audio quality. They are designed to carry signals with less interference. Let’s explore two common types of balanced connections: XLR to XLR and TRS to TRS.
Xlr To Xlr
XLR to XLR connections are common in professional audio setups. These cables have three pins. They ensure a strong signal. Connect the XLR cable from your audio interface’s output to your studio monitor’s input. Make sure the connections are secure. This will help prevent noise and signal loss. XLR cables are known for their durability. They offer a reliable connection for studio monitors.
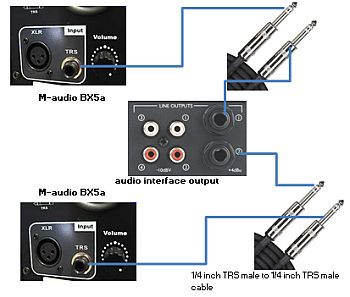
Trs To Trs
TRS to TRS cables are another option for balanced connections. TRS stands for Tip-Ring-Sleeve. These cables have three contact points. This helps in carrying a balanced signal. Connect the TRS cable from the audio interface’s output to the studio monitor’s input. Ensure the plugs are firmly connected. This helps maintain audio quality. TRS cables are versatile and easy to use. They are also widely available, making them a popular choice.
Connecting Unbalanced Cables
Connecting studio monitors to an audio interface can be simple. Unbalanced cables are common. They are often used for short distances. These cables can be RCA or TS types. Here’s how to connect them.
Rca To Rca
RCA cables have two connectors. One is red, and one is white. They are often used in home audio systems. To connect, plug one end into the audio interface. Match the colors. Then, plug the other end into the monitors. Ensure a secure connection. This setup is easy and effective for short distances.
Ts To Ts
TS cables are another unbalanced option. They have a single connector. It looks like a guitar cable. To connect, plug one end into the audio interface. The other end goes into the monitors. Make sure the connections are firm. TS cables are simple to use. They work well for many setups.
Setting Up The Audio Interface
Setting up your audio interface is a crucial step in connecting your studio monitors. This process ensures your monitors receive the correct audio signals. Let’s break it down into easy steps.
Powering On
First, ensure all devices are powered off. Connect the power cable to your audio interface. Plug the other end into a power outlet. Once connected, switch on the power button. Wait for the interface to fully boot up. This prevents any electrical issues or sudden surges.
Configuring Inputs And Outputs
After powering on, focus on configuring the inputs and outputs. This step is essential for proper signal flow.
- Locate the input jacks on the audio interface.
- Connect your audio source (e.g., microphone or instrument) to the input jacks.
- Identify the output jacks, usually labeled as “Output” or “Monitor Out”.
- Use balanced cables (XLR or TRS) to connect the output jacks to your studio monitors.
Check the connection table below for reference:
| Device | Connection Type |
|---|---|
| Microphone | XLR Cable |
| Instrument | TRS Cable |
| Studio Monitors | XLR or TRS Cable |
Ensure all connections are secure. Loose cables can cause signal loss or noise.
Positioning Studio Monitors
Properly positioning studio monitors is crucial for achieving accurate sound. The right placement can make a huge difference in the quality of your audio. Let’s explore the best practices for positioning studio monitors.
Optimal Placement
To achieve the best sound quality, place your studio monitors at ear level. The tweeters should align with your ears when you are in your listening position. Follow the equilateral triangle rule for optimal placement. This means the distance between the two monitors and the distance from each monitor to your listening position should be equal.
Consider using stands or mounts to adjust the height of your monitors. This helps avoid placing them directly on the desk, which can cause vibrations and affect sound quality. Keep the monitors at least 12 inches away from the walls to prevent low-frequency buildup.
Avoiding Reflections
Reflections from hard surfaces can distort sound. To minimize reflections, avoid placing monitors too close to walls or large reflective surfaces. Using acoustic panels can help absorb sound waves and reduce reflections. Position these panels on the walls at the first reflection points.
To find these points, sit in your listening position and have a friend move a mirror along the wall. Mark the spots where you see the monitors in the mirror. These are your first reflection points. Place acoustic panels at these spots to improve sound clarity.
| Placement Tips | Benefits |
|---|---|
| Ear Level | Accurate sound representation |
| Equilateral Triangle | Balanced stereo image |
| 12 inches from walls | Reduced low-frequency buildup |
| Acoustic Panels | Minimized reflections |
Properly positioning your studio monitors can significantly enhance your listening experience. By following these guidelines, you’ll ensure a clear and accurate sound in your studio.

Credit: www.canamlogistics.com
Adjusting Monitor Settings
Properly adjusting monitor settings can make a big difference in your sound. This process involves tweaking volume control and EQ settings. These adjustments help get the best audio quality from your studio monitors.
Volume Control
Start with the volume control. Each monitor has its own volume knob. Set each monitor at the same level. This ensures balanced audio output. Use a reference track to find the right volume. Keep it at a moderate level to avoid distortion.
Eq Settings
Next, focus on EQ settings. EQ adjusts the balance of frequencies. Each monitor may have different EQ options. Look for controls like bass and treble. Set them to neutral for a flat response. This gives a true representation of the sound. Fine-tune based on your room acoustics. Test with different types of music. Make small adjustments until the sound is clear and accurate.
Testing The Connection
After setting up your studio monitors and audio interface, it’s crucial to test the connection. This ensures everything works correctly and helps you identify any potential issues. Testing involves playing audio and troubleshooting common problems. Let’s dive into the steps.
Playing Test Audio
First, play a test audio track to check the sound output. Choose a high-quality track with clear highs, mids, and lows. Connect your audio source to the audio interface. Then, ensure the volume levels are set to a moderate level. Play the track and listen carefully.
Pay attention to any distortions or unusual noises. The sound should be clear and well-balanced. If the audio quality meets your expectations, your connection is likely good. If not, move on to troubleshooting.
Troubleshooting Common Issues
Sometimes, you may encounter issues during testing. Common problems include no sound, distorted audio, or uneven sound between monitors. Start by checking all cables and connections. Ensure everything is plugged in securely.
If there’s no sound, verify the audio interface is powered on. Check the software settings on your computer. Make sure the audio interface is selected as the output device. For distorted audio, adjust the volume levels. Too high or too low levels can cause issues.
For uneven sound, check the balance settings on your audio interface. Ensure both monitors are receiving equal signals. If problems persist, consult the user manuals. They often have troubleshooting guides specific to your equipment.
Credit: atseries.net
Maintaining Your Setup
Keeping your studio monitors and audio interface in top condition is essential. Regular maintenance ensures the best sound quality and prolongs the life of your gear. Here are some tips to help you maintain your setup.
Regular Cleaning
Dust and dirt can accumulate on your studio monitors and audio interface. This can affect their performance. Use a soft, dry cloth to wipe down your equipment weekly.
- Use a microfiber cloth to avoid scratches.
- Compressed air can help remove dust from hard-to-reach areas.
Cleaning your gear regularly will keep it looking new and performing at its best.
Checking For Wear And Tear
Regular inspections can help you spot potential issues before they become problems. Check your cables and connections for signs of wear and tear.
| Item | What to Check | Action |
|---|---|---|
| Cables | Fraying or exposed wires | Replace if damaged |
| Connectors | Loose or corroded | Tighten or clean |
Regular checks can prevent interruptions in your work and ensure a smooth recording experience.
Frequently Asked Questions
How Do I Connect Studio Monitors To An Audio Interface?
To connect studio monitors to an audio interface, use balanced XLR or TRS cables. Plug the cables from the audio interface’s output to the studio monitors’ input.
What Cables Do I Need For Studio Monitors?
You need balanced XLR or TRS cables to connect studio monitors. These cables ensure a clean and noise-free connection.
Can I Use Rca Cables With Studio Monitors?
Yes, you can use RCA cables with studio monitors. However, balanced XLR or TRS cables provide better audio quality and less noise.
Do I Need An Audio Interface For Studio Monitors?
Yes, an audio interface is essential for studio monitors. It ensures high-quality audio conversion and connectivity to your computer.
Conclusion
Connecting studio monitors to an audio interface can improve your sound quality. Follow the steps to ensure proper connections and settings. Double-check cables and ports for a secure fit. Adjust volume levels on your interface and monitors. Enjoy clearer, more accurate audio.

Practice these steps, and soon it will become second nature. Your music production experience will feel more professional. Happy recording!
{ “@context”: “https://schema.org”, “@type”: “FAQPage”, “mainEntity”: [ { “@type”: “Question”, “name”: “How do I connect studio monitors to an audio interface?”, “acceptedAnswer”: { “@type”: “Answer”, “text”: “To connect studio monitors to an audio interface, use balanced XLR or TRS cables. Plug the cables from the audio interface’s output to the studio monitors’ input.” } } , { “@type”: “Question”, “name”: “What cables do I need for studio monitors?”, “acceptedAnswer”: { “@type”: “Answer”, “text”: “You need balanced XLR or TRS cables to connect studio monitors. These cables ensure a clean and noise-free connection.” } } , { “@type”: “Question”, “name”: “Can I use RCA cables with studio monitors?”, “acceptedAnswer”: { “@type”: “Answer”, “text”: “Yes, you can use RCA cables with studio monitors. However, balanced XLR or TRS cables provide better audio quality and less noise.” } } , { “@type”: “Question”, “name”: “Do I need an audio interface for studio monitors?”, “acceptedAnswer”: { “@type”: “Answer”, “text”: “Yes, an audio interface is essential for studio monitors. It ensures high-quality audio conversion and connectivity to your computer.” } } ] }As an Amazon Associate, Cleanestor earns from qualifying purchases at no additional cost to you.