You can save your GarageBand project as an MP3 file quickly. It’s easy and involves just a few steps.
GarageBand is a popular music creation tool for Mac users. Musicians and podcasters love its features. But sometimes, sharing projects can be tricky. MP3 is a widely used audio format. It’s compatible with most devices and platforms. Knowing how to save your GarageBand project as an MP3 can be very helpful.
This blog post will guide you through the process, ensuring your music or podcast is ready to share. Stick with us, and you’ll master this essential skill in no time.
Credit: www.youtube.com
Introduction To Garageband
Saving your Garageband project as an MP3 is easy and quick. First, finish your project. Then, select “Share” from the menu, choose “Export Song to Disk,” and pick MP3 format. This method ensures your music is ready to share.
Garageband is a popular digital audio workstation. Apple Inc. developed it for macOS and iOS. It lets users create music and podcasts easily. The software is user-friendly and offers many features. Even beginners can produce professional-quality audio.
What Is Garageband?
Garageband is a software application. It allows users to create and edit music. You can record live instruments. You can also use virtual instruments. The interface is intuitive. It is ideal for both new and experienced musicians.
Key Features
Garageband offers a range of features. It includes a variety of virtual instruments. Users can access a large library of loops. These loops help in creating complex compositions. The software supports multi-track recording. You can mix and edit multiple tracks at once.
Garageband also provides a range of effects. You can add reverb, echo, and other sound effects. The software comes with built-in lessons. These lessons help users learn to play instruments. The interface is designed to be easy to use. Even those new to music production can start quickly.
“`
Credit: www.imobie.com
Setting Up Your Project
Getting started with GarageBand can seem difficult, but it’s easy with the right steps. The first step is to set up your project correctly. This ensures your final product is polished and professional. Below, we will guide you through creating a new project and importing audio files.
Creating A New Project
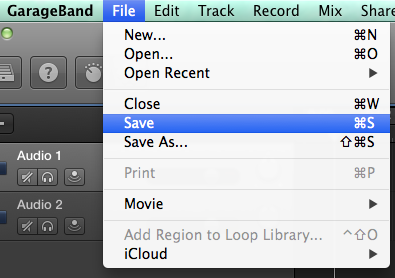
Open GarageBand and click on “File” in the top menu. Select “New” to create a new project. Choose the type of project you want to work on. You can select from options like “Empty Project” or “Hip Hop.” Click “Choose” and name your project. Pick a location to save your file and click “Create.”
Importing Audio Files
To import audio files, click on “File” in the top menu. Select “Import” and navigate to the audio file you want to use. Click on the file and then click “Open.” Your audio file will appear in the workspace. Drag the file to the desired track. Repeat this process for additional files.
Editing Your Track
Save your GarageBand project as an MP3 by selecting “Share” and then “Export Song to Disk. ” Choose MP3 format and save the file.
Editing your track in GarageBand is essential to create a polished sound. This process can turn raw recordings into a professional-sounding track. Here, we will explore basic editing tools and adding effects to your track.
Basic Editing Tools
GarageBand offers several tools to fine-tune your tracks. Use the cut, copy, and paste functions to rearrange sections. Trim unwanted parts by dragging the edges of your track. The loop tool helps you repeat a section seamlessly. Zoom in for precise edits and zoom out to see the whole track.
Adding Effects
Effects can enhance your track significantly. Use reverb to create space and depth. Add delay for an echo effect. The equalizer helps balance frequencies for a clear sound. Experiment with different effects to find the best combination. Always listen to the changes to ensure they improve your track.
“`
Exporting Your Track
You’ve spent hours perfecting your track in GarageBand. Now, you want to share it with the world. Exporting your track as an MP3 is easy and quick. Follow these steps to ensure your music sounds great on any device.
Preparing For Export
Before exporting, make sure your track is complete. Listen through your project to catch any mistakes or changes. Adjust volume levels and add final touches. Ensure all instruments and vocals are balanced.
Here’s a quick checklist:
- Check for any clipping or distortion
- Ensure all effects are applied correctly
- Confirm the track length is as desired
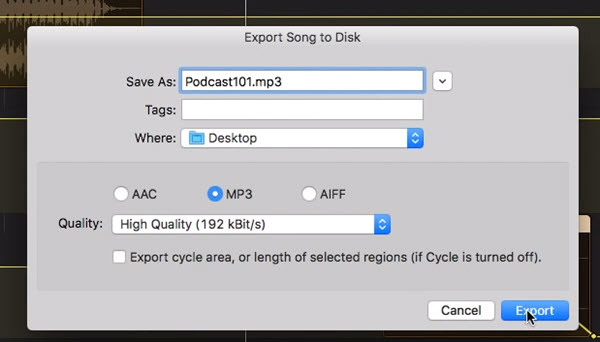
Selecting Export Options
Now, it’s time to select the export options.
- Click on Share in the menu bar.
- Select Export Song to Disk.
- Choose the MP3 format from the options.
Adjust the quality settings. Higher quality means a larger file size. Choose the bit rate that suits your needs. The common bit rates are:
| Bit Rate | Quality | File Size |
|---|---|---|
| 128 kbps | Good | Small |
| 192 kbps | Better | Medium |
| 320 kbps | Best | Large |
Select the desired bit rate and click Export. Choose the destination folder for your MP3 file. Your track will be saved as an MP3 and ready to share.
Saving As Mp3
Saving your GarageBand project as an MP3 is a straightforward process. This allows you to share your music files easily. MP3 files are widely supported and compress your audio efficiently. Let’s look at the steps involved in saving your project as an MP3.
Choosing The Right Format
First, you need to export your project. Click on “Share” in the top menu. Select “Export Song to Disk.” A new window will pop up. Here, you can choose the format. To save as an MP3, select “MP3” from the list of options. This ensures your file is compatible with most devices.
Adjusting Quality Settings
After choosing MP3, you can adjust the quality settings. These settings affect the file size and audio quality. You will see options like “Low Quality,” “Medium Quality,” and “High Quality.” Choose “High Quality” for the best sound. It will create a larger file but offers better audio clarity.
If you need a smaller file, choose “Medium Quality” or “Low Quality.” These options reduce the file size. But, the sound quality will not be as good. Select the quality that best meets your needs.
Credit: www.videoproc.com
Using Itunes For Conversion
If you have created a project in GarageBand and need it in MP3 format, iTunes can help. Using iTunes for conversion is easy and reliable. Follow these steps to convert your GarageBand project into an MP3 file.
Importing To Itunes
First, you need to export your GarageBand project. Follow these steps:
- Open your project in GarageBand.
- Click on Share in the top menu.
- Select Export Song to Disk.
- Choose the format as AIFF, WAV, or CAF.
- Click Export and save the file.
Now, import this exported file to iTunes:
- Open iTunes.
- Drag the exported file into the iTunes library.
- The file will appear in your iTunes library, ready for conversion.
Converting To Mp3 In Itunes
Once the file is in iTunes, follow these steps to convert it to MP3:
- In iTunes, click on iTunes in the top menu.
- Select Preferences.
- Go to the General tab.
- Click on Import Settings.
- Choose MP3 Encoder from the Import Using dropdown menu.
- Click OK to save the settings.
Now, convert the file:
- Find the file in your iTunes library.
- Right-click on the file.
- Select Create MP3 Version.
- iTunes will convert the file to MP3 format.
The MP3 file will appear in your iTunes library, ready for use.
Alternative Export Methods
If you use GarageBand and want to save your project as an MP3, you might wonder about alternative export methods. The built-in options might not meet all your needs. So, consider using other methods to get the job done.
Using Online Converters
Online converters can be handy for converting GarageBand files to MP3. Upload your exported file to one of these sites. They will convert it for you. This method is quick and easy. No need to install extra software. Many online converters are free to use. Just be cautious with your files. Ensure the site is trustworthy to protect your data.
Third-party Software Options
Third-party software can also help save GarageBand files as MP3. Programs like Audacity or LAME MP3 Encoder are popular choices. Download and install the software. Export your GarageBand file in a compatible format. Then, open it in the third-party program. Use the software to convert it to MP3. This method gives you more control over the output quality. It might require more steps, but it’s reliable.
Troubleshooting Common Issues
Experiencing issues while saving Garageband files as MP3 can be frustrating. This section will help you troubleshoot common problems. We will cover two main issues: Audio Quality Problems and Export Errors. Let’s dive into these problems and find solutions.
Audio Quality Problems
Sometimes, the audio quality might not be as expected. Here are some steps to address this:
- Check your input settings. Ensure you are using the correct microphone or instrument settings.
- Verify your output settings. Make sure the export settings match your desired quality.
- Use headphones to monitor your sound. This helps to catch any issues early.
Adjusting these settings can often resolve audio quality problems. If the issue persists, consider the following:
- Update Garageband. Sometimes updates fix bugs related to audio quality.
- Check for background noise. Ensure your recording environment is quiet.
Export Errors
Encountering errors while exporting your file can be annoying. Here are steps to troubleshoot:
- Ensure you have enough disk space. A full disk can cause export failures.
- Check your file format. Make sure you are exporting as MP3.
- Review the export settings. Sometimes, incorrect settings can cause errors.
Here’s a quick table to summarize common errors and solutions:
| Error | Solution |
|---|---|
| Insufficient Disk Space | Free up disk space and try again |
| Incorrect File Format | Select MP3 format in export settings |
| Export Settings Error | Review and adjust export settings |
By following these steps and referring to the table, you can resolve many export errors. Remember to save your work frequently to avoid losing progress.
Frequently Asked Questions
How Do I Convert Garageband Files To Mp3?
To convert GarageBand files to MP3, first export your project. Then, use iTunes or an online converter to save it as an MP3.
Can You Save Garageband As Mp3 Directly?
No, GarageBand does not directly save as MP3. You need to export your project and use another tool to convert it.
What Format Does Garageband Export?
GarageBand exports projects in M4A format. You can then convert the M4A file to MP3 using iTunes or other converters.
Why Can’t I Save Garageband As Mp3?
GarageBand does not support direct MP3 export. You need to export your project in M4A format and then convert it.
Conclusion
Saving GarageBand files as MP3s is simple and quick. Follow the steps outlined. Export your project to an MP3 file easily. Share your music with friends or upload online. GarageBand offers user-friendly tools for all. Now, you know how to save your work in MP3 format.

Enjoy creating and sharing your music effortlessly. Keep exploring GarageBand for more features and tips. Happy music-making!
As an Amazon Associate, Cleanestor earns from qualifying purchases at no additional cost to you.