
Removing vocals from a song on Garageband is easier than you think. With a few simple steps, you can create instrumental tracks.
Garageband is a powerful tool for music enthusiasts. It offers many features, including the ability to edit audio tracks. One common task is removing vocals from a song. This can be useful for karaoke, remixes, or just enjoying the music without the lyrics.
In this guide, we will explore how to remove vocals using Garageband. We’ll break down the process into easy steps. By the end, you’ll be able to create your own instrumental tracks. Ready to get started? Let’s dive in!
Credit: www.youtube.com
Introduction To Garageband
Garageband is a powerful music creation software developed by Apple. It’s available for Mac and iOS devices. With Garageband, you can create, edit, and produce high-quality music tracks. One useful feature of Garageband is the ability to remove vocals from a song. This makes it easier for users to create instrumental versions of their favorite tracks.
What Is Garageband?
Garageband is a digital audio workstation (DAW). It allows users to record and mix music. Designed with beginners in mind, it offers a user-friendly interface. You don’t need to be a professional to start creating music with Garageband.
The software supports various music genres. From rock to electronic, you can experiment with different sounds. It includes pre-recorded loops, virtual instruments, and a range of audio effects. This makes it a versatile tool for music enthusiasts.
Key Features Of Garageband
Garageband offers many features that make it a top choice for music production. Here are some key features:
- Multi-Track Recording: Record multiple tracks simultaneously.
- Virtual Instruments: Access a library of virtual instruments, including drums, pianos, and guitars.
- Pre-recorded Loops: Use over 1,000 Apple Loops to enhance your music.
- Audio Effects: Apply various effects like reverb, compression, and EQ.
- Editing Tools: Cut, copy, paste, and move sections of your track.
- Mixing: Adjust the volume, pan, and effects of each track.
With these features, Garageband makes music production accessible to everyone. Whether you’re a beginner or an experienced musician, Garageband provides the tools you need.

Credit: multimedia.easeus.com
Preparing Your Track
Preparing your track is the first crucial step in removing vocals from a song on Garageband. This process ensures that the song is ready for editing. By following these steps, you’ll set yourself up for success.
Importing The Song
First, open Garageband and create a new project. Choose the “Empty Project” option and click “Choose.” A new window will appear. Select “Audio” and click “Create.” Next, drag and drop the song file into the workspace. If the song is not in MP3 format, convert it first. Now, your song should appear as a new track.
Setting Up Your Workspace
With your song imported, it’s time to set up your workspace. Ensure the track is selected. Click on the “Smart Controls” button at the top left. A new panel will appear at the bottom. Here, you can adjust various settings. Focus on the EQ and effects. These tools will help you isolate the vocals.
Next, click on the “Track” menu at the top and select “New Track.” Choose “Audio” and click “Create.” This will be your new working track. Ensure both tracks are visible and properly aligned. Now, you are ready to start editing.
Using The Equalizer
Using the Equalizer in Garageband is a powerful way to remove vocals from a song. The equalizer allows you to adjust specific frequencies. This can help you isolate and reduce the vocal range.
Accessing The Equalizer
First, open Garageband and load your song. Look for the “Track” menu at the top. Click on it and select “Show EQ”. This will open the equalizer panel. Here, you can see a visual representation of your song’s frequencies.
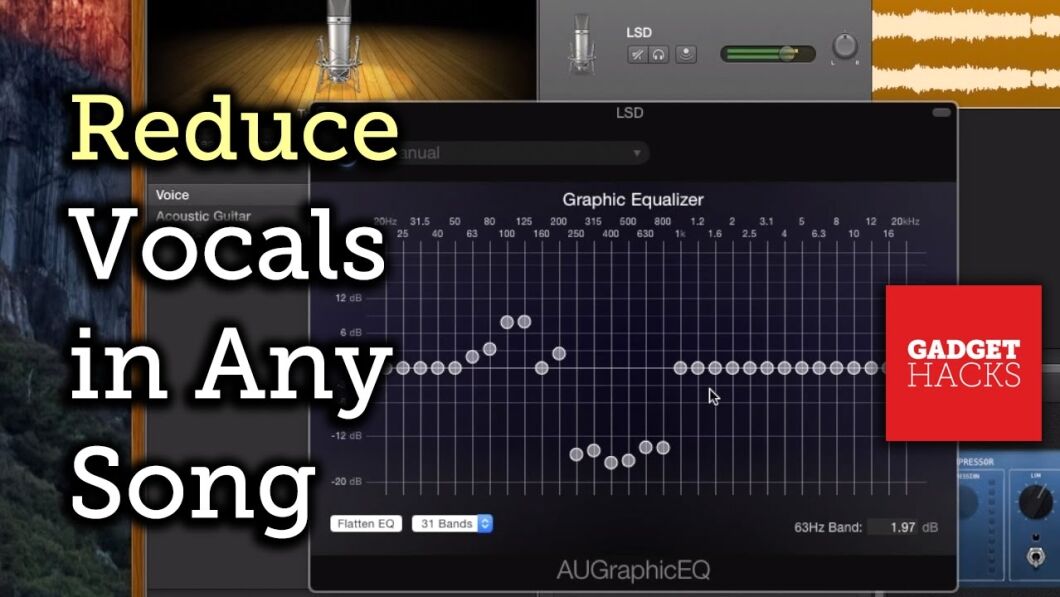
Adjusting Frequency Levels
Vocals typically sit between 1 kHz and 3 kHz. To reduce these frequencies, click on a point in this range. Drag it down to lower the volume. You may need to experiment with different points. Listen to the changes as you adjust.
Be careful not to lower other important frequencies. This can affect the overall sound quality. Make small adjustments and test the results. Repeat until the vocals are minimized.
Applying Audio Filters
Applying audio filters is a crucial step in removing vocals from a song on Garageband. These filters help isolate and eliminate unwanted frequencies, making it easier to achieve a cleaner instrumental track. Below, we will discuss two essential filters: High-Pass Filter and Low-Pass Filter.
High-pass Filter
A High-Pass Filter allows high-frequency sounds to pass through while removing lower frequencies. This can be useful in cutting out bass and other low-end sounds that may contain the vocal frequencies.
- Open your track in Garageband.
- Select the track you wish to edit.
- Go to the “Track” menu and choose “Show EQ.”
- In the EQ window, locate the High-Pass Filter section.
- Adjust the frequency slider to remove low-end sounds.
By adjusting the High-Pass Filter, you can focus on higher frequencies, which often contain instrumental elements.
Low-pass Filter
A Low-Pass Filter allows low-frequency sounds to pass through while removing higher frequencies. This can help eliminate vocals and other high-pitched elements.
- Open your track in Garageband.
- Select the track you wish to edit.
- Go to the “Track” menu and choose “Show EQ.”
- In the EQ window, locate the Low-Pass Filter section.
- Adjust the frequency slider to remove high-end sounds.
Adjusting the Low-Pass Filter can help isolate the instrumental lower frequencies, reducing the prominence of vocals.
Using High-Pass and Low-Pass Filters together can significantly enhance your ability to remove vocals and create a cleaner instrumental track. Experiment with different settings to find the right balance for your song.
Advanced Techniques
Removing vocals from a song using GarageBand can be straightforward. Yet, to achieve the best results, you may need advanced techniques. These methods provide better clarity and precision. Here, we will explore two such techniques: Phase Cancellation and Using Third-Party Plugins.
Phase Cancellation
Phase cancellation is a method used to remove vocals by inverting the phase of one of the stereo channels. This technique can be effective, but it requires precision.
Here’s how you can perform phase cancellation in GarageBand:
- Import the song into GarageBand.
- Duplicate the track by selecting the track and pressing
Command + D. - Pan one track hard left and the other hard right.
- Invert the phase of one track. Unfortunately, GarageBand doesn’t have a built-in phase inversion tool. You will need to use a third-party plugin for this step.
Once the phase is inverted, the vocals should be minimized. This method works best on tracks where vocals are centered in the mix.
Using Third-party Plugins
Third-party plugins can enhance GarageBand’s capabilities. They can help achieve better vocal removal. Some popular plugins for this purpose include:
- iZotope RX: Known for its advanced audio editing features.
- VocalZap: A simpler tool for quick vocal removal.
To use these plugins:
- Download and install the plugin on your computer.
- Open GarageBand and go to the track where you want to remove vocals.
- Select the plugin from the audio effects menu.
- Adjust the plugin settings to minimize the vocals as much as possible.
Using third-party plugins can provide a more intuitive interface. They often deliver better results than manual methods.
Finalizing The Track
Finalizing the track after removing vocals from a song on Garageband is a crucial step. This ensures your edited track sounds polished and professional. We’ll guide you through this final process.
Listening For Quality
Before exporting, listen to your track carefully. Use headphones for better sound quality. Check for any unwanted background noise or remnants of the original vocals. Ensure the audio balance is perfect.
Play the track multiple times. Listen for any inconsistencies or audio issues. Make necessary adjustments in the Garageband editor. Pay attention to the timing and synchronization of the music.
Exporting Your Edited Song
Once you are satisfied with the quality, it’s time to export. Follow these steps:
- Click on the “Share” menu at the top.
- Select “Export Song to Disk”.
- Choose your desired file format (e.g., MP3, WAV).
- Set the audio quality (good, high, or best).
- Click “Export”.
Your edited song is now ready for sharing or further processing. Ensure the exported file is saved in a location you can easily access.
Common Mistakes To Avoid
Removing vocals from a song in GarageBand can seem tricky. Many beginners make common mistakes that affect the final result. Knowing these mistakes helps you avoid them and achieve better outcomes.
Over-filtering
One common mistake is over-filtering. It happens when you apply too many filters. This can make the song sound unnatural. Some filters may remove essential parts of the music. Your song will lack depth and richness. So, use filters sparingly.
Ignoring Track Quality
Another mistake is ignoring track quality. Not all tracks are created equal. A low-quality track will give poor results. Ensure your audio file is high quality. This will make the vocal removal process smoother. And the final output will sound better.
Additional Resources
When you’re diving into removing vocals from a song on Garageband, you might need extra help. Many resources can guide you and answer your questions. Here are some useful sources to boost your skills.
Helpful Tutorials
Watching tutorials can make the learning process easier. They offer visual and step-by-step instructions. Some popular platforms for tutorials include:
- YouTube: Many channels provide Garageband tutorials. Search for specific videos on removing vocals.
- Udemy: This platform offers detailed courses. Some are free, while others are paid.
- Skillshare: You can find many classes on music production and Garageband.
Online Communities
Joining online communities can be very helpful. You can ask questions and share tips with other users. Some popular communities are:
- Reddit: Subreddits like r/GarageBand are great for discussions.
- Quora: You can find many threads about Garageband tips. People share their experiences and solutions.
- Facebook Groups: Search for groups related to Garageband and music production.
These resources can provide support and deepen your understanding of removing vocals on Garageband. Explore these options to enhance your skills.
Frequently Asked Questions
How Do You Remove Vocals From A Song In Garageband?
To remove vocals, use the “Vocal Reduction” feature in GarageBand. Import your track, then apply the “Channel EQ” effect. Adjust the frequency to isolate and reduce the vocal range.
Can Garageband Completely Remove Vocals?
GarageBand can reduce vocals significantly, but complete removal is challenging. The result depends on the track’s mixing and quality.
Is It Free To Remove Vocals In Garageband?
Yes, removing vocals in GarageBand is free. GarageBand itself is a free application for macOS and iOS users.
What Is The Best Tool In Garageband For Vocal Removal?
The best tool in GarageBand for vocal removal is the “Channel EQ” effect. It allows frequency adjustments to reduce vocals.
Conclusion
Removing vocals in GarageBand is simple with the right steps. Start by importing your song. Then, use the EQ tool to isolate the vocal frequencies. Adjust the settings until the vocals are minimized. Finally, export your new instrumental track. With some practice, this process becomes easier.

Experiment with different songs and techniques. You’ll quickly get the hang of it. Keep creating and enjoy making your unique tracks. GarageBand offers powerful tools for all music enthusiasts. Happy editing!
As an Amazon Associate, Cleanestor earns from qualifying purchases at no additional cost to you.