Looking for the Equalizer in Audacity? It’s a common tool for audio editing.
Audacity, a popular audio editing software, offers many features. One essential feature is the Equalizer. This tool helps adjust audio frequencies, making your recordings sound professional. Whether you’re a podcast creator, musician, or hobbyist, learning to locate and use the Equalizer can enhance your projects.
In this blog post, we’ll guide you step-by-step on finding the Equalizer in Audacity. This will help you make the most of this powerful tool. So, let’s dive in and explore how to improve your audio with Audacity’s Equalizer feature.
Credit: www.youtube.com
Introduction To Audacity
Audacity is a popular audio editing software. It is free and easy to use. Many people use it to edit music, podcasts, and other audio projects. It works on Windows, Mac, and Linux. Let’s learn more about this tool.
What Is Audacity?
Audacity is an open-source audio editing program. It allows users to record and edit sounds. This software is used by beginners and professionals. It is known for its user-friendly interface. You can download it for free from its official website.
Key Features
Audacity offers many features for audio editing. Below are some key features:
- Multi-track editing: Edit multiple audio tracks at once.
- Recording: Record live audio through a microphone or mixer.
- Import and export: Import and export various file formats like WAV, MP3, and OGG.
- Effects: Apply effects like echo, reverb, and equalization to your tracks.
- Analysis tools: Use tools to analyze audio frequencies and levels.
Audacity also has an equalizer feature. This helps you adjust the balance between frequency components. It is useful for improving sound quality.

Credit: music.tutsplus.com
Importance Of Equalizers
Equalizers are vital tools in audio editing. They allow you to balance sound frequencies, enhancing the quality of your audio projects. By adjusting the levels of different frequencies, you can make your recordings clearer and more pleasant to listen to.
Role In Audio Editing
Equalizers play a crucial role in audio editing. They help in shaping the sound of your recordings. By using an equalizer, you can adjust various frequency bands. This helps to enhance or reduce specific sounds in your audio.
For example, you can increase the bass for a deeper sound. Or, you can reduce the treble to cut down on harshness. This makes your audio more balanced and professional-sounding.
Benefits Of Using Equalizers
Using equalizers in Audacity offers several benefits:
- Improves audio clarity: By adjusting frequencies, you can make the sound clearer.
- Reduces noise: Equalizers help to minimize unwanted background noise.
- Enhances specific sounds: You can highlight vocals or instruments.
- Balances different elements: Equalizers ensure all parts of your audio mix are well-balanced.
Here’s a simple table to illustrate the effects of different frequency adjustments:
| Frequency Range | Effect |
|---|---|
| 20 Hz – 60 Hz | Deep bass, power |
| 60 Hz – 250 Hz | Bass, warmth |
| 250 Hz – 500 Hz | Fullness, muddiness |
| 500 Hz – 2 kHz | Body, honk |
| 2 kHz – 4 kHz | Presence, clarity |
| 4 kHz – 6 kHz | Sharpness, sibilance |
| 6 kHz – 20 kHz | Brilliance, air |
In summary, equalizers are essential for fine-tuning your audio. They help you achieve a professional sound by balancing different frequencies. This makes your recordings more enjoyable and polished.
Navigating Audacity’s Interface
Audacity is a popular audio editing software used by many. To use it effectively, you need to know how to navigate its interface. This guide will help you find the equalizer and other tools in Audacity.
Main Dashboard
The main dashboard is where you start in Audacity. Here, you can see all your audio tracks. At the top, there are menus for file, edit, and other functions. Below the menus, there are icons for common actions like play, pause, and stop.
On the left side, you find the toolbar with various tools. This is your control panel for editing audio. It includes selection, envelope, draw, and zoom tools. Knowing these tools will help you navigate Audacity with ease.
Common Tools
Understanding common tools is key to using Audacity. The selection tool lets you choose parts of the audio to edit. The envelope tool helps you adjust volume over time. The draw tool allows precise editing of waveforms. The zoom tool lets you see the audio in more detail.
To find the equalizer, go to the ‘Effect’ menu at the top. Click ‘Equalization’ to open the equalizer window. Here, you can adjust frequencies to enhance your audio. This tool is essential for improving sound quality.
With these tips, navigating Audacity’s interface becomes easier. You can find and use the equalizer effectively. Happy editing!
Finding The Equalizer
Audacity is a popular tool for editing audio. Many users seek the Equalizer feature to enhance their audio tracks. This guide will help you find and use the Equalizer in Audacity.
Step-by-step Guide
First, open Audacity on your computer. Ensure your audio file is loaded. This guide will show you the steps to locate the Equalizer.
Accessing Equalizer Settings
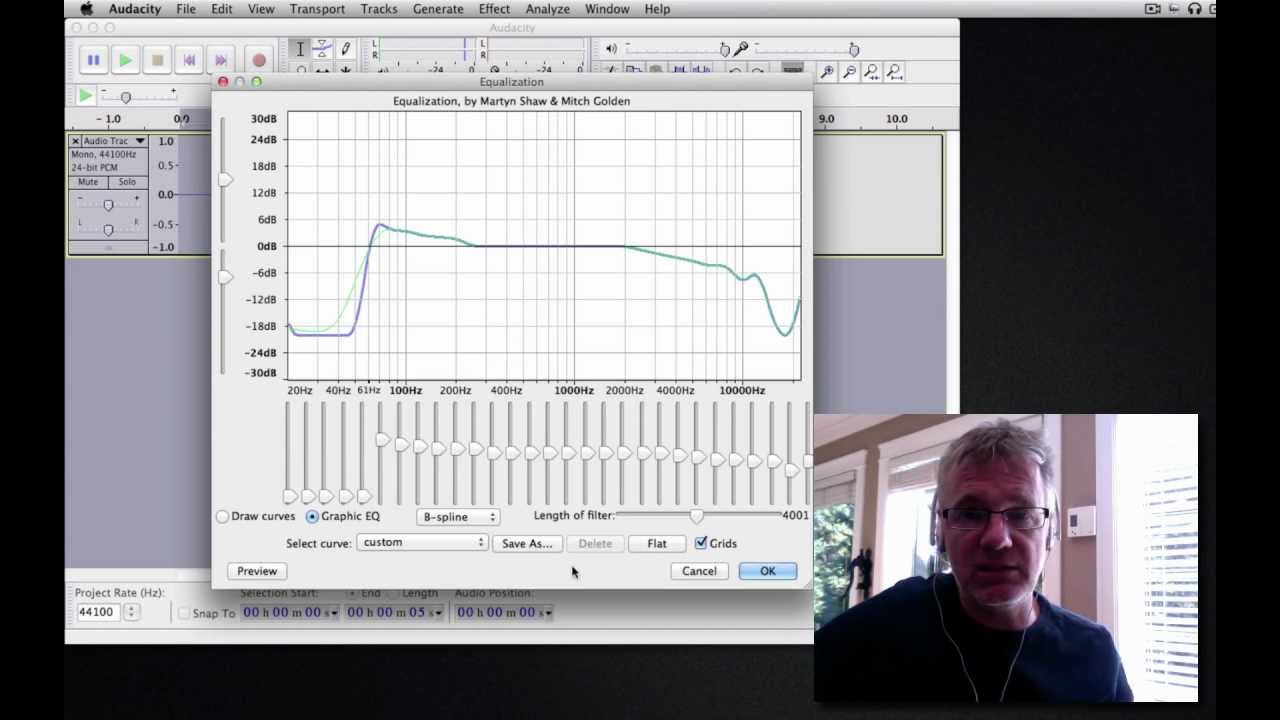
Click on the “Effect” menu at the top of the screen. Scroll down until you see “Equalization”. Click on it to open the Equalizer settings. Here, you can adjust the frequencies to improve your audio.
Using The Equalizer
Audacity is a popular audio editing software. It offers many tools for enhancing sound quality. One of the key tools is the equalizer. The equalizer allows you to adjust various frequency bands of your audio. This helps in making your recordings sound better. In this section, we will explore how to use the equalizer in Audacity.
Basic Adjustments
To start with the equalizer in Audacity, follow these steps:
- Open your audio file in Audacity.
- Click on the Effect menu at the top.
- Select Equalization from the drop-down menu.
You will now see a graph with a line. This represents the frequencies in your audio. You can adjust these frequencies by moving the points on the line. Dragging a point up will increase that frequency. Dragging it down will decrease it.
Advanced Techniques
For more advanced users, the equalizer offers further customization. Here are some techniques:
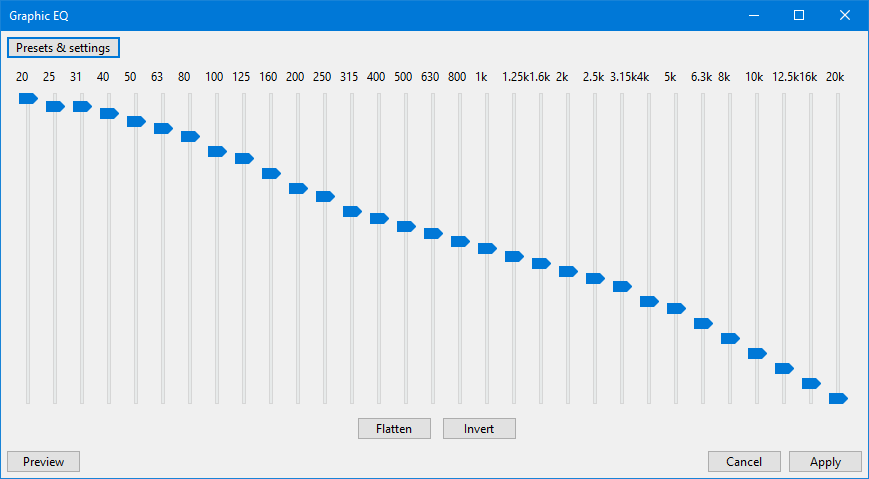
- Graphic EQ: You can adjust specific frequency bands with sliders.
- Parametric EQ: This allows you to set the center frequency, gain, and bandwidth.
- Presets: Audacity provides several presets for common adjustments. These can save time and provide a good starting point.
Using these advanced techniques can help you fine-tune your audio. Experiment with different settings to find what works best for your project.
Credit: manual.audacityteam.org
Customizing Equalizer Settings
Customizing equalizer settings in Audacity can enhance your audio projects. With the right tweaks, you can make your tracks sound professional. This guide will show you how to save presets and apply custom settings.
Saving Presets
After adjusting the equalizer, you might want to save your settings. To do this, click on the “Save/Manage Curves” button. A dialog box will appear. Enter a name for your preset. Click “Save” to store your custom settings. Now, you can quickly apply these settings to other projects.
Applying Custom Settings
Applying your saved presets is simple. Open the equalizer and click “Save/Manage Curves.” Select your preset from the list. Click “Load” to apply the preset. Your custom settings will now adjust the audio. This makes it easy to maintain consistency across your projects.
Troubleshooting Common Issues
Experiencing issues with finding the Equalizer in Audacity can be frustrating. Whether the Equalizer is not visible or you are encountering error messages, troubleshooting these problems is essential. Here are some common issues and how to address them.
Equalizer Not Visible
If the Equalizer is not visible in Audacity, start by checking the View menu. Follow these steps:
- Click on View in the top menu.
- Select Toolbars from the dropdown.
- Ensure the Equalizer option is checked.
If the Equalizer is still not visible, it might be hidden behind other toolbars. Try rearranging the toolbars by:
- Clicking and dragging them to different positions.
- Resizing the Audacity window to see if the Equalizer appears.
Error Messages
Sometimes, error messages can prevent the Equalizer from functioning. Common error messages include:
- “Plugin not found”
- “Invalid Effect”
To resolve these issues, try the following:
- Ensure that the Equalizer plugin is installed correctly.
- Check the Audacity Preferences under the Effects tab.
- Update Audacity to the latest version.
- Reinstall the Equalizer plugin if necessary.
Always restart Audacity after making changes to settings or plugins to ensure they take effect.
Tips And Tricks
Audacity is a powerful audio editing tool. It is popular among both beginners and experts. One of its useful features is the Equalizer. This tool helps adjust the balance between frequency components. Here are some tips and tricks to make the most of it.
Best Practices
First, start with a preset. Audacity offers several presets for different needs. These presets are great starting points. Use them to understand how the Equalizer works.
Next, make small adjustments. Big changes can distort your audio. Small, incremental changes work better. This way, you can fine-tune the sound without losing quality.
Listen often. Make changes, then listen. This helps you hear how each adjustment affects the audio. It also helps you catch any mistakes early.
Expert Recommendations
Experts recommend using the graphic EQ. It offers more control over specific frequencies. You can boost or cut precise ranges. This can improve the clarity of your audio.
Another tip is to cut rather than boost. Reducing unwanted frequencies often sounds better. Boosting can introduce noise and distortion.
Finally, use the Equalizer in conjunction with other tools. Combine it with compressors and limiters. This creates a balanced and polished final product.
Frequently Asked Questions
Where Is The Equalizer In Audacity?
The equalizer in Audacity is located under the “Effect” menu. Select “Graphic EQ” to adjust frequencies.
How Do I Adjust Frequencies In Audacity?
To adjust frequencies, open the “Effect” menu and choose “Graphic EQ”. Then, move the sliders.
Can I Customize The Equalizer Settings In Audacity?
Yes, you can customize the equalizer settings. Use the “Graphic EQ” to adjust specific frequency bands.
Does Audacity Have A Built-in Equalizer?
Yes, Audacity has a built-in equalizer. Access it through the “Effect” menu under “Graphic EQ”.
Conclusion
Finding the Equalizer in Audacity is simple once you know where to look. Open Audacity, go to the “Effect” menu, and select “Equalization. ” This tool helps you adjust audio frequencies easily. Experiment with different settings to enhance your audio.

Practice makes perfect, so don’t be afraid to try new adjustments. Your audio projects will sound better with the right equalizer settings. Now, you are ready to improve your audio quality in Audacity.
As an Amazon Associate, Cleanestor earns from qualifying purchases at no additional cost to you.