Yes, you can batch loudness normalization in Audacity. This feature is useful for processing multiple audio files at once, saving time and effort.
Audio editing can be time-consuming, especially when dealing with several files. Audacity, a popular free audio editor, offers a batch processing feature. This allows you to apply loudness normalization to many files simultaneously. This is perfect for podcasters, musicians, or anyone working with multiple audio tracks.
Understanding how to use this feature can make your audio editing workflow more efficient. In this guide, we will explore the steps to batch loudness normalization in Audacity. This will help you achieve consistent audio levels across all your files, ensuring a better listening experience for your audience.
Credit: manual.audacityteam.org
Introduction To Loudness Normalization
Introduction to loudness normalization is an essential part of audio editing. It ensures that audio tracks have consistent volume levels. This is especially important when you work with multiple audio files. Audacity, a popular audio editing software, offers tools to achieve this. Let’s dive into what loudness normalization is and why consistent audio levels matter.
What Is Loudness Normalization?
Loudness normalization is a process that adjusts the volume of an audio file. It ensures that all parts of the audio have a similar loudness. This is different from simple volume adjustment. Loudness normalization takes into account the human ear’s sensitivity to different frequencies. It aims to provide a more consistent listening experience.
Importance Of Consistent Audio Levels
Consistent audio levels are crucial for a pleasant listening experience. When audio levels vary too much, it can be jarring for listeners. They might need to constantly adjust their volume. This is especially true in podcasts, music playlists, and multimedia presentations. Consistent audio levels make the content more professional and enjoyable.
Inconsistent audio levels can also affect the perception of your content. People might find it unprofessional or distracting. By normalizing loudness, you ensure your audience focuses on the content, not the volume changes.
Credit: manual.audacityteam.org
Audacity Software
Audacity is a free, open-source audio editing software. It is popular among beginners and professionals alike. Many use it for tasks like recording, editing, and mixing audio files. The software runs on various operating systems, including Windows, Mac, and Linux.
Overview Of Audacity
Audacity offers a simple, user-friendly interface. This makes it easy to navigate and use. You can record live audio, edit sound files, and add effects. The software supports many audio formats like WAV, AIFF, MP3, and OGG.
Audacity allows for multi-track editing. You can work on multiple audio tracks at once. This feature is useful for creating complex audio projects. The software also has a range of built-in effects. These include echo, reverb, and noise reduction.
Key Features For Audio Editing
Audacity provides a wide range of audio editing tools. You can cut, copy, paste, and delete audio segments. The software also allows for precise editing. You can zoom in on waveforms to make detailed adjustments.
Audacity includes tools for adjusting audio levels. You can normalize, amplify, and fade in or out. These tools help achieve consistent volume levels. The software also supports batch processing. This means you can apply changes to multiple files at once.
Another useful feature is the spectral analysis. You can view the frequency content of your audio. This helps identify and fix issues like unwanted noise. Audacity also supports plugins. These extend the software’s capabilities. You can add new effects and tools to enhance your editing experience.
Preparing Your Files
Before diving into loudness normalization in Audacity, it’s crucial to prepare your files. Proper preparation ensures a smooth workflow and optimal results. Let’s start with importing your audio files and organizing your project.
Importing Audio Files
To begin, you need to import your audio files into Audacity. Follow these steps:
- Open Audacity.
- Click on File in the top menu.
- Select Import and then Audio.
- Browse your computer to find the files you need.
- Select the files and click Open.
Your audio files will now appear in the Audacity workspace. This step is essential for batch processing.
Organizing Your Project
Next, organize your project to keep things manageable:
- Create a dedicated folder for your project files.
- Rename each audio file clearly. For example, use numbers or dates.
- Save your Audacity project regularly. Click File and then Save Project.
- Use labels to mark different sections of your audio. Go to Tracks, then Add Label at Selection.
Organizing your project helps you stay on track and avoid confusion. Proper labeling and saving ensure a smooth editing process.
| Task | Steps |
|---|---|
| Import Audio Files | File > Import > Audio > Select Files > Open |
| Save Project | File > Save Project |
| Add Labels | Tracks > Add Label at Selection |
With your files imported and your project organized, you’re ready for the next steps in loudness normalization.
Loudness Normalization Techniques
Loudness normalization is essential in audio editing. It ensures that all audio tracks have a consistent volume level. This is crucial for podcasts, music, and any audio project. In Audacity, you can batch process loudness normalization using different techniques. Let’s explore these techniques in detail.
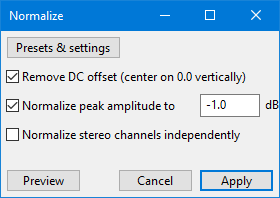
Peak Normalization
Peak normalization adjusts the audio to the highest peak level. This method ensures that the loudest part of your audio reaches a specific level. It doesn’t affect the dynamic range but brings the peaks to a uniform level.
Steps to Apply Peak Normalization in Audacity:
- Open Audacity and import your audio files.
- Select the tracks you want to normalize.
- Go to Effect > Normalize….
- Check the box Normalize peak amplitude to: and set your desired value.
- Click OK to apply the changes.
Rms Normalization
RMS normalization adjusts the average loudness of the audio. It focuses on the overall perceived loudness rather than just the peaks. This method is more consistent with human hearing and provides a balanced output.
Steps to Apply RMS Normalization in Audacity:
- Open Audacity and import your audio files.
- Select the tracks you want to normalize.
- Go to Effect > Normalize….
- Check the box Normalize RMS to: and set your desired value.
- Click OK to apply the changes.
Using these techniques in Audacity can save you time. It ensures consistent audio quality across multiple files. Experiment with both methods to find what works best for your project.
Batch Processing In Audacity
Audacity is a free, open-source software for recording and editing sounds. It offers powerful tools for sound editing. One key feature is batch processing. This allows you to apply the same edits to multiple files at once. It’s a huge time-saver.
Setting Up Batch Processing
First, open Audacity. Then, go to the Tools menu. Select Macros. You will see a window where you can create a new macro. Click on New and give your macro a name. Now, you can add commands. Click Insert to add a new command. Choose the command you need, such as Normalize.
After setting up your commands, save the macro. Next, go back to the Tools menu. Select Apply Macro to… and choose Files. A new window will pop up. Select the files you want to process. Click Open and your macro will run on all selected files.
Common Use Cases
Batch processing is useful in many situations. Here are a few:
- Podcast Editing: Normalize multiple episodes at once.
- Music Production: Apply the same effects to multiple tracks.
- Audiobook Creation: Ensure consistent volume across chapters.
- Lecture Recording: Standardize volume for all recorded sessions.
These are just a few examples. Batch processing in Audacity can save time. It’s a powerful tool for anyone working with audio.
Applying Loudness Normalization
Loudness normalization ensures that your audio plays at a consistent volume. This is essential for a smooth listening experience. Audacity offers tools to achieve this. You can batch process multiple files. This saves time and effort.
Step-by-step Guide
First, open Audacity. Load your audio files into the project window. You can do this by dragging and dropping the files. Next, select all the audio tracks. You do this by clicking and dragging across the tracks.
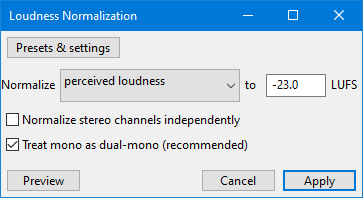
Navigate to the “Effect” menu. Select “Loudness Normalization.” A new window will appear. Choose your desired loudness level. -23 LUFS is a common standard. Click “OK” to apply the changes.
To batch process, use the “Chains” feature. Go to “File” and select “Edit Chains.” Create a new chain. Add the “Loudness Normalization” effect to the chain. Save your changes. Now apply this chain to all your files. Go to “File” and select “Apply Chain.” Choose the chain you created. Select the files you want to process. Audacity will process all files with the set loudness level.
Troubleshooting Common Issues
Sometimes, the loudness normalization may not work as expected. One common issue is inconsistent volume levels. Ensure that you have selected the correct loudness level. Double-check your settings in the “Loudness Normalization” window.
If the audio sounds distorted, reduce the loudness level. High levels can cause clipping. This results in poor audio quality. Another issue is the processing time. Batch processing can be slow. Make sure your computer meets the system requirements for Audacity. Close other programs to free up resources.
Check if your audio files are in a compatible format. Audacity supports many formats. However, some may cause issues. Convert your files to WAV or MP3 if you face problems.
Always keep your Audacity software updated. Updates fix bugs and improve performance. If issues persist, refer to Audacity’s support forum. The community can offer valuable solutions.
Advanced Tips
Batch loudness normalization in Audacity is a powerful feature. It can save time and ensure consistency. Let’s explore some advanced tips to make the most out of this tool.
Customizing Settings
Adjusting settings can optimize your results. Go to the “Effect” menu. Select “Loudness Normalization.” You can set your target volume level here. Choose between different algorithms. Each serves a unique purpose. Experiment with these settings. Find what works best for your audio.
Integrating Plugins
Plugins can enhance Audacity’s capabilities. They offer more control over loudness normalization. To add plugins, visit the “Add/Remove Plugins” menu. Install your desired plugins. Use them alongside Audacity’s built-in tools. This can improve your workflow. It also gives you more flexibility.
Credit: forum.audacityteam.org
Frequently Asked Questions
Can You Batch Normalize Audio In Audacity?
Yes, you can batch normalize audio in Audacity. Use the “Chains” feature to apply normalization to multiple files.
How Do You Normalize Loudness In Audacity?
To normalize loudness in Audacity, select your audio, go to “Effect,” and choose “Normalize. ” Adjust the settings as needed.
What Is The Chains Feature In Audacity?
The Chains feature in Audacity allows you to apply multiple effects to a batch of files. It automates repetitive tasks.
Is Audacity Good For Batch Processing?
Yes, Audacity is effective for batch processing. Its Chains feature simplifies applying effects to multiple files.
Conclusion
Batch loudness normalization in Audacity is simple and efficient. It saves time and ensures consistent audio levels. Follow the steps mentioned to normalize multiple files quickly. Audacity provides a user-friendly interface for this task. Try it out and experience better audio quality.

Happy editing!
{ “@context”: “https://schema.org”, “@type”: “FAQPage”, “mainEntity”: [ { “@type”: “Question”, “name”: “Can you batch normalize audio in Audacity?”, “acceptedAnswer”: { “@type”: “Answer”, “text”: “Yes, you can batch normalize audio in Audacity. Use the \”Chains\” feature to apply normalization to multiple files.” } } , { “@type”: “Question”, “name”: “How do you normalize loudness in Audacity?”, “acceptedAnswer”: { “@type”: “Answer”, “text”: “To normalize loudness in Audacity, select your audio, go to \”Effect,\” and choose \”Normalize.\” Adjust the settings as needed.” } } , { “@type”: “Question”, “name”: “What is the Chains feature in Audacity?”, “acceptedAnswer”: { “@type”: “Answer”, “text”: “The Chains feature in Audacity allows you to apply multiple effects to a batch of files. It automates repetitive tasks.” } } , { “@type”: “Question”, “name”: “Is Audacity good for batch processing?”, “acceptedAnswer”: { “@type”: “Answer”, “text”: “Yes, Audacity is effective for batch processing. Its Chains feature simplifies applying effects to multiple files.” } } ] }As an Amazon Associate, Cleanestor earns from qualifying purchases at no additional cost to you.