Yes, you can remove background noise in GarageBand. This digital audio workstation offers tools to help clean up your recordings.
In just a few steps, you can improve the sound quality. GarageBand is popular for music production and podcasting. Background noise can be a big problem. It can distract listeners and lower the quality of your work. Luckily, GarageBand has features that can help.
These tools are easy to use, even for beginners. Whether you’re recording music or a podcast, removing unwanted sounds is crucial. Clean audio makes your content more professional. In this post, we’ll guide you through the steps to achieve noise-free recordings in GarageBand. Ready to learn? Let’s dive in!

Credit: multimedia.easeus.com
Introduction To Garageband
Garageband is a powerful music creation tool. It is popular among beginners and experts alike. This software allows users to create and edit music easily. It is available exclusively for Apple devices. Let’s dive deeper into what makes Garageband special.
What Is Garageband?
Garageband is a digital audio workstation (DAW). It is created by Apple Inc. This application helps you record, edit, and produce music. It offers a user-friendly interface. It is suitable for both new and experienced musicians. Garageband is widely used for creating podcasts, recording vocals, and making beats.
Key Features Of Garageband
Garageband boasts many useful features. First, it has a large library of sounds and loops. These can enhance your music projects. Second, it supports multi-track recording. This allows you to record several instruments at once. Third, there are built-in audio effects. These can improve your sound quality. Fourth, Garageband includes virtual instruments. You can play these instruments using your keyboard or a MIDI controller.
Another key feature is the Drummer tool. This tool adds realistic drum tracks to your music. The software also allows for easy sharing. You can export your projects to iTunes or share them via social media. Lastly, Garageband supports third-party plugins. This expands its functionality even more.
Credit: borisfx.com
Importance Of Removing Background Noise
Background noise can be a major distraction in audio recordings. Whether you are creating a podcast, recording music, or producing a video, unwanted sounds can reduce the quality of your content. Removing background noise is essential to ensure clarity and professionalism in your audio projects. In this blog post, we will explore the importance of removing background noise in GarageBand.
Enhancing Audio Quality
Clear audio is crucial for listener engagement. Background noise can make it hard to hear the main content. Removing noise enhances the overall quality of your recordings. It ensures that listeners focus on the intended sound without distractions. High-quality audio keeps your audience interested and makes your content more enjoyable.
Professional Sound Production
Professionalism in audio production is key to standing out. Removing background noise helps you achieve a polished, studio-quality sound. This is important for building credibility and trust with your audience. Clean audio signals professionalism and attention to detail. It reflects your dedication to producing the best content possible.
Preparing Your Audio
Before you can remove background noise in GarageBand, you need to prepare your audio. This step ensures that your project starts off on the right foot. With a clean and organized setup, the process becomes much smoother. Let’s dive into two important steps: importing audio files and setting up your project.
Importing Audio Files
First, you need to get your audio files into GarageBand. Open GarageBand and create a new project. Select the “Empty Project” option. Click on “Choose.” Now, you have a blank canvas for your audio work.
To import audio files, go to the top menu. Click on “File,” then select “Import.” Find the audio file you want to edit. Click “Open.” The file will appear in your project timeline. Make sure you can see the waveform of your audio file.
Setting Up Your Project
Next, set up your project for the best results. Start by adjusting the project settings. Go to “Preferences” in the top menu. Choose “Audio/MIDI” and ensure your input and output devices are correct. This step is crucial for clear sound.
Now, organize your tracks. Create separate tracks if you have more than one audio file. Click the “+” button to add new tracks. Label each track for easy identification. For example, “Voiceover” or “Music.”
With your audio files imported and project set up, you’re ready to proceed. This preparation makes noise removal in GarageBand more effective and manageable.

Credit: www.youtube.com
Using Noise Gate
Using Noise Gate is an effective way to remove background noise in Garageband. This tool helps you clean up your recordings, making them sound more professional. Let’s explore how to use the Noise Gate feature in Garageband.
What Is Noise Gate?
The Noise Gate is a powerful tool in Garageband. It helps reduce or eliminate unwanted background sounds. It works by silencing audio signals below a certain threshold. This can be especially useful for vocal tracks or recordings with background noise.
Adjusting Noise Gate Settings
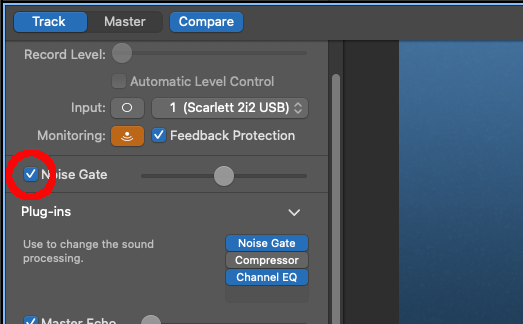
To start, open Garageband and select your track. Find the Noise Gate setting in the track’s controls. Here’s how you can adjust it:
- Open the track you want to edit.
- Click on the Track Info button to reveal track settings.
- Find the Noise Gate option and enable it.
You will see a slider to adjust the threshold. Move the slider to the left to allow more sound through. Move it to the right to block more sound.
| Setting | Description |
|---|---|
| Threshold | Adjusts the level below which sounds are muted. |
Play around with the settings to find the best level for your recording. It’s important to test your track after making adjustments. Listen carefully to ensure you are not cutting out important parts of the audio.
Applying Eq For Noise Reduction
Applying EQ for noise reduction in GarageBand can greatly improve your audio quality. By understanding and fine-tuning EQ settings, you can reduce unwanted noise, making your recordings clearer and more professional.
Understanding Eq
EQ, or equalization, adjusts the balance between different frequencies in an audio track. In GarageBand, EQ can help you reduce background noise by targeting specific frequency ranges. This process involves identifying and minimizing frequencies that contain unwanted sounds.
Fine-tuning Frequencies
Start by opening the EQ section in GarageBand. Use the Analyzer to visualize the frequencies. Look for any spikes or unusual activity in the lower and higher frequency ranges.
- Low Frequencies (20-250 Hz): These often contain hums and rumbles.
- Mid Frequencies (250-4000 Hz): Here, you might find some ambient noise or room echo.
- High Frequencies (4000-20000 Hz): These can include hisses or high-pitched sounds.
To remove noise:
- Select the frequency range where the noise is most noticeable.
- Use a narrow bandwidth (Q factor) to isolate the noise.
- Reduce the gain for that specific frequency to lower the noise level.
| Frequency Range | Common Noises | Suggested Action |
|---|---|---|
| 20-250 Hz | Hums, rumbles | Reduce gain |
| 250-4000 Hz | Ambient noise, echo | Reduce gain |
| 4000-20000 Hz | Hisses, high-pitched sounds | Reduce gain |
Make small adjustments and listen carefully. Over-reducing can make the audio sound unnatural. It’s a balance. Practice and patience will help you achieve the best results.
Using Third-party Plugins
Using third-party plugins can elevate your GarageBand projects. These plugins can help remove background noise and polish your audio. Let’s explore some recommended plugins and how to install and use them.
Recommended Plugins
Several third-party plugins can help with noise reduction in GarageBand. One popular option is iZotope RX. This plugin specializes in audio repair and noise reduction. Another useful plugin is Waves NS1. It provides a simple interface for quick noise reduction.
FabFilter Pro-Q is also a solid choice. It offers precise control over your audio frequencies. Each of these plugins brings unique features to enhance your audio projects.
Installing And Using Plugins
First, download your chosen plugin. Most plugins come as .dmg or .zip files. Open the file and follow the installation instructions. After installation, open GarageBand.
In GarageBand, go to the “Preferences” menu. Select the “Audio/MIDI” tab. Ensure the “Enable Audio Units” checkbox is ticked. This allows GarageBand to use third-party plugins.
Create a new track or select an existing one. Open the “Smart Controls” by clicking the knob icon. Click the “Plug-ins” section and select an empty slot. Choose “Audio Units” from the drop-down menu. Your installed plugins will appear here.
Select your plugin and adjust its settings. Experiment with different settings to find what works best. Always listen to your audio to ensure the noise reduction is effective. With practice, you will master using third-party plugins in GarageBand.
Tips For Better Noise Reduction
Eliminating background noise in Garageband can be challenging. Follow these tips for better noise reduction to enhance your audio quality. A quiet environment and quality equipment play a vital role. Keep reading to learn more.
Recording In A Quiet Environment
Find a quiet room for recording. Silence helps capture clear sound. Turn off all noisy devices. Close windows and doors. Use heavy curtains or blankets. These can block outside noise. Inform others in your home. Ask them to keep noise levels low.
Using Quality Equipment
Good equipment makes a difference. Invest in a high-quality microphone. It captures sound better. Use a pop filter. It reduces unwanted noise. Choose noise-canceling headphones. They help you hear clearly. Check your cables. Ensure they are in good condition. Faulty cables can cause static noise.
Exporting Your Clean Audio
Once you have successfully removed the background noise in Garageband, the next step is to export your clean audio. This process ensures that your audio file is ready for use in any project, whether it’s a podcast, music track, or video. Here’s how to do it.
Export Settings
Before exporting, select the best settings for your audio file. Click on Share in the top menu and choose Export Song to Disk. A dialog box will appear with several options:
- File Format: Choose between AAC, MP3, or AIFF. For high-quality audio, select AIFF.
- Audio Quality: Options include Good, Better, and Best. Choose Best for the highest quality.
- Bit Rate: If you select MP3, you can adjust the bit rate. A higher bit rate means better quality.
Make sure to review and select the appropriate settings for your project needs.
Saving Your Project
After setting the export options, it’s time to save your project. Follow these steps to save it correctly:
- Click on Save As and choose a location on your computer.
- Enter a file name that is easy to identify.
- Click Save to store your clean audio file.
It is a good practice to create a dedicated folder for your audio projects. This helps in organizing and accessing your files easily.
Frequently Asked Questions
How To Remove Background Noise In Garageband?
To remove background noise in GarageBand, use the Noise Gate feature. It reduces unwanted sounds by setting a threshold. Adjust the gate until the noise is minimized.
Can I Use Plugins To Reduce Noise?
Yes, you can use third-party plugins for noise reduction in GarageBand. Popular ones include iZotope RX and Waves NS1. These plugins offer more control and advanced options.
Is Garageband Good For Noise Reduction?
GarageBand provides basic noise reduction tools. While it’s effective for minor noise issues, professional-grade software might be needed for complex noise problems.
What Is The Noise Gate In Garageband?
The Noise Gate in GarageBand is a tool that reduces unwanted background noise. It works by setting a threshold level, below which sounds are muted.
Conclusion
Removing background noise in GarageBand is achievable with patience and practice. Use the tools provided by the software. Experiment with noise gate, EQ, and other features. These can help reduce unwanted sounds. Always remember, clearer audio enhances your overall project quality.

Keep practicing to improve your skills. Soon, you’ll create cleaner, more professional recordings. Happy editing!
{ “@context”: “https://schema.org”, “@type”: “FAQPage”, “mainEntity”: [ { “@type”: “Question”, “name”: “How to remove background noise in GarageBand?”, “acceptedAnswer”: { “@type”: “Answer”, “text”: “To remove background noise in GarageBand, use the Noise Gate feature. It reduces unwanted sounds by setting a threshold. Adjust the gate until the noise is minimized.” } } , { “@type”: “Question”, “name”: “Can I use plugins to reduce noise?”, “acceptedAnswer”: { “@type”: “Answer”, “text”: “Yes, you can use third-party plugins for noise reduction in GarageBand. Popular ones include iZotope RX and Waves NS1. These plugins offer more control and advanced options.” } } , { “@type”: “Question”, “name”: “Is GarageBand good for noise reduction?”, “acceptedAnswer”: { “@type”: “Answer”, “text”: “GarageBand provides basic noise reduction tools. While it’s effective for minor noise issues, professional-grade software might be needed for complex noise problems.” } } , { “@type”: “Question”, “name”: “What is the Noise Gate in GarageBand?”, “acceptedAnswer”: { “@type”: “Answer”, “text”: “The Noise Gate in GarageBand is a tool that reduces unwanted background noise. It works by setting a threshold level, below which sounds are muted.” } } ] }
As an Amazon Associate, Cleanestor earns from qualifying purchases at no additional cost to you.