Yes, you can use the Akai MPK Mini with Garageband. It’s a popular choice for many musicians.
This compact MIDI controller works well with Garageband, offering great functionality. Garageband is a user-friendly digital audio workstation. The Akai MPK Mini is a versatile MIDI controller. Together, they make music production easy and fun. Whether you are a beginner or an experienced musician, this combination can enhance your creative process.
Connecting the Akai MPK Mini to Garageband is straightforward. This setup allows you to create, edit, and produce music seamlessly. In this blog post, we will explore how to connect and use the Akai MPK Mini with Garageband, including tips for getting the best experience. Let’s dive in and see how you can make the most of this powerful duo.

Credit: www.youtube.com
Setting Up Akai Mpk Mini
Setting up the Akai MPK Mini with GarageBand can elevate your music production. This guide helps you get started quickly and easily. Let’s begin with the unboxing and connecting steps.
Unboxing And Components
When you unbox the Akai MPK Mini, you’ll find a few key components:
- The Akai MPK Mini controller
- A USB cable
- A user manual
- Software download instructions
Make sure all components are present. The USB cable is essential for connecting the controller to your computer.
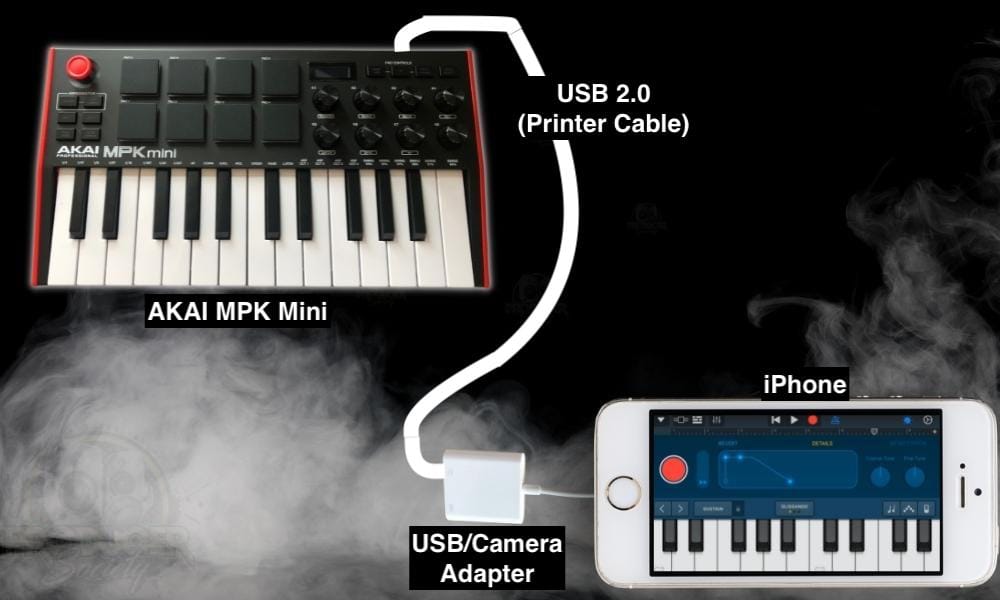
Connecting To Your Computer
Connecting the Akai MPK Mini to your computer is straightforward. Follow these steps:
- Plug one end of the USB cable into the MPK Mini.
- Connect the other end to a USB port on your computer.
- Turn on your computer if it isn’t already on.
- Wait for your computer to recognize the new device.
Once connected, your computer should automatically detect the MPK Mini. You might need to install drivers or software updates. Check the software download instructions for more details.
Now, you are ready to start using the Akai MPK Mini with GarageBand. Enjoy creating music with your new setup!

Credit: support.akaipro.com
Installing Necessary Drivers
Installing the necessary drivers for using the Akai MPK Mini with Garageband is essential. This step ensures smooth communication between your MIDI controller and the software. Without the right drivers, your device might not function correctly. Let’s walk through the process of downloading and installing the drivers.
Downloading Drivers
First, visit the official Akai website. Look for the support or downloads section. Here, you will find drivers specific to the MPK Mini. Select the appropriate driver for your operating system. Ensure you download the latest version for optimal performance.
Sometimes, the driver files come compressed. If so, extract them using a tool like WinRAR or 7-Zip. This step is crucial as it prepares the files for installation.
Installation Process
Once you have the driver files, open the installer. Follow the on-screen instructions. The installer will guide you through the process step-by-step.
During installation, you might need to connect your MPK Mini to your computer. Use the USB cable provided with the device. Make sure the connection is secure before proceeding.
After installation, restart your computer. This ensures all changes take effect. Open Garageband and test your MPK Mini. If everything is set up correctly, you should be ready to create music.
Configuring Garageband
Configuring Garageband to work with your Akai MPK Mini can seem tricky. This guide will simplify the process. Follow these steps to get started.
Initial Setup
First, connect your Akai MPK Mini to your computer. Use a USB cable for this. Ensure the device is powered on. Open Garageband on your computer. Start a new project or open an existing one.
Next, check if Garageband recognizes your Akai MPK Mini. Go to the ‘Preferences’ menu. Click on ‘Audio/MIDI’. Your device should be listed there. If not, try reconnecting the USB cable.
Midi Preferences
Set up your MIDI preferences in Garageband. Go to ‘Preferences’ again. This time, click on ‘MIDI’. Here, you can configure MIDI input and output settings.
Ensure ‘MIDI Input’ is enabled. This allows your MPK Mini to send signals to Garageband. Test by pressing a key on your MPK Mini. You should see activity in Garageband.
Adjust MIDI settings for better performance. You can change the MIDI channel, velocity curve, and more. Experiment with these settings to find what works best for you.
Remember to save your preferences. This ensures your setup remains the same next time you use Garageband.
Credit: producersociety.com
Mapping Controls
Mapping controls on the Akai MPK Mini to Garageband can elevate your music production. This allows you to customize how the hardware interacts with the software. It can make your workflow smoother and more intuitive. Here’s how you can do it effectively.
Customizing Knobs And Pads
To start, connect your Akai MPK Mini to your computer. Open Garageband and create a new project. Click on the “Control” menu and choose “Learn Assignment.” This will let you assign specific functions to the knobs and pads. Move a knob or tap a pad on your MPK Mini. Garageband will recognize the action. You can now assign it to a specific control in the software. Repeat this process for all knobs and pads you want to customize.
Customizing the knobs and pads allows for a more personalized experience. You can set them to control volume, effects, or other parameters. This flexibility can enhance your creative process. It also makes it easier to access important functions quickly.
Saving Control Mappings
After customizing your knobs and pads, you will want to save your settings. This ensures you do not lose your configuration. In Garageband, go to the “Control” menu and select “Save Assignment.” Name your mapping and save it. This file can be loaded anytime you open a new project.
Saving control mappings is crucial for consistency. It saves time, especially if you use the same setup often. You can also create different mappings for different projects. This allows for easy switching between configurations.
Creating Your First Track
Creating your first track with the Akai MPK Mini and Garageband is fun. This guide will help you get started. You will learn how to select instruments and record MIDI data. Let’s dive in!
Selecting Instruments
Open Garageband on your computer. Create a new project. Choose the software instrument track. This track will be where you add sounds. Click on the Library button. You will see different instrument options. Browse through them. Select the one you like. You can choose a piano, guitar, or drum kit. Make sure your Akai MPK Mini is connected. It will control the instrument you choose.
Recording Midi Data
Now, it’s time to record. Press the red record button in Garageband. Play notes on your Akai MPK Mini. The notes will be recorded in Garageband. You will see them on the screen. Don’t worry about mistakes. You can edit them later. When you finish, press the stop button. Listen to your recording. If you need to, make changes. Move notes around or delete them.
Keep practicing. With time, you will get better. Creating music with the Akai MPK Mini and Garageband is easy and fun.
Advanced Techniques
The Akai MPK Mini is a versatile MIDI controller, and using it with Garageband can be exciting. For those who want to step up their music production, advanced techniques can make a big difference. These techniques will help you create more complex and interesting sounds.
Using Arpeggiator
The arpeggiator on the Akai MPK Mini can add rhythm to your tracks. An arpeggiator creates patterns from chords, playing notes in sequence. Start by pressing the “Arp” button on your MPK Mini. Then, hold down a chord on the keys. You will hear the arpeggiator in action. You can change the speed and pattern of the arpeggiator using the knobs. This will give your music a unique feel.
In Garageband, you can sync the arpeggiator to your project tempo. This ensures everything stays in time. To do this, go to the “Control” menu and select “MIDI Sync”. Now, the arpeggiator will follow the tempo of your song. Experiment with different patterns and speeds. It can add a lot of character to your music.
Applying Effects
Effects can transform the sound of your tracks. The Akai MPK Mini makes it easy to apply effects in Garageband. First, select the track you want to edit. Then, open the “Smart Controls” pane. You will see a list of effects to choose from. Try adding reverb for a spacious sound. Use delay for an echo effect.
You can also map the MPK Mini’s knobs to control effects in real-time. Click on “Learn” in the “Smart Controls” pane. Move a knob on your MPK Mini to assign it to an effect. Now, you can adjust the effect by turning the knob. This allows for dynamic changes while you play. It makes your performance more expressive.
Experiment with different effects and settings. Each effect can change the mood of your music. By using the arpeggiator and applying effects, you can take your Garageband projects to the next level.
Troubleshooting
Using the Akai MPK Mini with Garageband can be a great experience. But sometimes, things do not go as planned. You might face issues that stop you from making music. This section will help you fix common problems. Read on to find solutions and get back to creating your tunes.
Common Issues
Many users face similar issues with the Akai MPK Mini and Garageband. One common problem is the device not being recognized. Sometimes, the keys or pads do not respond. You might also have trouble with MIDI mapping. Another issue is no sound coming from the device. These problems can be frustrating. But do not worry, they can be fixed.
Finding Solutions
First, ensure all cables are connected properly. Check that your software is up to date. Sometimes, a simple restart can solve the problem. If the device is not recognized, try using a different USB port. Make sure the Akai MPK Mini is selected as the MIDI input in Garageband. To fix mapping issues, open the MIDI settings and check the configurations. For sound issues, ensure the volume is up and the device is not muted.
Frequently Asked Questions
Is Akai Mpk Mini Compatible With Garageband?
Yes, Akai MPK Mini is compatible with Garageband. You can easily connect it via USB. Garageband supports the MIDI functionality of the MPK Mini, allowing you to create and record music seamlessly.
How Do I Connect Akai Mpk Mini To Garageband?
To connect Akai MPK Mini to Garageband, plug it into your Mac using a USB cable. Open Garageband, select the MPK Mini as your MIDI input device, and start creating music.
Do I Need Drivers For Akai Mpk Mini?
No, you do not need drivers for Akai MPK Mini. It is class-compliant and works plug-and-play with Garageband. Simply connect it via USB, and it should be recognized automatically.
Can I Use Akai Mpk Mini Pads In Garageband?
Yes, you can use Akai MPK Mini pads in Garageband. The pads can trigger drum sounds, samples, and other instruments within the software, enhancing your music production experience.
Conclusion
Connecting the Akai MPK Mini with GarageBand is simple and effective. This pairing enhances your music production experience. Both beginners and pros find it useful. Follow the setup steps carefully. Enjoy creating music with ease. Explore different sounds and features.

Experiment with various settings. Your creativity will shine through. Keep practicing and learning. The combination of Akai MPK Mini and GarageBand offers endless possibilities. Happy music-making!
As an Amazon Associate, Cleanestor earns from qualifying purchases at no additional cost to you.