Violins are crafted through a meticulous process. Expert hands and high-quality materials are essential.
The creation of a violin is an art form. Each piece is carefully constructed to produce the perfect sound. From selecting the right wood to the final varnish, every step matters. This process has been refined over centuries. The result is a beautiful instrument that captivates with its sound.
In this blog, you will learn about each stage of violin making. Discover the secrets behind the craftsmanship. Understand why violins are cherished by musicians worldwide. Whether you are a music lover or a curious reader, this journey into violin making will fascinate you. So, let’s explore the art and science of creating a violin.
History Of Violins
The history of violins is rich and fascinating. These beautiful instruments have evolved over centuries. Their journey began in the early Renaissance period and continues today. Understanding the history of violins helps appreciate their craftsmanship and significance in music.
Origins
The origins of violins trace back to the 16th century in Italy. Early violins were influenced by other stringed instruments like the lira da braccio and the rebec. Italian makers, such as Andrea Amati, crafted the first violins. These early violins had a simple design but produced a rich sound. The violin’s shape and form we recognize today emerged during this time.
Evolution Over Time
The evolution of violins saw many changes in design and construction. In the 17th century, makers like Antonio Stradivari and Giuseppe Guarneri improved the violin’s design. They introduced new techniques and materials. Their violins are still highly valued today.
During the 18th and 19th centuries, the violin underwent further refinements. Makers experimented with different woods, varnishes, and construction methods. These changes improved the violin’s sound quality and playability. The modern violin is the result of centuries of innovation and craftsmanship.
Today, violins are made using both traditional and modern techniques. Craftsmen still follow many of the methods developed by the great makers of the past. The violin’s history is a testament to human creativity and the desire to create beautiful music.
Credit: www.yamaha.com
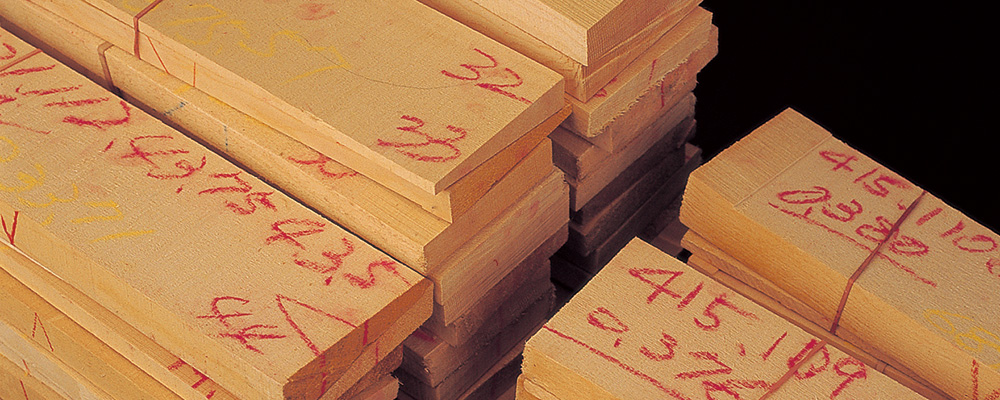
Selecting The Wood
One of the first steps in crafting a violin is selecting the wood. The quality and type of wood determine the sound and durability of the instrument. This process is crucial for creating a violin with the desired tone and resonance.
Types Of Wood
Violin makers use specific types of wood for different parts of the instrument. The most common woods include:
- Spruce for the top plate
- Maple for the back, sides, and neck
- Ebony for the fingerboard
- Willow or Spruce for the internal blocks and linings
Spruce is chosen for its lightness and resonance. Maple provides strength and beauty with its fine grain. Ebony is durable and smooth, perfect for the fingerboard. Willow and spruce are flexible and supportive for internal structures.
Wood Quality
The quality of the wood impacts the violin’s sound and longevity. Here are important factors:
- Grain: Straight and even grain ensures a consistent sound
- Age: Older wood is more stable and produces a richer tone
- Density: Proper density affects the instrument’s vibration and sound
- Moisture Content: Properly dried wood prevents warping and cracking
Violin makers carefully select wood that meets these criteria. They often use aged wood, sometimes over 20 years old. This careful selection process ensures a high-quality instrument.
Crafting The Body
The body of a violin is crucial to its sound quality. Skilled luthiers (violin makers) follow traditional methods to ensure each instrument sounds perfect. The body is carefully crafted, focusing on both aesthetic and acoustic elements.
Carving The Top
The top of the violin, or soundboard, is made from spruce. This wood is chosen for its light weight and excellent resonance. The process starts by selecting a high-quality piece of spruce. The luthier then carves the wood into an arched shape. This arch helps to distribute the tension of the strings evenly.
Next, the top is hollowed out, leaving thicker areas around the edges and under the bridge. This step ensures the top can vibrate freely, enhancing the sound. The f-holes are then cut into the top. These holes allow the sound to project from the violin. The placement and shape of the f-holes are critical for the instrument’s tone.
Shaping The Back
The back of the violin is typically made from maple. Maple is chosen for its strength and beautiful grain. Like the top, the back is carved into an arched shape. This arching provides structural support and influences the sound.
The back is also hollowed out, but not as much as the top. This allows the back to reflect sound, contributing to the violin’s volume and richness. The two-piece back is often bookmatched, meaning the two pieces are mirror images of each other. This creates a visually pleasing pattern and helps with the instrument’s symmetry.
The final step in shaping the back involves adding purfling. Purfling is a decorative inlay that runs around the edge of the violin. It helps prevent cracks and adds an elegant touch to the instrument.
Assembling The Parts
Assembling the parts of a violin is a meticulous process. Each part must fit perfectly for the best sound. This stage involves joining the body and attaching the neck. Attention to detail is crucial.
Joining The Body
The body of a violin consists of the top plate, back plate, and ribs. These parts are carefully glued together. Luthiers use clamps to hold the parts in place as the glue dries. The top plate, made of spruce, is carved and tuned for optimal sound.
Steps to Join the Body:
- Glue the ribs to the back plate.
- Clamp the structure until the glue sets.
- Attach the top plate to the ribs.
- Ensure all joints are smooth and tight.
Attaching The Neck
The neck is crucial for playability and sound. It connects the body to the scroll and fingerboard. The neck is usually made of maple. It must be shaped accurately to fit into the body.
Steps to Attach the Neck:
- Carve the neck to fit the body precisely.
- Apply glue to the joint area.
- Insert the neck into the body slot.
- Clamp the neck firmly until the glue dries.
Ensuring a strong bond is vital. The neck must align perfectly with the body for the violin to function well.
Creating The Fingerboard
The fingerboard is a vital part of the violin. It allows the player to press the strings and change the pitch of the notes. Making a high-quality fingerboard requires careful attention to detail. The process involves choosing the right material and shaping it with precision.
Material Choice
The best fingerboards are made from ebony wood. Ebony is dense and durable. It can withstand the pressure from the strings. It also has a smooth surface, which is important for fast playing. Some violins use rosewood or maple, but ebony remains the top choice.
Precision Shaping
After selecting the wood, the next step is shaping. The fingerboard must be the right size and thickness. It needs to be comfortable for the player’s fingers. It also must be curved slightly to match the strings’ arc. This curve allows the bow to play each string individually.
Craftsmen use specialized tools to shape the fingerboard. They measure and carve with great care. Even small mistakes can affect the violin’s playability. Once shaped, the fingerboard is sanded smooth. This ensures the player’s fingers can move quickly and easily.
Adding The Varnish
The varnish applied to a violin gives it a beautiful finish. It also protects the wood from damage. This step is crucial in the violin-making process. The varnish impacts the sound quality. It adds character and uniqueness to each instrument.
Varnish Types
There are several types of varnish used in violin making. Each type has its own characteristics.
- Oil varnish: This is known for its flexibility and durability.
- Spirit varnish: Made from alcohol, it dries quickly and is harder.
- Natural resin varnish: This is made from tree sap and provides a warm glow.
Application Techniques
Applying varnish requires skill and patience. Here are some common techniques:
- Brushing: This is the traditional method. A fine brush is used to apply thin layers.
- Spraying: Used for even application. It requires special equipment.
- French polishing: This involves rubbing the varnish with a cloth. It creates a smooth, glossy finish.
Each layer must dry before adding the next one. This ensures a smooth and even finish. The number of layers can vary. Some violins have up to 30 layers of varnish.
| Technique | Advantages | Disadvantages |
|---|---|---|
| Brushing | Traditional, detailed | Time-consuming |
| Spraying | Even application | Requires equipment |
| French polishing | Glossy finish | Labor-intensive |
The varnish process is both an art and a science. It combines the use of various types and techniques to achieve the perfect finish. This step brings the violin to life, adding both beauty and protection.
Stringing The Violin
Stringing the violin is a crucial step in making this beautiful instrument sing. It involves selecting the right strings and ensuring they are perfectly tuned. This process affects the sound quality and playability of the violin. Let’s explore the key steps involved in stringing the violin.
Choosing Strings
The choice of strings significantly impacts the violin’s sound. There are different types of strings available. Gut strings offer a warm, rich tone. Synthetic strings provide a balance between warmth and stability. Steel strings produce a bright, clear sound. Each string type has its own characteristics. Violinists often choose based on their playing style and the sound they want to achieve.
Tuning Process
Tuning the violin is essential for producing harmonious music. Start by tuning the A string. Use a tuning fork or electronic tuner for accuracy. Once the A string is tuned, move to the D string. Tune each string carefully, making small adjustments. Check the pitch repeatedly. Ensure each string is in harmony with the others. The tuning process requires patience and a good ear for music.
Final Adjustments
The final adjustments in violin making ensure the instrument’s optimal sound. This stage involves placing the sound post and aligning the bridge correctly. These elements play a crucial role in the violin’s tone and playability.
Sound Post Placement
The sound post is a small wooden dowel inside the violin. It stands between the top and back plates. Its placement affects the violin’s sound quality. Luthiers insert the sound post with precision. They adjust its position to achieve the best resonance. A well-placed sound post enhances the instrument’s clarity and volume.
Bridge Alignment
The bridge supports the strings and transmits vibrations to the body. It must be aligned correctly for optimal sound. Luthiers ensure the bridge is straight and centered. They adjust its height for the desired string action. Proper bridge alignment balances the violin’s sound. It also makes playing more comfortable.
Quality Control
Quality control is a critical step in violin making. It ensures each instrument meets high standards. This process involves thorough inspection and testing. Let’s explore the key aspects of quality control in violin making.
Sound Testing
Sound testing is vital for a violin’s quality. Experts play the instrument to check its tonal quality. They listen for clarity, balance, and projection. Any flaws in sound can indicate issues with construction. This step ensures the violin produces beautiful music.
Physical Inspection
Physical inspection covers the violin’s structure. Craftsmen examine the body for cracks, dents, or imperfections. They check the alignment of the neck and fingerboard. The varnish must be smooth and even. This ensures the violin is visually appealing and structurally sound.

Credit: www.yamaha.com
Frequently Asked Questions
What Materials Are Used To Make Violins?
Violins are typically made from spruce and maple wood. The fingerboard is usually crafted from ebony. Other materials used include horsehair for the bow and various varnishes.
How Long Does It Take To Make A Violin?
Crafting a violin can take anywhere from 200 to 400 hours. This includes carving, assembling, and varnishing. The process requires great skill and attention to detail.
What Tools Are Needed To Make A Violin?
Violin makers use chisels, gouges, and planes to shape the wood. They also use clamps for assembly and brushes for varnishing. Specialized measuring tools ensure precision.
Why Is Varnish Important For Violins?
Varnish protects the wood and enhances the violin’s sound. It also adds to the instrument’s beauty. The type and application of varnish can affect the tone quality.
Conclusion
Crafting a violin is an art. Each step requires skill and patience. Wood selection, shaping, and varnishing all play crucial roles. Quality components ensure a beautiful sound. The process is both traditional and precise. Understanding this makes us appreciate violins more.

Next time you hear one, think of the craftsmanship involved. Violin making is truly a blend of science and art. So, enjoy the music and respect the craft.
As an Amazon Associate, Cleanestor earns from qualifying purchases at no additional cost to you.