Recording streaming audio with Audacity is easier than you might think. In just a few steps, you can capture any sound playing on your computer.
Audacity is a free, open-source tool for recording and editing audio. Many people use it for podcasting, music production, or simply capturing sounds from their computer. Whether you want to save a live stream, a webinar, or a song, Audacity can help.
This guide will walk you through the process, ensuring you can record high-quality audio effortlessly. Let’s dive into the simple steps to get you started with recording streaming audio using Audacity.
Credit: www.appgeeker.com
Introduction To Audacity
Audacity is a free and open-source audio recording software. It helps you record and edit audio with ease. Whether you are a beginner or an expert, Audacity has tools for everyone. This section will introduce you to Audacity and its key features.
What Is Audacity?
Audacity is a powerful audio recording and editing tool. It works on Windows, Mac, and Linux. You can use it to record live audio, edit sound files, and mix tracks. It supports many audio formats. You can even use it to change the pitch or speed of a recording.
Key Features
Audacity offers many features to help you with audio projects. Here are some key features:
- Multi-track editing: Work on several tracks at once.
- Noise reduction: Remove background noise from recordings.
- Effects: Add reverb, echo, and other effects.
- Export options: Save files in different formats like MP3, WAV, and more.
- Plugins: Extend functionality with additional tools.
These features make Audacity a versatile tool for any audio project. With its user-friendly interface, you can start recording and editing in no time.
Setting Up Audacity
Audacity is a powerful tool for recording streaming audio. Setting it up correctly is the first step to ensure smooth operation. Let’s dive into the process of getting Audacity ready for use.
Downloading And Installing
First, visit the official Audacity website. Locate the download page. Select the version compatible with your operating system. Click the download link and save the file. Once downloaded, open the file to begin the installation. Follow the on-screen instructions. This will install Audacity on your computer.
Initial Configuration
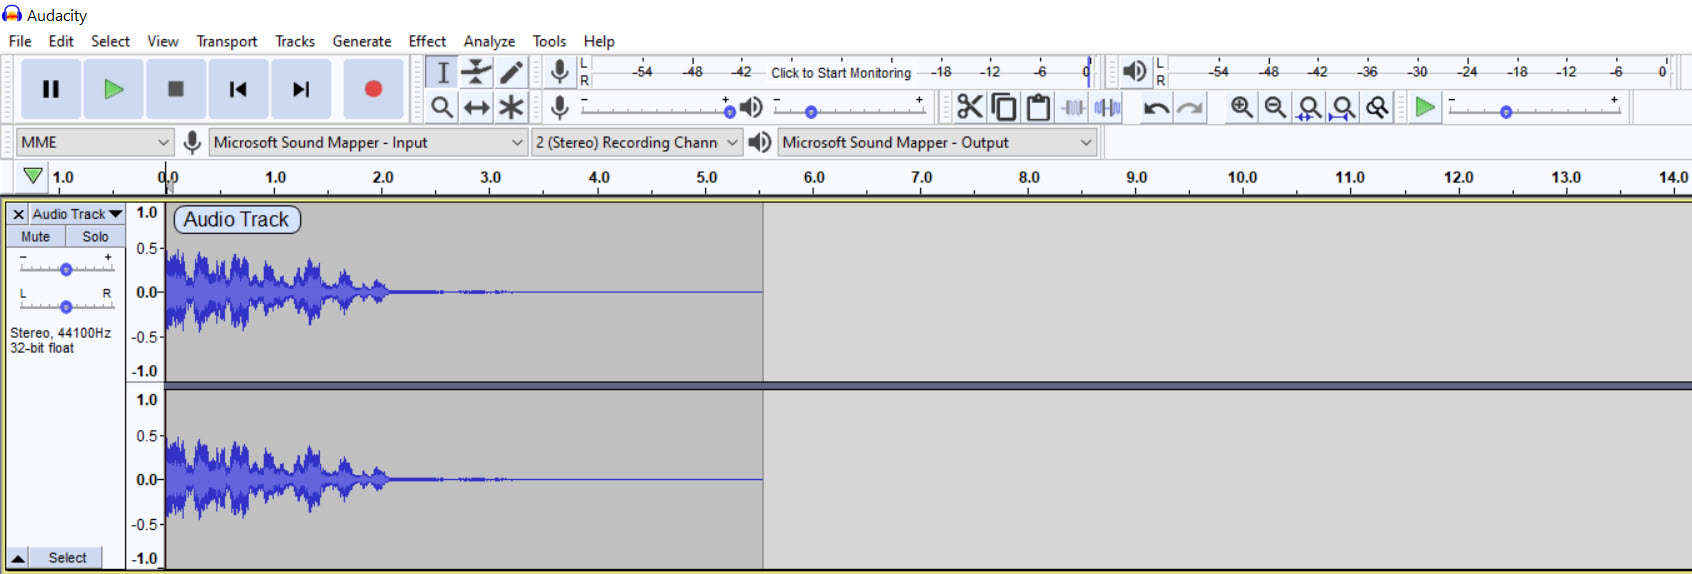
After installing, open Audacity. You need to configure a few settings. Go to the “Edit” menu and select “Preferences”. This opens the settings window. Under “Devices”, choose your recording device. Ensure it matches your audio source. Next, set the channels to “2 (Stereo)”. This captures the best audio quality.
In the “Recording” section, enable “Software Playthrough”. This allows you to hear the audio while recording. Check the box for “Play other tracks while recording”. This is useful if you plan to mix multiple tracks. Lastly, go to the “Quality” section. Set the default sample rate to “44100 Hz. This is the standard for high-quality audio.
Click “OK” to save your settings. Audacity is now configured. You are ready to start recording streaming audio with ease.
Preparing To Record Streaming Audio
Learn to record streaming audio with Audacity. Open Audacity, set the input to “Stereo Mix,” and press record. Save your file when finished.
Recording streaming audio with Audacity can seem tricky. But with the right preparation, it becomes simple. Before you start, there are a few things to get ready. Let’s dive into the key steps.Choosing The Right Equipment
To get the best audio quality, choose the right equipment. This doesn’t mean you need expensive gear. A good quality microphone and headphones will suffice. Here are some options:| Equipment | Recommended Models |
|---|---|
| Microphone | Blue Yeti, Audio-Technica AT2020 |
| Headphones | Sony MDR7506, Audio-Technica ATH-M50x |
Adjusting System Settings
Proper system settings are crucial for a smooth recording. Here’s a simple checklist:- Open your computer’s sound settings.
- Select your microphone as the input device.
- Adjust the input volume to a moderate level.
- Ensure the output device is set to your headphones.
- Go to Control Panel > Hardware and Sound > Sound.
- Click the Recording tab and select your microphone.
- Click Properties and adjust the levels.
- Open System Preferences > Sound.
- Select the Input tab and choose your microphone.
- Adjust the input volume slider.
Configuring Audacity For Recording
Configuring Audacity for recording streaming audio is crucial. A proper setup ensures high-quality recordings. This guide will walk you through the steps. You’ll be ready to capture any audio stream.
Selecting Input Source
First, open Audacity on your computer. Look at the top toolbar. You’ll see a microphone icon. Click on the drop-down menu next to it. Choose the correct input source. For streaming audio, select “Stereo Mix” or “What U Hear.” If these options are not visible, check your system’s sound settings. Ensure they are enabled.
Setting Audio Preferences
Next, set the audio preferences in Audacity. Go to the “Edit” menu at the top. Select “Preferences” from the dropdown. A new window will appear. Click on the “Devices” tab. Under “Recording,” ensure the input device matches the source you selected. Adjust the channels to “Stereo.”
Navigate to the “Quality” tab. Set the “Default Sample Rate” to 44100 Hz. Set the “Default Sample Format” to 16-bit. These settings provide a good balance of quality and file size. Click “OK” to save your changes. Now, Audacity is ready to record streaming audio.
Recording Streaming Audio
Recording streaming audio allows you to save your favorite songs, podcasts, and other audio directly from the internet. Audacity is a powerful tool for this task. It’s free, easy to use, and works on multiple platforms. Let’s dive into how you can record streaming audio with Audacity.
Starting A New Project
First, you need to start a new project in Audacity. Follow these steps:
- Open Audacity.
- Click on File in the top menu.
- Select New to create a new project.
Ensure your audio settings are correct. This will make your recording smooth and clear.
Capturing The Audio
Next, you need to capture the streaming audio. Here’s how:
- Go to the Edit menu and select Preferences.
- Under Devices, set your Recording Device to your computer’s sound card.
- Set the Recording Channels to 2 (Stereo).
- Click OK to save your settings.
Now, you are ready to start recording:
- Click the Record button (the red circle) in Audacity.
- Play the streaming audio you want to record.
- When done, click the Stop button (the yellow square).
After recording, you can edit your audio. Trim unwanted parts. Adjust volume levels. When satisfied, save your project.
| Step | Action |
|---|---|
| 1 | Open Audacity |
| 2 | Start a new project |
| 3 | Set recording device |
| 4 | Record and save audio |
Using these steps, you can easily record streaming audio with Audacity. It’s a great way to save your favorite audio content.
Credit: forum.audacityteam.org
Editing Your Recording
Once you have recorded your streaming audio with Audacity, the next step is to edit your recording. Editing helps you remove unwanted parts, enhance the sound quality, and make your recording more professional. Audacity offers several tools to help you with this process. This section will guide you through two important editing tasks: trimming and cutting, and applying effects.
Trimming And Cutting
Trimming and cutting are basic yet essential editing tasks. Start by listening to your entire recording. Identify parts you want to keep and parts you want to remove. To trim a section, select the unwanted part by clicking and dragging your mouse over it. Then, click the “Cut” button or press “Ctrl+X” on your keyboard. This will remove the selected section. To ensure smooth transitions, you may need to zoom in and fine-tune your cuts. This ensures the final audio sounds natural and seamless.
Applying Effects
Audacity offers various effects to improve your recording. One common effect is “Noise Reduction.” To apply this, first select a section with only background noise. Go to “Effect” > “Noise Reduction,” then click “Get Noise Profile.” Next, select the entire recording, return to “Noise Reduction,” and click “OK.” This will reduce the background noise. Another useful effect is “Normalize.” This adjusts the volume levels across your recording. To apply it, select your entire recording and go to “Effect” > “Normalize.” Click “OK” to apply the effect. These simple steps can significantly enhance your audio quality.
Exporting Your Audio
After recording your streaming audio with Audacity, the next step is to export your audio. This process allows you to save your work in a format that is easy to share and use on different devices. Follow these steps to ensure your audio file is saved correctly.
Choosing File Formats
Audacity offers various file formats for exporting your audio. The most common formats include:
- MP3: Great for general use. Compatible with most devices.
- WAV: Uncompressed format. Ideal for high-quality audio.
- OGG: Open-source format. Good for streaming and sharing.
Choose the format that best suits your needs. For most users, MP3 is a good choice due to its balance between quality and file size.
Saving And Exporting
Once you have chosen your file format, follow these steps to save and export your audio:
- Click on File in the top menu.
- Select Export from the dropdown menu.
- Choose the desired file format (e.g., MP3, WAV, OGG).
- Enter a name for your file in the File Name field.
- Click Save.
A new window will appear with options to edit metadata. You can add details like artist name, album title, and more. This is optional but can be useful for organizing your audio files.
After editing metadata, click OK to complete the export process. Your audio file is now saved and ready for use.
Credit: www.youtube.com
Tips And Best Practices
Recording streaming audio with Audacity can be a fun and rewarding experience. To ensure you get the best results, follow these tips and best practices. This section will help you avoid common pitfalls and improve your audio quality. Let’s dive in!
Avoiding Common Mistakes
First, check your recording source. Make sure you select the correct input device. Wrong settings lead to poor recordings. Also, monitor your recording levels. Too high or too low levels can ruin your audio. Aim for a balanced level to avoid distortion or noise.
Save your work often. Audacity can crash unexpectedly. Regular saves prevent data loss. Use shortcuts to speed up your workflow. This helps to keep your focus on the recording process.
Improving Audio Quality
Use a good quality microphone. Built-in mics often produce low-quality sound. An external mic can make a big difference. Position your microphone correctly. Place it close to the audio source. This reduces background noise and captures clear sound.
Record in a quiet environment. Minimize background noise as much as possible. Turn off fans, air conditioners, and other noisy appliances. Use Audacity’s noise reduction tool to clean up any remaining noise. This will make your recording sound professional.
Experiment with Audacity’s settings. Adjust sample rates and bit depth for better quality. Higher settings yield better sound but use more space. Find a balance that works best for your needs.
Frequently Asked Questions
How Do I Set Up Audacity For Recording?
First, download and install Audacity. Open Audacity, go to the “Edit” menu, select “Preferences,” and configure your audio input settings.
Can I Record Streaming Audio Directly In Audacity?
Yes, you can. Set your audio input to “Stereo Mix” or similar. Press the record button in Audacity to capture streaming audio.
How Do I Save My Recorded Audio?
After recording, go to “File” and select “Export. ” Choose your desired audio format (e. g. , MP3, WAV) and save the file.
Is Audacity Free To Use?
Yes, Audacity is free and open-source software. You can download and use it without any cost for recording and editing audio.
Conclusion
Recording streaming audio with Audacity is simple and effective. Follow the steps outlined above for the best results. Ensure your audio settings are correct. Practice makes perfect, so don’t get discouraged. Soon, you’ll capture high-quality audio easily. Remember to save your recordings regularly.

Editing your files is just as important. Keep exploring Audacity’s features to enhance your skills. Enjoy your audio projects and keep experimenting!
{ “@context”: “https://schema.org”, “@type”: “FAQPage”, “mainEntity”: [ { “@type”: “Question”, “name”: “How do I set up Audacity for recording?”, “acceptedAnswer”: { “@type”: “Answer”, “text”: “First, download and install Audacity. Open Audacity, go to the \”Edit\” menu, select \”Preferences,\” and configure your audio input settings.” } } , { “@type”: “Question”, “name”: “Can I record streaming audio directly in Audacity?”, “acceptedAnswer”: { “@type”: “Answer”, “text”: “Yes, you can. Set your audio input to \”Stereo Mix\” or similar. Press the record button in Audacity to capture streaming audio.” } } , { “@type”: “Question”, “name”: “How do I save my recorded audio?”, “acceptedAnswer”: { “@type”: “Answer”, “text”: “After recording, go to \”File\” and select \”Export.\” Choose your desired audio format (e.g., MP3, WAV) and save the file.” } } , { “@type”: “Question”, “name”: “Is Audacity free to use?”, “acceptedAnswer”: { “@type”: “Answer”, “text”: “Yes, Audacity is free and open-source software. You can download and use it without any cost for recording and editing audio.” } } ] }As an Amazon Associate, Cleanestor earns from qualifying purchases at no additional cost to you.