Using GarageBand on your iPad can be simple and fun. In just a few steps, you can create amazing music.
GarageBand is a powerful music app that turns your iPad into a recording studio. With its user-friendly interface, even beginners can start making music right away. Whether you want to record your voice, play virtual instruments, or mix tracks, GarageBand has you covered.
This guide will help you understand how to use GarageBand on your iPad effectively. You’ll learn the basics and explore some tips to get the most out of this versatile app. Get ready to unleash your creativity and make music wherever you go!
Introduction To Garageband
GarageBand is a powerful music creation app developed by Apple. It allows users to create music or podcasts. The app is user-friendly and perfect for beginners and professionals alike. Available on iPad, it lets you make music on the go. Whether you are a novice or an expert, GarageBand has something to offer.
Features Of Garageband
GarageBand on iPad comes with a variety of features:
- Live Loops: Create music by tapping cells and columns in a grid.
- Touch Instruments: Play keyboards, guitars, and drums with multi-touch gestures.
- Audio Recording: Record your voice or any sound using the built-in microphone.
- Virtual Drummer: Add realistic, studio-quality drum performances to your tracks.
- Sound Library: Access a wide range of free loops and instruments.
- Mixing and Effects: Fine-tune your tracks with built-in effects and mixing tools.
Compatibility With Ipad
GarageBand is designed to work seamlessly on iPads. It supports various iPad models, including:
| iPad Model | Compatibility |
|---|---|
| iPad Pro (all models) | Fully Compatible |
| iPad Air (3rd generation and later) | Fully Compatible |
| iPad (5th generation and later) | Fully Compatible |
| iPad mini (5th generation and later) | Fully Compatible |
Make sure your iPad is running iOS 14.0 or later to enjoy all features. GarageBand is optimized for touch, making it perfect for iPad users. The app is free to download from the App Store.
Getting Started
Getting started with GarageBand on your iPad is easier than you think. This powerful app turns your iPad into a full-featured recording studio. You’ll be making music in no time. Let’s dive in and get you started.
Downloading The App
First, open the App Store on your iPad. Type “GarageBand” into the search bar. Select the app from the search results. Tap the “Get” button to download and install the app. Make sure you have enough storage space. The app is large and may take a few minutes to download.
Initial Setup
Once the app is downloaded, open it from your home screen. You will see a welcome screen with tips. Follow the prompts to get familiar with the interface. Choose your preferred instrument to begin. You can always switch instruments later.
GarageBand will ask for permission to access your microphone. Allow this to record audio. You might also need to enable notifications. This helps you stay updated with new features.
Now, you are ready to start creating. Explore the different sounds and tools. Experiment with loops and beats. Enjoy the process of making music on your iPad.
User Interface
GarageBand on iPad is a powerful tool for music creation. Understanding its user interface helps you get the most out of it. The interface is intuitive and user-friendly. Let’s break down the main parts of the interface: the home screen and the controls.
Navigating The Home Screen
The home screen is where you start your journey. Here, you can create new projects or open existing ones. The layout is simple and easy to navigate. At the top, you’ll find the project gallery. This section displays all your saved projects. To start a new project, tap the plus icon in the top right corner.
On the left side, there’s a menu for browsing different instrument types. Tap on an instrument to view its options. This makes it easy to switch between instruments while working on your project. The home screen is designed to get you into your music-making quickly.
Understanding The Controls
Once inside a project, you will see various controls. These controls help you create and edit your music. Let’s look at some of the key controls:
- Track View: This is where you see all your tracks. Each instrument or recording gets its own track.
- Playhead: This vertical line shows your current position in the song. You can drag it to move to different parts of the track.
- Transport Controls: These are the buttons for play, pause, record, and rewind. They are located at the top of the screen.
- Smart Controls: These let you tweak the sound of each track. You can adjust things like volume, pan, and effects.
Understanding these controls is key to making great music. They are straightforward and easy to use. With a bit of practice, you’ll be navigating GarageBand like a pro.
Credit: www.youtube.com
Creating A New Project
Creating a new project in GarageBand on your iPad opens up a world of musical possibilities. Whether you’re a beginner or an experienced musician, this guide will help you get started. Let’s dive into the essential steps of creating your first project.
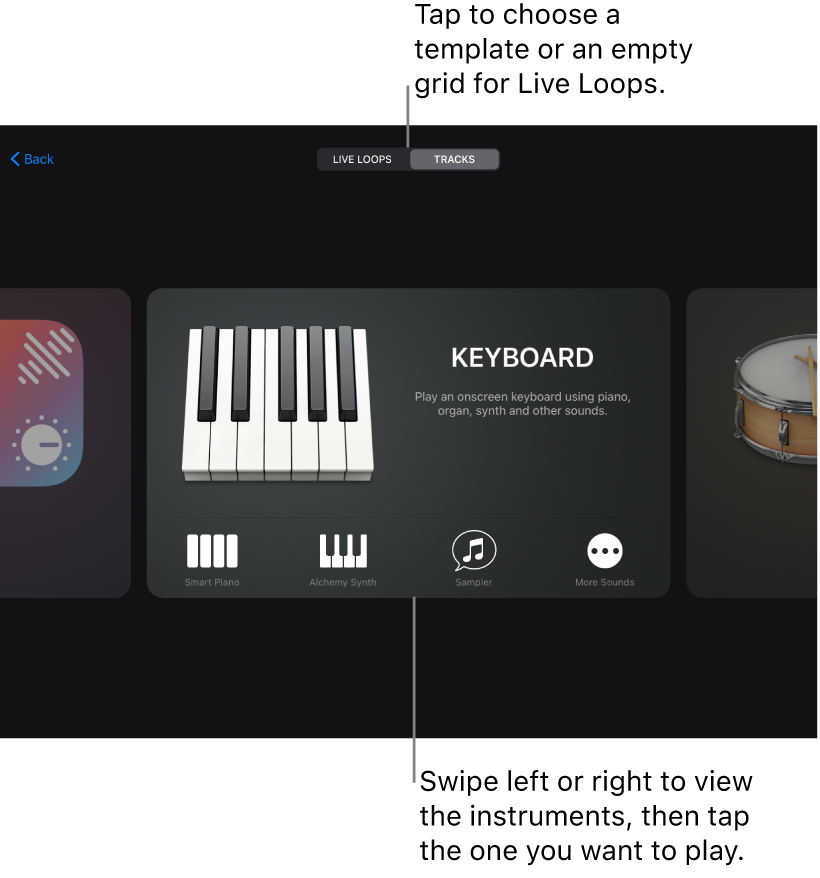
Choosing An Instrument
The first step in your new project is choosing an instrument. GarageBand offers a variety of instruments to choose from. Tap on the instrument icon to explore the available options. You can select from guitars, keyboards, drums, and more. Each instrument has its own unique sounds and features.
Setting The Tempo And Key
Next, you need to set the tempo and key for your project. The tempo determines the speed of your music. Tap on the tempo button and adjust the slider to your desired speed. The key of the project defines the scale in which you will compose your music. Tap on the key button and choose the key that suits your composition. Setting these parameters is crucial for the overall feel of your song.
Recording Audio
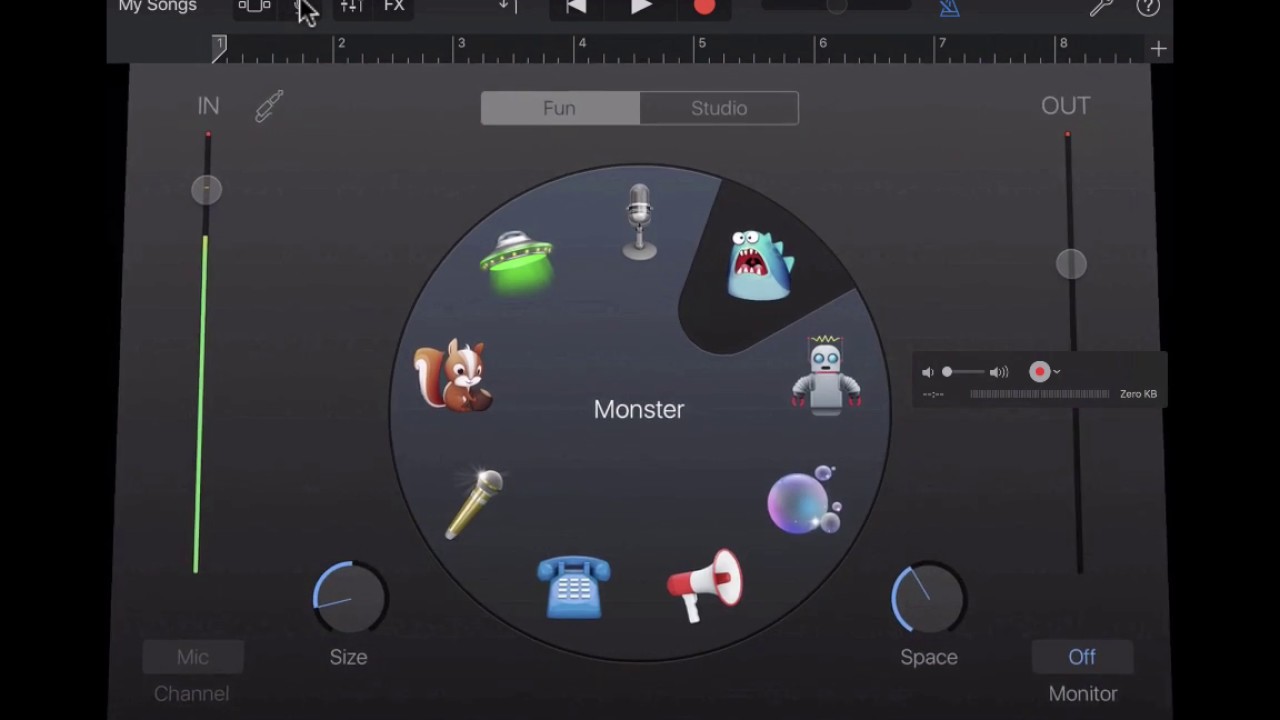
Using GarageBand on iPad for recording audio is simple. It’s a powerful tool for musicians and podcasters. You can record high-quality audio with just a few taps. Let’s explore how to use the microphone and record multiple tracks.
Using The Microphone
To start recording with GarageBand, open the app and create a new project. Select the Audio Recorder option. Tap on the Microphone icon to access the built-in microphone.
Here are the steps to follow:
- Ensure you are in a quiet environment.
- Position the iPad’s microphone close to the sound source.
- Tap the Record button to start recording.
- Tap the Stop button to end the recording.
You can listen to your recording by tapping the Play button. If needed, you can edit the audio using the built-in tools.
Recording Multiple Tracks
GarageBand allows you to record multiple tracks. This is useful for creating songs with different instruments or adding layers to your podcast.
Follow these steps to record multiple tracks:
- Start by recording your first track using the steps above.
- Tap the Tracks View icon to view your recorded track.
- Tap the Add Track button to create a new track.
- Select the instrument or audio option for the new track.
- Tap the Record button to record the new track.
- Repeat these steps to add more tracks as needed.
GarageBand will play the existing tracks while you record new ones. This helps you stay in sync with your previous recordings.
Using these features, you can create professional-quality audio projects right on your iPad.
Editing Your Tracks
Editing tracks in Garageband on iPad can be easy and fun. You can change your tracks to create the perfect sound. This section will cover the basics of editing. You will learn how to cut and paste tracks. You will also learn how to add effects to make your music unique.
Cutting And Pasting
Cutting and pasting help you control your music. To cut a part of a track, you need to select it first. Touch and hold the region until it highlights. Then, use the scissors icon to cut the selected part. You can paste this part anywhere in your project. Just touch and hold the timeline where you want to paste it. Select “Paste” from the menu.
You can use these steps to create loops. Cut a section of your track. Paste it multiple times to create a loop. This is helpful if you want to repeat a chorus or a beat.
Adding Effects
Adding effects can make your music stand out. Garageband offers many effects like reverb, echo, and distortion. To add an effect, select the track you want to edit. Tap on the “Track Settings” button. Then, choose “Plug-ins and EQ”. Here, you can add and adjust effects.
You can also use the EQ to balance your track. This is useful for making sure all parts of your track sound good together. Experiment with different effects to find the best sound for your music.
Mixing And Mastering
Mixing and mastering are the final steps in music production. These steps ensure your song sounds balanced and polished. With GarageBand on iPad, you can mix and master your tracks easily. Let’s dive into the details.
Balancing Levels
Balancing levels means adjusting the volume of each track. This helps your song sound clear and professional. Here’s how you can do it:
- Open your project in GarageBand.
- Tap on a track to select it.
- Use the volume slider to adjust the level.
- Repeat for each track until you find the right balance.
Remember to keep the main vocal or melody track at a higher volume. This ensures it stands out.
Finalizing Your Song
Finalizing your song involves adding effects and making the final adjustments. Follow these steps:
- Tap on the track you want to edit.
- Click on the FX button to add effects like reverb or delay.
- Use the EQ feature to fine-tune the sound.
- Listen to the song from start to finish and make any last changes.
Once you’re happy with the mix, you can export your song. Tap on the share button and choose your preferred format.
Mixing and mastering might seem complex, but with practice, it becomes easier. Use these tips to make your songs sound amazing with GarageBand on iPad.
Credit: support.apple.com
Exporting Your Music
Exporting your music from Garageband on iPad is a simple process. After creating your masterpiece, you will want to share it with the world. There are several ways to export your music, including sharing on social media and saving to your device.
Sharing On Social Media
First, tap on the song you wish to share. Then, tap the share button. Choose the social media platform you want to use. You can share directly to Facebook, Twitter, or YouTube. Log in to your account if prompted. Add a description or tags to your post. Finally, tap ‘Share’ to post your music online.
Saving To Your Device
Tap on the song you want to save. Press the share button. Select ‘Save to Files’ or ‘Open in’. Choose your preferred location, like iCloud Drive or your iPad storage. Tap ‘Save’. Your music will now be available on your device. You can listen to it anytime or share it later.
Tips And Tricks
GarageBand on iPad is a fantastic tool for creating music. With some tips and tricks, you can get the most out of this app. Let’s dive into some useful shortcuts and advanced features that will enhance your music-making experience.
Using Shortcuts
Shortcuts can save you time. Here are some handy ones:
- Double-tap to open the settings for an instrument.
- Pinch to zoom in and out of your track.
- Swipe left or right to move through your timeline quickly.
- Three-finger swipe to undo and redo actions.
Using these shortcuts will make your workflow smoother. Try incorporating them into your routine.
Advanced Features
GarageBand has many advanced features. Here are some you should explore:
- Automation: Adjust volume, pan, and effects over time.
- Sampler: Record sounds and turn them into instruments.
- Drummer: Add realistic drum tracks to your songs.
- Audio Unit Extensions: Use third-party effects and instruments.
These features can help you create more complex and professional music. Experiment with them to see what works best for your style.

Credit: www.macworld.com
Frequently Asked Questions
How Do I Start A New Project In Garageband On Ipad?
To start a new project in GarageBand, open the app and tap on the “+” button. Choose a template or start with a blank project to begin creating your music.
Can I Use External Instruments With Garageband On Ipad?
Yes, you can connect external instruments to your iPad using compatible adapters. GarageBand supports MIDI keyboards, guitars, and other instruments for enhanced music creation.
How Do I Add Loops In Garageband On Ipad?
To add loops in GarageBand, tap on the Loop Browser icon. Browse the available loops and drag your chosen loop into the project timeline.
How Do I Edit Tracks In Garageband On Ipad?
To edit tracks, tap on the track you want to modify. Use the editing tools to cut, copy, paste, and adjust the audio clips within the track.
Conclusion
Using GarageBand on your iPad is simple and fun. Start by exploring the app’s features. Experiment with different sounds and instruments. Create music by tapping and swiping on the screen. Save and share your creations with friends. With practice, your skills will improve.

Remember, creativity has no limits. Enjoy making music anytime, anywhere with GarageBand. Happy creating!
{ “@context”: “https://schema.org”, “@type”: “FAQPage”, “mainEntity”: [ { “@type”: “Question”, “name”: “How do I start a new project in GarageBand on iPad?”, “acceptedAnswer”: { “@type”: “Answer”, “text”: “To start a new project in GarageBand, open the app and tap on the \”+\” button. Choose a template or start with a blank project to begin creating your music.” } } , { “@type”: “Question”, “name”: “Can I use external instruments with GarageBand on iPad?”, “acceptedAnswer”: { “@type”: “Answer”, “text”: “Yes, you can connect external instruments to your iPad using compatible adapters. GarageBand supports MIDI keyboards, guitars, and other instruments for enhanced music creation.” } } , { “@type”: “Question”, “name”: “How do I add loops in GarageBand on iPad?”, “acceptedAnswer”: { “@type”: “Answer”, “text”: “To add loops in GarageBand, tap on the Loop Browser icon. Browse the available loops and drag your chosen loop into the project timeline.” } } , { “@type”: “Question”, “name”: “How do I edit tracks in GarageBand on iPad?”, “acceptedAnswer”: { “@type”: “Answer”, “text”: “To edit tracks, tap on the track you want to modify. Use the editing tools to cut, copy, paste, and adjust the audio clips within the track.” } } ] }As an Amazon Associate, Cleanestor earns from qualifying purchases at no additional cost to you.