
Making a Native American flute is both an art and a craft. It involves skill, tradition, and patience.
Native American flutes have a rich history. They are known for their soothing sounds and cultural significance. Crafting one yourself can be a rewarding experience. You connect with an ancient tradition while creating music. The process requires specific materials and steps.
This guide will walk you through each one. You’ll learn about the wood, tools, and techniques needed. By the end, you’ll have a flute that is not only functional but also a piece of art. Ready to start this journey? Let’s dive into the fascinating world of Native American flute making.
Credit: www.youtube.com
Introduction To Native American Flutes
Native American flutes have a unique sound that captivates many. They have a deep history and cultural significance. These flutes are not just musical instruments; they are a bridge to the past.
Historical Significance
The Native American flute has ancient roots. It dates back centuries. Early flutes were made from bones and wood. They played a key role in tribal ceremonies and daily life. Each tribe had its own flute designs. These designs reflected their traditions and environment. The flute’s history is rich and varied.
Cultural Importance
The flute is more than a musical tool. It holds cultural value. Native Americans used flutes in rituals and storytelling. The music of the flute carries spiritual meanings. It connects people to nature and the divine. The flute also symbolizes peace and healing. Playing the flute is a way to honor ancestors and traditions.
Materials Needed
Creating a Native American flute can be a rewarding experience. The process begins with gathering the right materials. Each material plays a crucial role in the final sound and quality of the flute. Below, we will explore the materials needed to craft a beautiful and functional Native American flute.
Wood Selection
Wood selection is very important. Different types of wood affect the sound. Common choices include cedar, walnut, and maple. Cedar is soft and easy to carve. It produces a warm, mellow tone. Walnut is harder, offering a rich, resonant sound. Maple is dense and creates a bright, clear tone. Choose wood that is free of knots and cracks. This ensures the flute will be strong and produce a good sound.
Tools Required
Several tools are necessary to make a Native American flute. A saw is needed to cut the wood to size. A chisel helps carve out the inner chambers. Sandpaper is used to smooth the surface. A drill is essential for making precise holes. A tuning tool is also useful. It ensures the flute produces the right notes. Safety gear like goggles and gloves are important too. They protect you while working with tools.
Design And Measurements
Creating a Native American flute involves precise design and measurements. These elements determine the flute’s sound quality and playability. The design and measurements include choosing the key, determining the length, and calculating the diameter.
Choosing The Key
The key of a flute defines its pitch. Common keys for Native American flutes are A, G, and F#. Each key gives the flute a unique voice. Choose a key based on your desired sound. For beginners, the key of A is a good start. It offers a balanced tone and is easier to play.
Determining Length And Diameter
The length of the flute affects its pitch. Longer flutes produce lower pitches. Shorter flutes create higher pitches. Measure the flute length accurately to match the chosen key. For example, a flute in the key of A is about 19 inches long.
The diameter influences the sound’s richness. A larger diameter gives a deeper tone. A smaller diameter results in a brighter sound. Balance the length and diameter to achieve the desired sound quality. For an A key flute, a diameter of 1 inch is typical.
Crafting The Body
Crafting the body of a Native American flute is an art form. This process involves careful selection of wood, precise hollowing, and detailed shaping. Each step requires patience and skill to create a beautiful, melodic instrument.
Hollowing The Wood
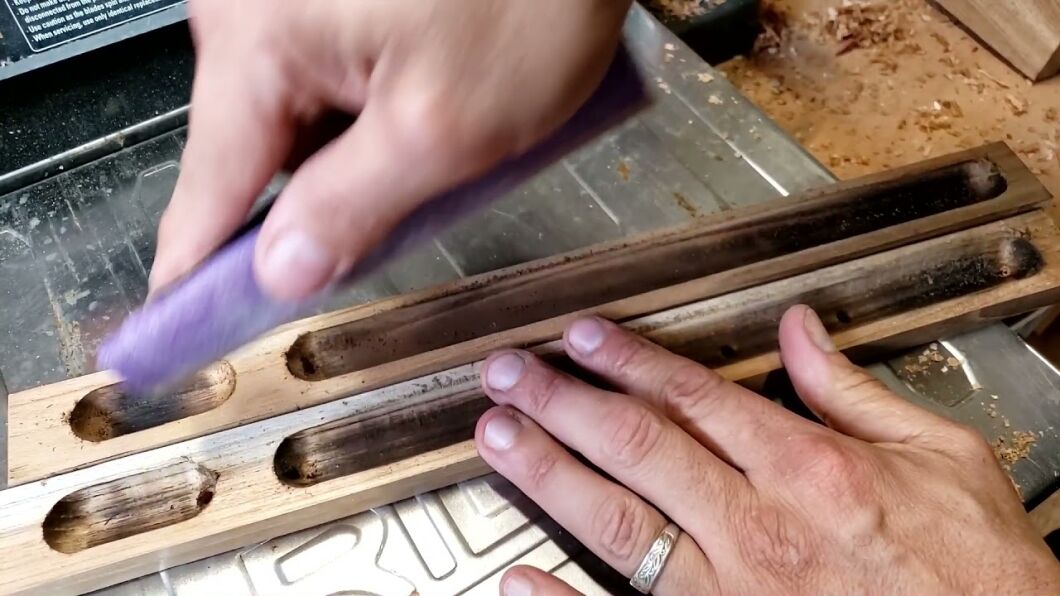
First, select a suitable piece of wood for the flute. Cedar, walnut, and cherry are popular choices. Split the wood piece lengthwise into two halves. Use a chisel to carve out the interior of each half. Ensure the hollow is even and smooth. This forms the air chamber of the flute. The size and shape of the chamber influence the sound quality.
Next, sand the interior surfaces to remove rough spots. A smooth interior helps produce clear tones. Once hollowed and sanded, glue the two halves back together. Clamp them tightly until the glue dries completely. This creates a seamless body for your flute.
Shaping The Exterior
With the interior complete, focus on the flute’s exterior. Begin by trimming any excess wood from the glued seam. Use a knife or rasp to shape the outside. Aim for a cylindrical form, tapering slightly towards one end.
Sand the exterior to a smooth finish. This removes any rough edges and prepares the surface for decoration. Some flutemakers carve intricate designs or add inlays. These details personalize the flute and enhance its beauty. Finally, apply a finish to protect the wood and enhance its natural color.
Crafting the body of a Native American flute is a rewarding experience. Each flute is unique, reflecting the maker’s skill and creativity.
Creating The Sound Mechanism
Creating the sound mechanism of a Native American flute is a crucial step. This process ensures the flute produces a pleasing sound. It involves precision and attention to detail. Let’s dive into the main parts of creating the sound mechanism.
Cutting The Sound Hole
The sound hole is essential for producing notes. First, mark the position of the sound hole on the flute body. Use a small drill to make a starter hole. Then, carefully shape the hole with a file or a chisel. Ensure the edges are smooth. The size and shape of the hole affect the sound quality. Take your time to get it right.
Installing The Block
The block, also known as the bird or fetish, sits on top of the sound hole. It directs the air stream into the flute. First, carve the block from a small piece of wood. It should fit snugly on the flute. Secure it with a leather strap or glue. Test the flute by blowing air through it. Adjust the block’s position if needed. The sound should be clear and pleasant.

Credit: www.flutopedia.com
Tuning The Flute
Crafting a Native American flute involves several steps. One of the most critical is tuning the flute. Proper tuning ensures the flute produces beautiful, harmonious sounds. This process requires patience and attention to detail. The main goal is to achieve the right pitch for each note.
Adjusting The Finger Holes
The placement of finger holes affects the tuning. Measure and mark the holes carefully. Use a drill to create the holes. Start with smaller holes. You can always make them larger. Test the sound after each adjustment.
Cover all holes and blow into the flute. Open each hole one by one. Listen to the pitch. If a note is too high, enlarge the hole slightly. If it is too low, reduce the hole size by filling it slightly. This step ensures each note is in tune.
Fine-tuning The Notes
After adjusting the finger holes, fine-tuning the notes is necessary. Use a tuner to check each note. Play each note and see the tuner’s reading. If a note is sharp, sand the hole slightly. If a note is flat, make the hole bigger.
Repeat this process until the flute is in perfect tune. Each adjustment should be small. This avoids over-tuning and damaging the flute. Patience and careful listening are key. The goal is a beautiful, harmonious sound.
Decorating The Flute
Decorating a Native American flute is a chance to express your creativity. It’s not just about the sound; it’s also about the look. This section will guide you through the process of making your flute unique. From carving to painting, and adding personal touches, your flute will become a work of art.
Carving And Painting
Carving is the first step in decorating your flute. You can carve symbols, patterns, or even animals. Use a sharp knife or carving tool. Be careful to avoid damaging the flute. You can find many traditional Native American symbols online.
Painting comes next. Choose colors that have meaning to you. Many flutes use earth tones like brown, red, and green. Use non-toxic paint to keep your flute safe to play. Apply the paint in thin layers. This helps to keep the surface smooth.
Adding Personal Touches
Adding personal touches makes your flute unique. You can add feathers, beads, or leather strips. Feathers can be tied to the end of the flute. Beads can be strung along the leather strips.
- Attach feathers with a small piece of string.
- Use a hot glue gun to secure beads.
- Wrap leather strips around the flute for a traditional look.
Each touch adds to the flute’s story. Your flute will reflect your personality and style.

Credit: flutecraft.org
Care And Maintenance
Proper care and maintenance of your Native American flute ensure its longevity and perfect sound. A well-maintained flute can last for generations. It also preserves the unique tone and beauty of the instrument. Regular cleaning and safe storage are key to maintaining your flute.
Cleaning Techniques
Cleaning your Native American flute is essential. Use a soft, dry cloth to wipe the exterior. Avoid using water or harsh chemicals. These can damage the wood. For the interior, use a small, dry brush. Gently remove dust and debris. Some players use a small, oiled cloth for the interior. This helps to keep the wood conditioned. But be cautious. Too much oil can clog the flute.
Storage Tips
Storing your Native American flute correctly is crucial. Keep it in a cool, dry place. Avoid direct sunlight and extreme temperatures. These can warp the wood. A padded flute bag provides extra protection. It prevents scratches and damage. Store the flute horizontally. This helps maintain its shape. Vertical storage can lead to warping over time.
Playing The Native American Flute
Playing the Native American flute is a beautiful and soulful experience. The instrument’s sound is both calming and enchanting. Learning to play can connect you with nature and culture. Here are some basic techniques and tips for learning traditional songs.
Basic Techniques
Start by holding the flute correctly. Use both hands, one at the top and one at the bottom. Your thumbs support the flute from underneath. Cover the holes with your fingers completely to avoid air leaks.
Next, practice your breath control. Use your diaphragm to push out air gently. The sound should be steady and smooth. Experiment with different breath pressures. This will help you find the flute’s sweet spot.
Learning to control your fingers is crucial. Start with simple scales. Lift one finger at a time while playing. Make sure each note is clear. Practice regularly to build muscle memory.
Learning Traditional Songs
Listening to traditional Native American flute music is important. It helps you understand the rhythms and melodies. Try to play along with recordings. This can improve your timing and technique.
Many traditional songs are passed down orally. Seek out a teacher or community group. They can show you the nuances of each song. Playing with others also builds your confidence.
Practice is key. Start with short, simple songs. Gradually move to more complex pieces. Remember, the journey of learning is as rewarding as the destination. Enjoy every note you play.
Frequently Asked Questions
What Materials Are Needed For A Native American Flute?
To make a Native American flute, you need wood, a saw, sandpaper, a drill, and a knife. You also need patience and attention to detail.
How Long Does It Take To Make A Flute?
Creating a Native American flute can take several hours to a few days. The time depends on your skill level and the complexity of the design.
What Type Of Wood Is Best For A Native American Flute?
Cedar, walnut, and cherry are popular choices for making Native American flutes. These woods produce a warm, resonant sound.
Can Beginners Make A Native American Flute?
Yes, beginners can make a Native American flute with the right tools and guidance. Start with a simple design and practice.
Conclusion
Crafting a Native American flute is a rewarding journey. It requires patience and skill. Each step, from selecting the wood to tuning, is crucial. Practice makes perfect, so keep trying. Enjoy the process and the music you create. Your handmade flute will carry unique, personal sounds.

Share your experience with others. Inspire them to explore this beautiful art. Happy flute making!
As an Amazon Associate, Cleanestor earns from qualifying purchases at no additional cost to you.