Creating audio effects can be fun and creative. Making your audio stutter in Audacity is simple.
Stuttering effects can give your audio a unique, catchy sound. Whether you are working on music, podcasts, or sound design, adding a stutter can make your project stand out. Audacity, a free and powerful audio editing tool, allows you to do this easily.
In this guide, we will walk you through the steps to achieve that cool stutter effect. You don’t need to be a professional to get started. With a bit of practice, you can make your audio sound more dynamic and interesting. Let’s dive in and learn how to make your audio stutter using Audacity.
Introduction To Audio Stuttering
Audio stuttering is a unique technique used in sound editing. It can add creativity and excitement to your audio projects. Audacity is a free tool that allows you to create audio stuttering effects easily. Let’s explore what audio stuttering is and its common uses.
What Is Audio Stuttering?
Audio stuttering is a repeating effect in sound editing. It makes a short audio clip repeat quickly. This creates a jittery, rhythmic sound. You can control the speed and duration of the repeats. This technique is popular in music production and sound design.
Common Uses Of Audio Stuttering
Audio stuttering is common in electronic music. Artists use it to create exciting beats and rhythms. It adds texture and interest to the music. DJs use it during live performances to energize the crowd. It is also used in radio and podcast editing. It can emphasize a point or create a dramatic effect.
Sound designers use audio stuttering in movies and games. It can create tension or excitement in a scene. This effect is versatile and can be used in many creative ways.
Credit: forums.raspberrypi.com
Setting Up Audacity
Before you can make your audio stutter in Audacity, you need to set up the software. Setting up Audacity is straightforward and involves downloading, installing, and configuring the software.
Downloading Audacity
First, you need to download Audacity. Visit the official Audacity website. There, you will find the download link. Click on the appropriate link for your operating system. Audacity supports Windows, macOS, and Linux.
Important: Ensure you download from the official site to avoid malware.
Installing Audacity On Your Computer
After downloading, locate the file in your Downloads folder. Double-click the file to start the installation process. Follow the on-screen instructions to install Audacity.
- Choose your preferred language.
- Accept the license agreement.
- Select the installation location.
Once installed, open Audacity. It should open with a welcome message.
Configuring Audacity
After installation, configure Audacity for your needs. Start by setting up your audio input and output devices. Go to Edit > Preferences. Select Devices from the left panel.
- For Host, choose the appropriate option (e.g., MME for Windows).
- For Playback, select your default speakers or headphones.
- For Recording, choose your microphone.
Click OK to save your settings. You are now ready to start working on your audio files.
Importing Audio Files
Importing audio files into Audacity is a simple yet crucial step. It allows you to work on your project efficiently. This step ensures that you start with a clear, high-quality audio file. Knowing how to import your audio correctly can save you time and headaches.
Supported Audio Formats
Audacity supports a wide range of audio formats. Here are the most common formats you can use:
- WAV: Uncompressed and high quality.
- MP3: Compressed, smaller file size.
- AIFF: Similar to WAV, often used on Macs.
- FLAC: Compressed but lossless, retains quality.
- OGG: Open-source and compressed.
Ensure your audio file is in one of these formats. This will make the import process smoother.
Steps To Import Audio
Follow these steps to import audio into Audacity:
- Open Audacity on your computer.
- Go to the File menu at the top.
- Select Import, then choose Audio.
- A file dialog will appear. Navigate to your audio file.
- Select your audio file and click Open.
Your audio file will now appear in Audacity’s workspace. You can see the waveform and start editing.
If you have multiple audio files, repeat the process. Each file will appear on a new track. This makes managing different audio sources easier.
Importing audio files correctly is the foundation of your project. It ensures you start with the best possible quality.
Basic Editing Tools
Editing audio can be a fun process, especially with Audacity. This powerful, free tool offers many features to help you create the perfect sound. In this section, we’ll focus on the Basic Editing Tools you need to make your audio stutter. Let’s dive into the essentials of cutting, copying, and pasting, as well as using the selection tool.
Cut, Copy, And Paste
Audacity’s cut, copy, and paste tools are essential for editing audio. These tools work just like they do in word processors. They allow you to manipulate your audio easily.
- Cut: Remove selected audio from your track.
- Copy: Duplicate a selected portion of your audio.
- Paste: Insert the copied audio into another part of your track.
To use these tools, first select the portion of the audio you want to edit. Then, choose the appropriate action from the Edit menu or use the keyboard shortcuts:
| Action | Shortcut |
|---|---|
| Cut | Ctrl + X |
| Copy | Ctrl + C |
| Paste | Ctrl + V |
Using The Selection Tool
The selection tool is crucial for making precise edits. It looks like a cursor and allows you to highlight specific parts of your audio track. Follow these steps to use the selection tool effectively:
- Click on the selection tool icon in the toolbar.
- Click and drag your mouse over the part of the track you want to select.
- Release the mouse button to finalize your selection.
With the selection tool, you can highlight segments to cut, copy, or paste. This control is vital for creating a stutter effect in your audio. Simply select small portions and use the cut or copy tools to rearrange them.
Creating Audio Stutter Effects
Audio stutter effects can add a unique flair to your audio projects. Audacity, a free audio editing software, offers several ways to create these effects. Whether you want to add a repetitive glitch or a rhythmic stutter, Audacity has tools to help you achieve that sound.
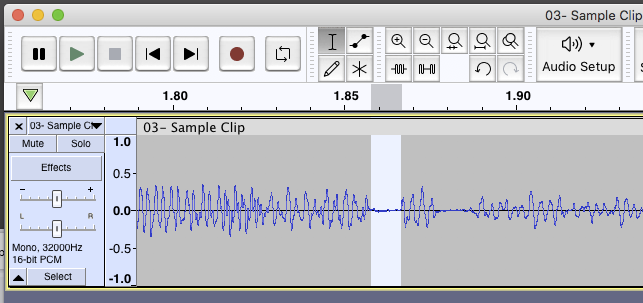
Manual Stutter Creation
Creating a stutter effect manually involves a few simple steps. Follow this process to get a basic stutter effect:
- Open your audio file in Audacity.
- Select the section you want to stutter by clicking and dragging.
- Copy the selected section by pressing Ctrl+C (or Cmd+C on Mac).
- Move your cursor to where you want the stutter to start.
- Paste the copied section multiple times by pressing Ctrl+V (or Cmd+V on Mac).
Repeat this process to create a more pronounced stutter. Adjust the length and frequency of the stutter by experimenting with different copy and paste patterns.
Using The Repeat Function
The Repeat function in Audacity can also create stutter effects. This method is quicker and more precise:
- Select the audio section you want to stutter.
- Go to the Effect menu.
- Choose Repeat from the dropdown list.
- In the dialog box, enter the number of repetitions you want.
- Click OK to apply the effect.
This method allows for easy control over the number of stutters. Adjust the repetition number to find the desired effect. This can save time and create a consistent stutter sound.
Using these techniques, you can create a variety of stutter effects to enhance your audio projects. Experiment with different settings and methods to discover what works best for your needs.
Advanced Techniques
Advanced techniques in Audacity can help you create unique audio effects. Making your audio stutter is one such effect that adds an interesting layer to your sound projects. Below, we dive into two advanced techniques: time shifting audio and applying additional effects.
Time Shifting Audio
Time shifting audio is a technique used to move segments of audio within your track. This can create a stutter effect by repeating certain parts. Here’s how you can do it:
- Open your audio file in Audacity.
- Select the Selection Tool from the toolbar.
- Highlight the section you want to stutter.
- Use the Edit menu to Copy the section.
- Move the cursor to where you want the stutter to start.
- Use the Edit menu to Paste the copied section.
This method ensures precise control over where the stutter occurs.
Applying Additional Effects
Adding effects to your stuttered audio can make it more engaging. Audacity offers a variety of effects that can enhance the stutter. Here are some steps to follow:
- Select the stuttered section of your audio.
- Go to the Effects menu.
- Choose an effect, such as Echo or Reverb.
- Adjust the effect settings to suit your needs.
- Click OK to apply the effect.
Experimenting with different effects can lead to unique and interesting results.
Here’s a simple table summarizing the key steps:
| Technique | Steps |
|---|---|
| Time Shifting Audio | 1. Open file 2. Select section 3. Copy and paste |
| Applying Additional Effects | 1. Select section 2. Choose effect 3. Adjust settings |
Using these advanced techniques can add depth and creativity to your audio projects.
Exporting The Stuttered Audio
After creating your stutter effect in Audacity, the next step is exporting the stuttered audio. This step ensures your audio is saved in a usable format. Follow these guidelines to export your stuttered audio efficiently.
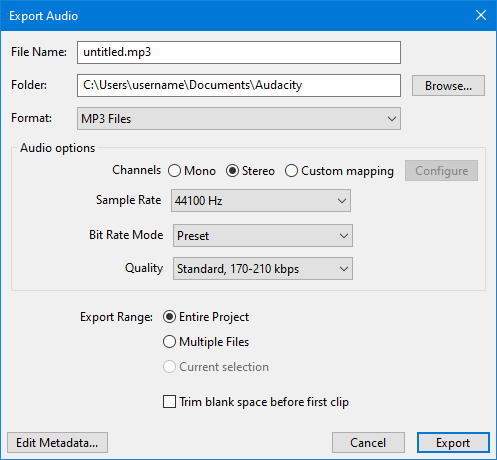
Choosing Export Formats
First, decide on the format for your exported audio. Common formats include MP3, WAV, and OGG. MP3 files are small and widely supported. WAV files are larger but offer higher quality. OGG files are a good alternative, balancing size and quality.
Export Settings And Tips
Click on “File” and then “Export” to start. Choose your desired format. If you select MP3, a settings window will appear. Adjust the bit rate to balance quality and file size. A higher bit rate means better quality but a larger file.
For WAV files, you don’t need to adjust many settings. WAV files keep the original quality of your audio. OGG files also have settings for quality. Choose a middle-range quality for a good balance.
Always preview your audio before saving. Check for any issues or errors. Save your project often to avoid losing work. Finally, name your file clearly to find it easily later.
Credit: manual.audacityteam.org
Troubleshooting Common Issues
Experiencing audio stutter can be frustrating. Addressing common issues in Audacity can help you achieve smooth playback. This section covers typical problems and their solutions.
Audio Quality Problems
Poor audio quality can cause stutter. Here are some tips to fix it:
- Check Sample Rate: Ensure your project’s sample rate matches your audio files. Go to
Project Rate (Hz)at the bottom-left corner. Set a standard rate like 44100 Hz. - Reduce Latency: High latency might cause stuttering. Navigate to
Edit > Preferences > Devicesand adjust the latency settings. - Optimize Buffer Size: A large buffer size can reduce stutter. Go to
Edit > Preferences > Recordingand increase the buffer size.
File Compatibility Issues
Incompatible file formats can lead to audio stutter. Here’s how to resolve this:
- Use Compatible Formats: Audacity supports WAV, AIFF, and MP3. Convert your files to one of these formats.
- Check File Integrity: Corrupted files can cause problems. Use a reliable converter to ensure file integrity.
- Update Audacity: Ensure you are using the latest version. Updates often include bug fixes and compatibility improvements.
By following these steps, you can resolve common issues and enjoy a smoother audio experience in Audacity.
Credit: forum.audacityteam.org
Frequently Asked Questions
What Is Audio Stuttering In Audacity?
Audio stuttering in Audacity refers to intermittent, choppy playback or recording. This happens when the audio stream is interrupted. It can be caused by various factors like system performance, incorrect settings, or issues with the audio file itself.
How To Fix Audio Stuttering?
To fix audio stuttering, try adjusting the buffer size in Audacity. Go to Edit > Preferences > Devices. Increase the buffer length. Ensure your system has enough resources and close unnecessary applications.
Why Does Audio Stutter During Playback?
Audio stuttering during playback occurs due to system performance issues. It can also be caused by incorrect buffer settings or high CPU usage. Ensuring optimal settings and sufficient system resources can help.
Can Audio Stuttering Damage Recordings?
Audio stuttering usually does not damage recordings. It mainly affects playback quality. However, frequent stuttering can indicate underlying issues that might need addressing to ensure smooth recording sessions.
Conclusion
Creating audio stutter in Audacity is straightforward and fun. By following the steps outlined, you can easily add a stutter effect. Experiment with different settings to achieve unique sounds. Remember to save your work frequently. Practice makes perfect, so keep trying.

Soon, you’ll be comfortable with these techniques. Audacity offers powerful tools for audio editing. Enjoy exploring its possibilities. Happy editing!
{ “@context”: “https://schema.org”, “@type”: “FAQPage”, “mainEntity”: [ { “@type”: “Question”, “name”: “What is audio stuttering in Audacity?”, “acceptedAnswer”: { “@type”: “Answer”, “text”: “Audio stuttering in Audacity refers to intermittent, choppy playback or recording. This happens when the audio stream is interrupted. It can be caused by various factors like system performance, incorrect settings, or issues with the audio file itself.” } } , { “@type”: “Question”, “name”: “How to fix audio stuttering?”, “acceptedAnswer”: { “@type”: “Answer”, “text”: “To fix audio stuttering, try adjusting the buffer size in Audacity. Go to Edit > Preferences > Devices. Increase the buffer length. Ensure your system has enough resources and close unnecessary applications.” } } , { “@type”: “Question”, “name”: “Why does audio stutter during playback?”, “acceptedAnswer”: { “@type”: “Answer”, “text”: “Audio stuttering during playback occurs due to system performance issues. It can also be caused by incorrect buffer settings or high CPU usage. Ensuring optimal settings and sufficient system resources can help.” } } , { “@type”: “Question”, “name”: “Can audio stuttering damage recordings?”, “acceptedAnswer”: { “@type”: “Answer”, “text”: “Audio stuttering usually does not damage recordings. It mainly affects playback quality. However, frequent stuttering can indicate underlying issues that might need addressing to ensure smooth recording sessions.” } } ] }As an Amazon Associate, Cleanestor earns from qualifying purchases at no additional cost to you.