Measuring drum heads is crucial for drummers. It ensures the right fit and sound.
But how do you measure drum heads accurately? Understanding how to measure drum heads is essential for every drummer. The correct size ensures optimal performance and sound quality. Incorrect measurements can lead to poor sound and even damage the drum.
Whether you’re a beginner or an experienced drummer, knowing this skill will save you time and money. In this guide, we’ll explain the steps to measure drum heads correctly. You’ll learn the tools needed and tips for getting precise measurements. So, let’s dive in and make sure your drum heads fit perfectly every time.
Introduction To Drum Heads
Drum heads are a crucial part of a drum set. They are the surface you strike to create sound. Understanding drum heads is vital for any drummer. Choosing the right one can affect your playing style and sound quality.
Purpose Of Drum Heads
Drum heads serve several purposes:
- Produce Sound: The primary purpose is to produce sound when struck.
- Control Tone: Different drum heads offer various tones and pitches.
- Durability: Good quality heads can withstand repeated strikes.
Types Of Drum Heads
There are various types of drum heads, each with unique characteristics:
| Type | Description | Usage |
|---|---|---|
| Single-ply | Thin, single layer of material. | Great for jazz or softer music. |
| Double-ply | Two layers of material. | Ideal for rock or heavy music. |
| Coated | Has a textured coating. | Provides a warmer sound. |
| Clear | Transparent, no coating. | Produces a brighter sound. |
Choosing the right drum head depends on the sound you want. Experiment with different types to find your perfect match.
Tools For Measuring Drum Heads
Measuring drum heads is crucial for ensuring the right fit and sound quality. Using the right tools can make this task easier and more accurate. Below, we discuss two essential tools for measuring drum heads: the measuring tape and the caliper tool.
Measuring Tape
A measuring tape is a simple and effective tool for measuring drum heads. It helps you get the diameter of the drum head accurately. To use a measuring tape:
- Place the drum on a flat surface.
- Stretch the measuring tape across the center of the drum head.
- Read the measurement from one edge to the opposite edge.
Ensure the tape is straight and not twisted. This gives you the most precise measurement. A flexible measuring tape works best for this task.
Caliper Tool
A caliper tool provides more precision than a measuring tape. It is useful for measuring the thickness and diameter of the drum head. To use a caliper tool:
- Open the caliper and place it around the drum head.
- Close the caliper until it touches the edges of the drum head.
- Read the measurement on the caliper scale.
Caliper tools come in digital and analog forms. Digital calipers are easier to read and provide more accurate measurements. This tool is ideal for drummers seeking precise measurements.
Both tools are essential for ensuring drum heads fit perfectly. Accurate measurements lead to better sound quality and performance.
Preparing The Drum
Before measuring your drum heads, you need to prepare the drum. This involves removing the old drum head and cleaning the drum rim. Proper preparation ensures accurate measurements and better sound quality. Let’s dive into the steps.
Removing The Old Drum Head
First, you need to remove the old drum head. Use a drum key to loosen the tension rods. Turn each rod counterclockwise. Follow a star pattern to keep even tension. Once all rods are loose, remove them and set aside.
Now, lift the old drum head off the drum. Be careful not to damage the drum shell. Check the tension rods and lugs. Replace any that are worn or damaged.
Cleaning The Drum Rim
Next, clean the drum rim. Use a soft cloth to wipe away dust and debris. For stubborn dirt, use a mild cleaner. Avoid harsh chemicals that can damage the drum.
Inspect the drum shell and bearing edge. Ensure they are smooth and free of damage. A clean drum rim ensures a better fit for the new drum head.
Now, your drum is ready for a new head. Accurate measurements begin with proper preparation.
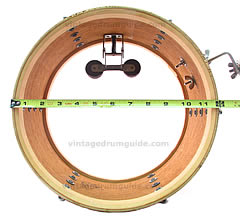
Credit: www.vintagedrumguide.com
Measuring The Diameter
Understanding how to measure drum heads is crucial for both beginners and experienced drummers. Accurate measurements ensure you get the right fit for your drum. The most important step is to measure the drum head’s diameter correctly.
Finding The Drum’s Center
To start measuring, you need to find the drum’s center. This step ensures accuracy in your measurements. Place the drum on a flat surface. Look for the center point. It is usually where the drum’s hardware aligns.
Using A Measuring Tape
Once you find the center, take a measuring tape. Stretch it across the drum from edge to edge. Make sure the tape goes through the center point. This gives you the diameter.
Use a flexible measuring tape. It helps in getting an accurate measurement. Note the diameter in inches. Most drum heads are measured in inches.
Here is a simple table to help you understand common drum sizes:
| Drum Type | Common Diameter |
|---|---|
| Snare Drum | 14 inches |
| Bass Drum | 20-24 inches |
| Tom-Tom | 12-16 inches |
Remember, accurate measurements lead to better performance. Always double-check your measurements.
Measuring The Drum Head Depth
Understanding how to measure the depth of your drum head is crucial. This ensures you achieve the desired sound and fit for your drum kit. Below, we’ll explore the steps involved in measuring the drum head depth, focusing on two key methods.
Determining Depth Requirements
Before measuring, know your drum’s depth requirements. Drum depth affects the sound and tone. Typically, deeper drums produce a lower tone, while shallow drums offer a higher pitch.
Consider the drum’s purpose and music genre. A rock drum may need more depth for a booming sound. A jazz drum might be shallower for crisp, clear tones.
Using A Caliper
A caliper is a precise tool for measuring drum depth. Follow these steps:
- Place the drum on a flat surface.
- Extend the caliper’s jaws to fit across the drum’s depth.
- Read the measurement from the caliper’s scale.
Make sure the caliper is straight and aligned with the drum’s center.
For accurate measurements, repeat the process a few times. Average the results for the best precision.
Using a caliper ensures you have a precise measurement, which helps in selecting the right drum heads.
Ensuring Accurate Measurements
Measuring drum heads correctly is essential for achieving the best sound. Accurate measurements help you select the right drum heads. This ensures your drums produce the desired tone and resonance. Let’s explore the importance of double-checking your measurements and common mistakes to avoid.
Double-checking Measurements
Always double-check your measurements. Use a reliable measuring tape or ruler. Measure across the drumhead from one edge to the other. Take the measurement at the widest point. This ensures you get the drum’s true diameter. Repeat the process to confirm your measurement.
It’s easy to make small errors. Even a slight miscalculation can affect the sound. Double-checking reduces this risk. It ensures your drum heads fit perfectly.
Common Mistakes
One common mistake is measuring the drum shell instead of the drum head. The drum head sits on top of the shell. Measure the drum head, not the shell. Another mistake is using a flexible measuring tape. This can stretch and give inaccurate readings. Use a rigid ruler or a non-stretchable tape.
Also, avoid measuring from inside the drum. Always measure from the outer edges. This gives the most accurate diameter. Taking measurements in poor lighting can also lead to errors. Ensure you have good lighting to see clearly.
By avoiding these common mistakes, you ensure your measurements are accurate. This helps in selecting the right drum heads for your drums. Accurate measurements lead to better sound quality and performance.
Choosing The Right Drum Head
Choosing the right drum head can transform your drumming experience. A well-selected drum head can enhance sound quality and performance. Understanding key factors will help you make an informed choice.
Material Considerations
Drum heads come in various materials. Each material has unique properties and sounds. Common materials include Mylar, Kevlar, and animal hide.
Mylar is durable and versatile. It suits many styles of music. Kevlar is extremely tough. It handles heavy hitting well. Animal hide offers a traditional sound. It is often used in classical and world music.
Sound Preferences
Sound preferences are personal. Think about the tone you want. Some drum heads produce a warm, mellow sound. Others create bright, sharp tones.
Coated drum heads give a softer sound. They are good for jazz and blues. Clear drum heads produce a louder and brighter tone. They are great for rock and pop music.
Choosing the right drum head depends on these factors. Consider material and sound preferences. This will help you find the best drum head for your needs.
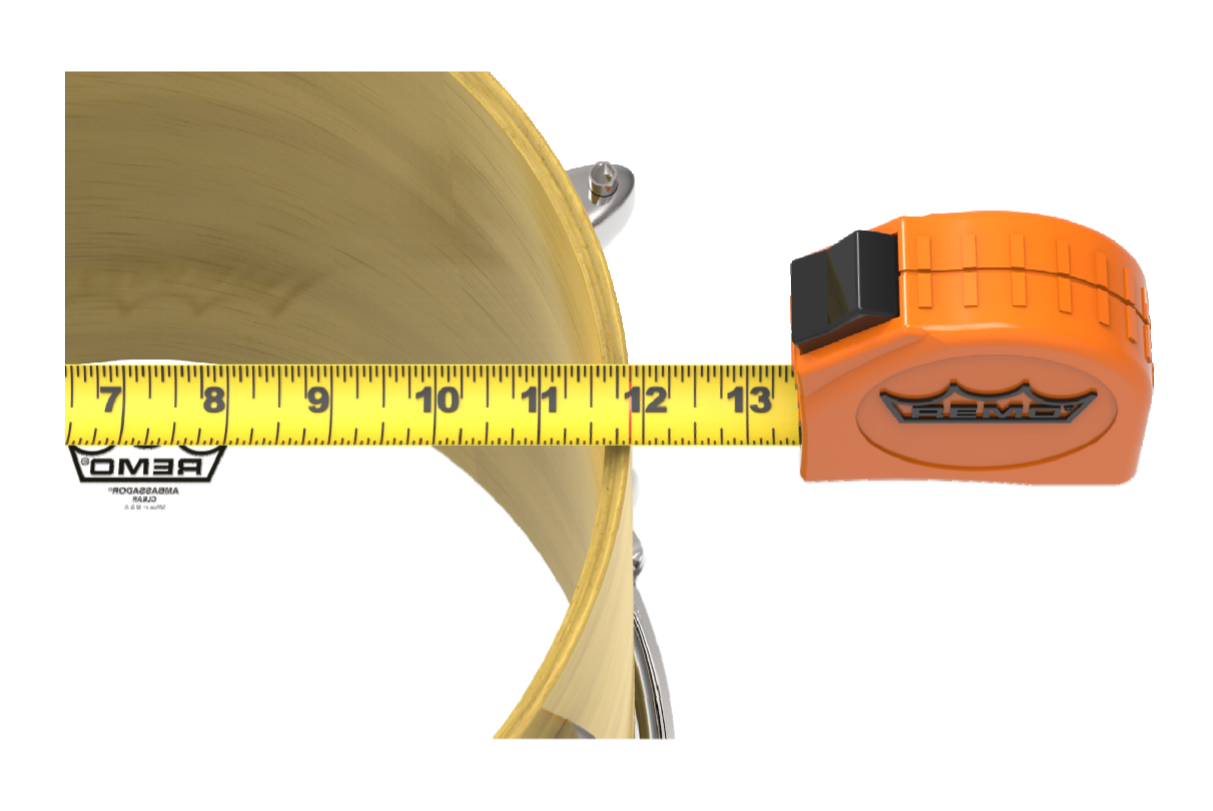
Credit: support.remo.com
Installing A New Drum Head
Installing a new drum head can seem challenging. But with some guidance, it becomes a simple task. This section will guide you through the steps.
Aligning The Drum Head
First, place the drum head on the drum shell. Ensure it sits flat and even. Check that the drum head rim aligns with the shell edge. This step is crucial for proper sound.
Rotate the drum head slightly to find the best fit. Look for any uneven gaps. Adjust if needed. Once aligned, the drum head should look centered.
Tightening The Drum Head
Next, use a drum key to tighten the tension rods. Start with the rod closest to you. Give each rod a few turns. Move to the rod directly opposite.
Work in a star pattern. This helps distribute tension evenly. Repeat the process for all tension rods. Tighten each rod gradually. Avoid over-tightening.
Once all rods are tightened, tap the drum head near each rod. Listen for consistent pitch. Adjust as needed. Ensure even tension across the drum head.
After tightening, the drum head is ready for fine-tuning. This ensures the best sound quality. And your drum is ready to play.
Tuning The Drum Head
Tuning the drum head is crucial for achieving the best sound from your drum. Proper tuning ensures that the drum produces a clear, resonant tone. It involves both initial and fine-tuning steps. Let’s break down these steps to help you get the perfect sound.
Initial Tuning Steps
Begin by placing the drum head on the drum shell. Make sure it sits evenly without any wrinkles. Insert the tension rods through the hoop and into the lugs. Tighten each rod slightly with your fingers. Use a criss-cross pattern when tightening. This prevents uneven tension.
Next, use a drum key to tighten the rods further. Turn each rod one or two full turns. Continue to use the criss-cross pattern. This ensures even tension across the drum head. Tap the drum head near each tension rod. Listen for differences in pitch. Adjust as needed to make the pitch even across the head.
Fine-tuning Techniques
Fine-tuning requires a more detailed approach. Tap the drum head near each tension rod again. Listen carefully. Use your drum key to make small adjustments. Turn the key in small increments, about a quarter turn. Adjust until the pitch is consistent all around the drum head.
You may also want to adjust the drum head’s overall tension. Higher tension results in a higher pitch. Lower tension gives a deeper sound. Use your drum key to tighten or loosen all the rods slightly. Make sure to maintain even tension.
Another technique is to use a drum dial or tuner. This tool measures the tension of the drum head. Place the drum dial on different points of the head. Adjust the tension rods to achieve the desired tension reading. This ensures a precise and consistent tuning.
Remember: Regular tuning keeps your drum sounding its best. Check and adjust the tuning often, especially after playing for long periods.
Credit: www.youtube.com
Maintaining Drum Heads
Maintaining drum heads is crucial for achieving the best sound quality. Regular care ensures your drum heads last longer and perform well. Simple steps can make a big difference. Let’s explore some essential tips.
Regular Inspection
Inspect your drum heads regularly. Check for any signs of wear and tear. Look for dents, cracks, or stretched areas. Light taps can help you hear any inconsistencies. Listen for changes in sound quality. Early detection prevents bigger issues.
Replacing Worn Drum Heads
Replace worn drum heads promptly. Old drum heads can affect your sound. Remove the drum head carefully. Clean the drum shell before placing a new head. Ensure the new drum head fits well. Tighten the lugs gradually. Tune the drum to your desired pitch. Test the sound for any adjustments. This keeps your drum in top shape.
Frequently Asked Questions
What Tools Do I Need To Measure Drum Heads?
You will need a ruler or measuring tape. Make sure it’s flexible and easy to handle.
How Do I Measure Drum Head Diameter?
Place the ruler or tape across the center. Measure from one edge to the opposite edge.
Why Is Measuring Drum Heads Important?
Proper measurement ensures you get the correct replacement. It also helps in tuning and performance.
Can I Measure Drum Heads Without Removing Them?
Yes, you can measure without removing. Just ensure the ruler spans the drum’s center.
Conclusion
Measuring drum heads is simple with the right tools and steps. Accurate measurements ensure a perfect fit for your drum. This helps improve sound quality. Always use a tape measure and measure across the diameter. Remember to measure from edge to edge.

Check your measurements twice to avoid mistakes. With practice, you’ll measure drum heads quickly. This skill is essential for all drummers. Keep your drum sounding its best by measuring correctly.
As an Amazon Associate, Cleanestor earns from qualifying purchases at no additional cost to you.