Neck relief for an electric guitar typically ranges from 0.010 to 0.020 inches. This measurement is vital for playability and tone.
The precise adjustment of neck relief is crucial for any electric guitar player aiming to achieve optimal string action and playability. With neck relief set properly, the guitar not only becomes more comfortable to play but also avoids issues like fret buzz.
Guitarists often adjust this parameter to match their playing style and the gauge of strings they use. Proper neck relief balances the tension of the strings against the guitar’s neck straightness, ensuring a seamless playing experience. Whether you’re a seasoned professional or a beginner, understanding and setting the correct neck relief is a foundational aspect of maintaining your instrument and enhancing your performance.
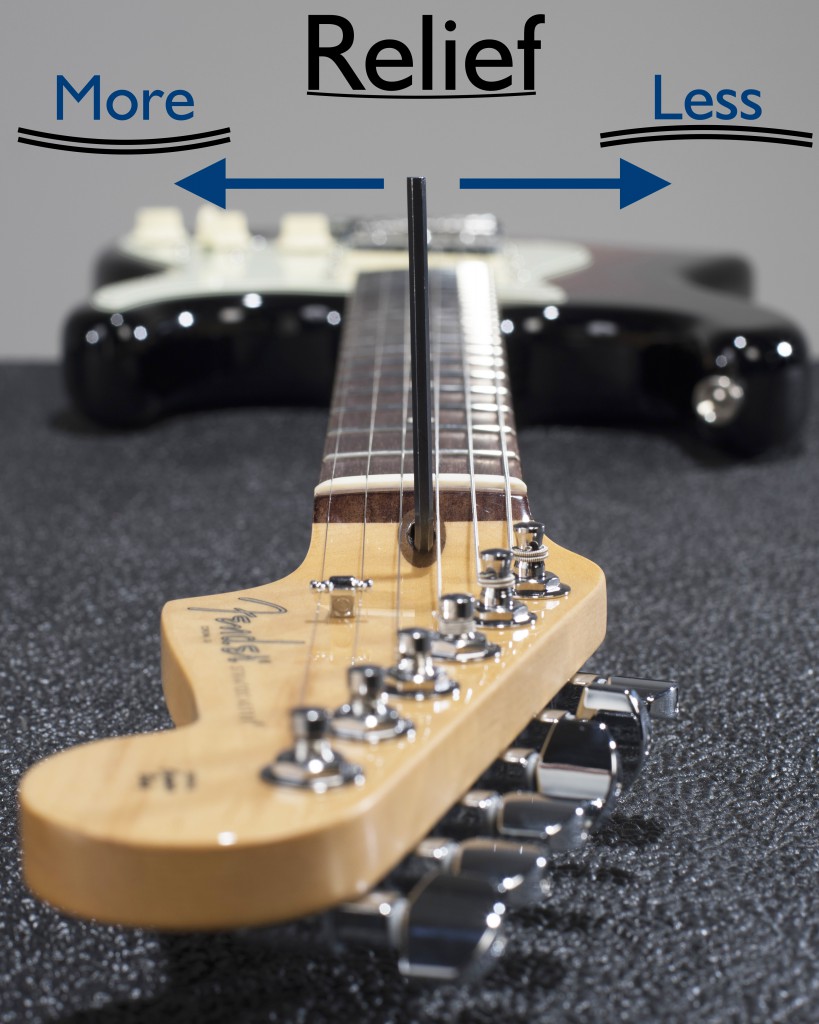
Credit: www.fender.com
Introduction To Neck Relief In Electric Guitars
Neck relief refers to the slight curvature found in the neck of an electric guitar. This curvature is critical, as it allows for optimal string vibration without any hindrance. Setting it properly ensures a comfortable playing experience while reducing fret buzz. Many guitarists find that a properly adjusted neck can significantly enhance the instrument’s playability and overall tone.
Understanding Neck Relief And Its Significance
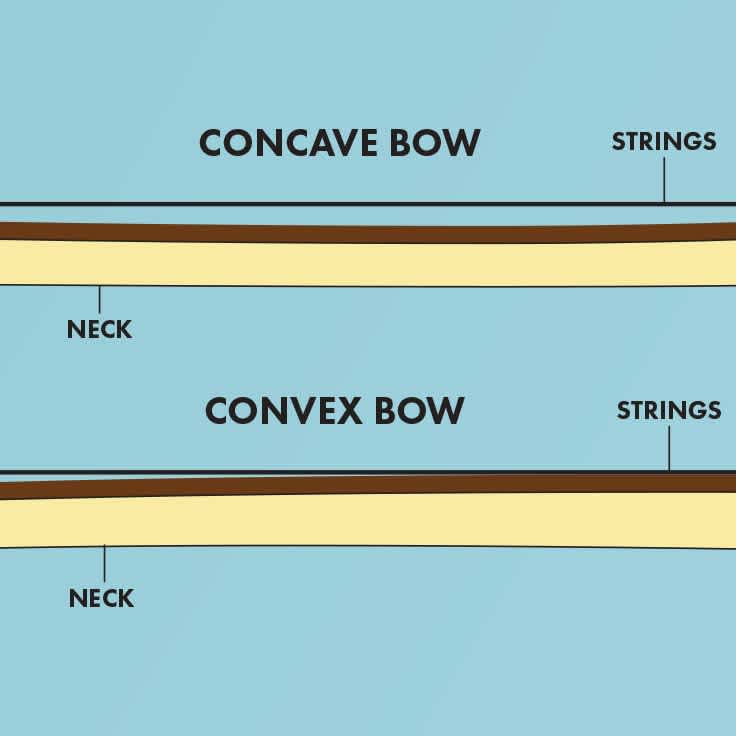
Neck relief is the concave bow that guitar necks exhibit when viewed sideways. This bow is adjusted by altering the tension on the guitar’s truss rod—a metal rod running along the neck’s length. Adequate neck relief is critical to allow the strings to vibrate freely over the frets. It also affects action—the distance between the strings and the fretboard, impacting how easily the guitar can be played.
The Impact Of Neck Relief On Playability And Tone
The curvature of the neck directly impacts the guitar’s playability. A neck with too much relief may lead to a higher action, requiring more effort to press the strings down. Conversely, insufficient relief might cause fret buzz as strings vibrate against the frets. The tonal quality is also influenced, as the string’s tension and height relative to the pickups alter the instrument’s resonance and sustain.
Factors That Influence Neck Relief
- String Gauge: Heavier strings exert more tension, potentially requiring more relief.
- Playing Style: Players with a heavier touch may prefer more relief to avoid buzz.
- Climate: Humidity and temperature can cause wood to expand or contract, altering relief.
- Truss Rod Tension: The tightness of the truss rod adjusts the neck’s curvature.
Credit: www.sweetwater.com
Measuring Neck Relief
Measuring the neck relief of an electric guitar is a crucial step in ensuring optimal playability and comfort. Precise neck relief impacts string action and the overall feel of the instrument, making it essential for both seasoned players and beginners alike to understand and be able to assess their guitar’s neck relief.
Tools Required For Measuring Neck Relief
Gathering the right tools is the first step towards a successful neck relief measurement. Ensure you have these essentials:
- Capo: A capo will keep the strings uniformly pressed to the fretboard.
- Feeler Gauge Set: Precision is key, and a set of feeler gauges will provide accurate measurements.
- Ruler: A ruler or a specialized measuring tool for string action can be helpful.
- Notepad and Pen: Record measurements to track adjustments and maintain consistency.
Step-by-step Guide To Checking Neck Relief
- Place the capo on the first fret to immobilize the strings.
- Holding down the last fret on the low E string, check the gap between the bottom of the string and the top of the 8th fret.
- Use the feeler gauge to measure this gap. Slide the appropriate gauge into the space to determine the relief.
- Document the measurement for future reference.
- Repeat this process for the high E string to ensure even relief across the fretboard.
Interpreting Measurements: Ideal Neck Relief Criteria
Understanding the measurements you’ve taken is crucial for maintaining the optimum curvature of your guitar’s neck. The ideal neck relief for most electric guitars ranges from .005 to .010 inches. Here’s what to consider:
| Measurement | Neck Condition | Recommended Action |
|---|---|---|
| Less than .005″ | Too flat | Loosen the truss rod slightly |
| .005″ to .010″ | Ideal | Maintain current setup |
| More than .010″ | Too much relief | Tighten the truss rod slightly |
Adjusting The Neck Relief
Keep your electric guitar’s performance in check with proper neck relief adjustments. Neck relief is the slight curvature in your guitar’s neck crucial for a buzz-free play. Understanding when, why, and how to adjust can mean the difference between a good and great playing experience. Let’s dive into the specifics of neck relief adjustments for your electric guitar.
When And Why To Adjust Your Guitar’s Neck Relief
Over time, guitars may develop imbalanced tensions leading to less than ideal action, which affects playability and comfort. Perhaps you’re experiencing unwanted fret buzz or the strings feel too high above the fretboard. These are telltale signs that your guitar’s neck relief requires attention. Changes in humidity and temperature can also necessitate adjustments, making it vital to assess neck relief regularly for optimal performance.
The Truss Rod: Understanding Its Role And Mechanism
The truss rod is a steel rod running along your guitar’s neck. It counteracts the tension of the strings to maintain a functional curvature of the neck. Adjusting the truss rod tweaks this curvature, called neck relief. Turning the truss rod clockwise tightens it, reducing relief and straightening the neck. Conversely, turning it counterclockwise loosens it, increasing relief.
Detailed Procedure For Adjusting Neck Relief
- Tune your guitar to the desired pitch, as relief changes with tension.
- Capo the first fret to isolate the neck’s role.
- Hold down the last fret on the lowest string and check the gap between the top of the eighth fret and the bottom of the string using a feeler gauge.
- The optimal gap is typically 0.006-0.010 inches (0.15-0.25 mm)
- Locate your guitar’s truss rod adjustment point, often at the headstock or the heel of the neck.
- Choose the correct truss rod tool for your guitar and carefully make the adjustments. A quarter turn is often enough to notice a change.
- Retune your guitar and recheck the relief, repeating the process if necessary.
Tips For Maintaining Optimal Neck Relief Over Time
- Keep your guitar in a stable environment with consistent humidity and temperature.
- Conduct a regular relief check, ideally before each performance.
- Store your guitar in its case when not in use to protect it from environmental changes.
- Consult a professional for periodic setups, ensuring expert attention.
Troubleshooting Common Issues
Neck relief is a critical aspect of your electric guitar’s setup, influencing both playability and comfort. Occasionally, guitarists may encounter challenges when adjusting the neck relief. This section addresses common troubleshooting tactics for when you encounter too much or too little neck relief, issues with the truss rod, and signs indicating the need for a professional setup.
Addressing Excessive Or Insufficient Neck Relief
Proper neck relief is essential for achieving the best action and playability from your electric guitar. If strings buzz or the action feels too high, your neck may require adjustment. Here’s what to look for and how to fix it:
- Excessive Relief: manifests as a significant dip in the neck’s curvature. Play notes at various frets. If you detect buzzing in the lower frets, your neck might be too concave.
- Insufficient Relief: results in high action, making it hard to press the strings down. Check by holding down the first and last fret; there should be a tiny gap—a few thousandths of an inch—between the top of the frets and the bottom of the strings around the 7th to 9th frets.
Adjustments can be made with the guitar’s truss rod. Turning the truss rod clockwise tightens it, reducing relief, while turning it counterclockwise loosens it, adding relief.
Dealing With Truss Rod Limitations And Damage
Truss rod adjustments have limitations and potential for damage if not handled properly. Here’s how to address these concerns:
- Stuck Truss Rod: Apply a few drops of penetrating oil and gently attempt to move it.
- Stripped Truss Rod: If the rod turns freely but doesn’t adjust the neck, it may be stripped. This requires professional attention.
Never force a truss rod. If it doesn’t turn with reasonable effort, consult a professional to avoid causing irreparable damage to your guitar.
Recognizing When Professional Setup Is Required
Some guitar issues necessitate a professional setup for optimal performance:
| Issue | Action |
|---|---|
| Truss Rod Maxed Out | If further adjustment isn’t possible, a pro should assess the situation. |
| Persistent Buzzing | A tech can identify and fix the source of the buzz. |
| Tuning Instability | Professionals can address other factors like nut condition and intonation. |
Complex setups can involve adjusting nut slots, fret work, or repositioning the bridge, all best left to someone with specialized tools and expertise.
How Does the Length of a Bass Guitar Neck Compare to the Neck Relief on an Electric Guitar?
The relationship between bass guitar neck length and neck relief on an electric guitar significantly affects playability. Typically, a longer bass guitar neck offers more tension and requires precise adjustments in relief to ensure optimal string action. For an in-depth analysis, consider the terms and factors in “bass guitar neck length explained.
Frequently Asked Questions On How Much Neck Relief Electric Guitar
What Should Neck Relief Be At 12th Fret?
For optimal neck relief at the 12th fret, aim for about 0. 010 inches (0. 25 mm) gap. Adjust the truss rod to achieve this clearance.
How Much Relief Should A Stratocaster Neck Have?
A typical Stratocaster neck should have a slight relief of about 0. 010 inches (0. 25 mm) at the 8th fret. Use a feeler gauge and capo for accurate measurement.
Should You Put Relief On A Guitar Neck?
Yes, adding relief to a guitar neck can improve playability by allowing the strings to vibrate freely without buzzing. Adjust the truss rod carefully to achieve the desired curvature.
How Do I Know If My Guitar Has Too Much Neck Relief?
To determine if your guitar has excessive neck relief, press down on the low E string at the first and last fret. Observe the gap at the 8th fret—if it’s much larger than a business card, the neck likely has too much relief.
Conclusion

Understanding the ideal neck relief for your electric guitar is crucial. It impacts playability and tone. Each player’s preference and playing style dictates the sweet spot. Remember, tiny adjustments can make a huge difference. Consult a professional for the best results, and keep rocking!
As an Amazon Associate, Cleanestor earns from qualifying purchases at no additional cost to you.