Adding music to a voice recording can enhance the listening experience. It can make your audio more engaging and professional.
Whether you’re a podcaster, a content creator, or just someone looking to spice up a personal recording, knowing how to mix music with your voice is a valuable skill. It can transform a plain recording into something vibrant and appealing.
In this guide, we’ll explore easy steps to seamlessly blend music with your voice recordings. From choosing the right software to balancing audio levels, we’ll cover all the basics you need to create polished and captivating audio. Let’s dive in and discover how to add that perfect musical touch to your voice recordings!
Choosing The Right Software
Finding the right software is crucial to add music to voice recordings. The right tool can make the process smooth and the result professional. But with many options available, making the right choice can be overwhelming. Let’s explore some popular software and their key features.
Popular Software Options
| Software | Platform | Price |
|---|---|---|
| Audacity | Windows, Mac, Linux | Free |
| GarageBand | Mac, iOS | Free |
| Adobe Audition | Windows, Mac | Subscription |
Key Features To Look For
- Ease of Use: The software should be user-friendly.
- Audio Formats: Support for various audio file types is essential.
- Editing Tools: Look for basic and advanced editing features.
- Effects and Plugins: Check for built-in effects and plugin support.
- Export Options: Ensure it offers multiple export options.
Choosing the right software is about finding a balance between features and ease of use. Make sure it fits your needs and budget. Experiment with free options first to understand what works best for you.
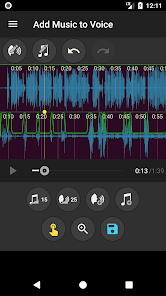
Credit: play.google.com
Preparing Your Voice Recording
Before adding music to your voice recording, it’s essential to prepare your recording. Good preparation ensures clarity and quality. This section will guide you through some essential tips and considerations.
Recording Tips
Ensure you record in a quiet environment. Background noise can ruin the clarity of your voice. Use a good-quality microphone. This will make your recording sound professional. Speak clearly and at a steady pace. This helps in blending the music seamlessly later. Take breaks if needed. This keeps your voice fresh and consistent.
File Formats
Choose the right file format for your voice recording. Common formats include MP3, WAV, and AAC. MP3 files are compressed and take up less space. WAV files are uncompressed and offer higher quality. AAC files also provide good quality but are less common. Ensure your editing software supports your chosen format. Converting files later can reduce quality.
Selecting The Music
Adding music to your voice recording can create a more engaging experience. It can set the mood, emphasize key points, and make your content more memorable. Before you start, it is important to select the right music. This involves finding royalty-free music and choosing the right genre.
Finding Royalty-free Music
Royalty-free music is essential for voice recordings. It ensures you avoid legal issues. Many websites offer royalty-free music. Some popular options include Free Music Archive, Incompetech, and Bensound. These platforms provide a wide range of music genres. You can find music suitable for different moods and themes.
Explore these websites. Listen to samples before downloading. Ensure the music complements your voice recording. Remember, the right track enhances your content. It should not distract listeners from your message.
Choosing The Right Genre
Genre plays a crucial role in setting the tone of your recording. For a calm and soothing effect, choose classical or ambient music. If you aim to energize, opt for upbeat genres like pop or electronic. Consider the message you want to convey. The music should align with your content’s theme.
Think about your audience. What kind of music do they enjoy? Select a genre that resonates with them. This connection can make your recording more impactful. Experiment with different genres. Find the one that best matches your voice and message.
Credit: m.youtube.com
Importing Files
Adding music to a voice recording can make your audio more engaging. The first step in this process is importing the necessary files. This involves bringing your voice recording and music track into your editing software.
Adding Voice Recording
To begin, you need to import your voice recording. Follow these steps:
- Open your audio editing software.
- Locate the Import option in the file menu.
- Select your voice recording file from your computer.
- Click Open to import the file into the software.
Your voice recording will now appear on the timeline. You can play it to ensure the file is correct.
Adding Music Track
Next, you need to import your music track. Here’s how:
- Click on the Import option again.
- Choose the music file from your computer.
- Click Open to add the music track to the software.
The music track will be placed on a separate timeline. This allows you to edit both the voice recording and music track individually. You can adjust the volume, timing, and other settings to blend the audio seamlessly.
By importing both files correctly, you set the stage for creating a polished and engaging audio project.
Syncing Music With Voice
Syncing music with a voice recording enhances the overall listening experience. It adds depth and emotion to your voice. The process involves aligning the music track with the spoken words. This creates a cohesive and engaging audio piece. Let’s delve into the steps to sync music with voice effectively.
Adjusting Timing
First, adjust the timing of the music. Use audio editing software for this task. Import both the voice and music tracks. Place them on separate layers. This allows you to edit each track individually. Start by identifying the key moments in your voice recording. These moments could be pauses, emphasis points, or transitions.
Next, align the music to these moments. Ensure the music complements the speech. Avoid overpowering the voice with loud music. Adjust the volume and position of the music. This ensures a balanced mix. Check for any timing mismatches. Make small adjustments as needed.
Matching Music To Speech
Now, focus on matching the music to the speech. Choose music that fits the mood of your voice recording. The tone and pace of the music should align with the spoken words. For instance, a calm voice recording requires soft, gentle music. A lively speech needs upbeat, energetic music.
Listen to the entire recording. Identify any segments where the music and speech clash. Adjust the music to fit the speech. You can also use fades and cuts. This helps in blending the music seamlessly. Repeat the process until you achieve a perfect sync. Pay attention to the overall flow. The goal is to create a smooth, engaging audio experience.
Editing And Mixing
Editing and mixing music with voice recordings can be fun. It helps create professional and engaging audio content. Proper editing and mixing make sure the music and voice blend well. This enhances the listening experience and keeps the audience engaged. In this section, learn essential tips for balancing volumes and using effects when adding music to voice recordings.
Balancing Volumes
Balancing volumes ensures that the voice and music are clear. If the music is too loud, it will drown out the voice. If the voice is too loud, the music will be hard to hear.
- Use volume control sliders to adjust levels.
- Listen to your audio in different environments.
- Keep the voice slightly louder than the music.
This way, the voice remains the main focus. The music enhances the content without overpowering it.
Using Effects
Adding effects can make the audio sound more professional. Common effects include reverb, equalization (EQ), and compression.
- Reverb: Adds a sense of space. Makes the voice sound like it’s in a room.
- EQ: Adjusts the frequency balance. Enhances clarity by boosting or cutting specific frequencies.
- Compression: Controls the dynamic range. Makes the voice and music levels more consistent.
Use effects sparingly. Overusing effects can make the audio sound unnatural.
Experiment with different settings to find the best balance. This ensures the voice and music complement each other.
Exporting The Final Product
Once you have combined your voice recording with music, it’s time to export your final product. This process ensures your project is saved in a format that suits your needs. Here’s how you can do it effectively.
Choosing Export Formats
Choosing the right export format is crucial. Different formats serve different purposes. Here are some common formats:
- MP3: This is a popular format. It’s great for sharing because of its small size.
- WAV: This format is uncompressed. It offers high-quality audio but takes up more space.
- AAC: This format is used by Apple devices. It provides good quality and a smaller file size.
Select the format that best fits your needs. For online sharing, MP3 is often the best choice. For high-quality audio, consider WAV.
Saving Your Project
After choosing the format, it’s time to save your project. Follow these steps:
- Click on the File menu in your audio editing software.
- Select Export or Save As.
- Choose the desired file format (MP3, WAV, AAC).
- Pick a destination folder on your computer.
- Click Save or Export.
Make sure to name your file appropriately. This makes it easier to locate later. Always double-check the saved file to ensure it plays correctly.
Sharing Your Recording
Sharing your voice recording with added music is an exciting step. It allows others to enjoy your creation. Whether you are a podcaster, storyteller, or musician, you want your work to reach a wide audience. This section will guide you on how to share your recording effectively.
Uploading To Platforms
First, choose the right platform for your recording. Popular options include SoundCloud, Spotify, and YouTube. These platforms have large audiences. They also offer easy upload options.
To upload, create an account on your chosen platform. Follow the instructions to upload your audio file. Ensure your file is in the correct format. MP3 is a common choice. Add a title, description, and tags. These help people find your recording.
Consider your audience. If your recording is a podcast, upload to podcast platforms. Examples include Apple Podcasts and Google Podcasts. This increases the chances of reaching listeners who enjoy your content.
Promoting Your Work
Once uploaded, promotion is key. Share your recording on social media. Platforms like Facebook, Twitter, and Instagram are great for this. Use simple language to describe your work. Ask friends and family to share it as well.
Join online communities related to your topic. Share your recording there. Be active in these communities. This helps build your audience. Engage with listeners who comment on your recording. Thank them and answer their questions.
Consider creating a blog or website. Share your recordings there. Write posts about the making of your recordings. This gives listeners more context and keeps them engaged. Finally, keep track of your recording’s performance. Adjust your promotion strategies based on what works best.

Credit: www.canva.com
Frequently Asked Questions
How Can I Add Music To A Voice Recording?
You can use audio editing software like Audacity, GarageBand, or online tools. Import your voice recording and music file. Adjust the volume levels and timing. Export the final mix.
What Software Is Best For Adding Music?
Popular software includes Audacity, GarageBand, and Adobe Audition. These tools offer user-friendly interfaces and powerful features for mixing audio tracks.
Can I Add Music Using My Smartphone?
Yes, you can use apps like GarageBand for iOS or Audio Evolution Mobile Studio for Android. These apps allow easy mixing and editing of audio tracks.
Is It Free To Add Music To A Voice Recording?
Many audio editing tools like Audacity are free. Some advanced software and apps may require a purchase or subscription.
Conclusion
Adding music to your voice recording can enhance your content significantly. With a few simple steps, you can create a professional sound. Choose the right software. Select appropriate music. Mix carefully to balance the audio. Always review your final product.

Practice makes perfect, so keep experimenting. Soon, you will have polished recordings that engage your audience. Enjoy the process and happy recording!
{ “@context”: “https://schema.org”, “@type”: “FAQPage”, “mainEntity”: [ { “@type”: “Question”, “name”: “How can I add music to a voice recording?”, “acceptedAnswer”: { “@type”: “Answer”, “text”: “You can use audio editing software like Audacity, GarageBand, or online tools. Import your voice recording and music file. Adjust the volume levels and timing. Export the final mix.” } } , { “@type”: “Question”, “name”: “What software is best for adding music?”, “acceptedAnswer”: { “@type”: “Answer”, “text”: “Popular software includes Audacity, GarageBand, and Adobe Audition. These tools offer user-friendly interfaces and powerful features for mixing audio tracks.” } } , { “@type”: “Question”, “name”: “Can I add music using my smartphone?”, “acceptedAnswer”: { “@type”: “Answer”, “text”: “Yes, you can use apps like GarageBand for iOS or Audio Evolution Mobile Studio for Android. These apps allow easy mixing and editing of audio tracks.” } } , { “@type”: “Question”, “name”: “Is it free to add music to a voice recording?”, “acceptedAnswer”: { “@type”: “Answer”, “text”: “Many audio editing tools like Audacity are free. Some advanced software and apps may require a purchase or subscription.” } } ] }As an Amazon Associate, Cleanestor earns from qualifying purchases at no additional cost to you.