Thirsty enough to get the best sound possible from your studio monitors? Well, this Studio Setup 101 guide will take you through the whole process step by step in a very easy and comfortable way.
Creating a great studio surrounding is fantastic to get started in music production. But all that gets in the way of creating good music if your listening environment doesn’t serve you perfectly. What you need is a seamless audio treatment for your studio.
Countless studios are stuck with a common studio setup without a proper listening environment. So, you can guess that audio treatment is the quintessential part of the studio setup. Most artists set their hearts on creating and mixing their own songs in an ideal condition. But most of the time, that seems to be a long way off from happening because the monitor is not calibrated with the rest of the setup.
Related Readings
- The Yamaha HS8 Studio Monitor Review
- How To Clean Studio Monitors?
- What Are Studio Monitors (The Ultimate Guide)
Calibrating between the monitor and the listening space is one of the most crucial works that gets overlooked. On the other hand, a well-calibrated sound brings more consistency, well-focused adjustments, and decisions when it comes to listening.
What We Will Learn
In this article, we are going through step by step on these topics:
- How to position your speakers correctly
- How to calibrate your studio monitors
- How to calibrate your Digital Audio Workstation (DAW)
- How to calibrate with the sound from your computer output
Why Calibrating The Monitor Is So Important?
The main purpose of speaker calibration is very simple. Our brain responds differently to the altering frequencies at different sound levels. For example – at a lower volume, the brain focuses more on the midrange frequencies. Conversely, at higher volume levels, the brain focuses more on the low-end and high-end frequencies. This is a simple outline of the Fletcher Munson Curve.
So, the bottom line is…
Fixating on a consistent loudness enhances the listening ability for sure. Plus, it also enables you to understand the music at other sound levels i.e., whether the tonal balance is on or off or if the sound is too loud or not.
So, if anything, what did we learn from this Fletcher Munson Curve? Here’s the piece you want to know.
85 dB Sound Processing Level (SPL) is ideal in a large room and also the best range for flat sounds.
79 dB Sound Processing Level (SPL) is ideal in a small (bedroom) sized room for obtaining the best flat response.
Now, you know what the best SPL for your ideal-sized room is. So, it’s easier to be more aware of the bass and treble of your track at varying sound levels.
Here are a few reasons why you should enhance your listening environment:
1. The main aim of calibrating your studio monitors is to understand whether the pre-defined output levels of your DAW match with the SPL defined on your speakers. It’s that simple.
2. Listening to the sample audio tracks at a fixed loudness makes you accustomed to that sound level and the output levels based on that listening environment. So, any changes in the frequency of sound become easily perceivable.
3. Use the Fletcher Munson curve to find the ideal flat sound that is suitable for all frequencies and environments.
4. No two monitors are manufactured equally by default. Although they are great, they still carry a volume difference of around -0.5 dB to 1 dB. So, setting the same volume level for both monitors in the same position can possibly generate an inaccurate stereo image.
Speaker Positioning
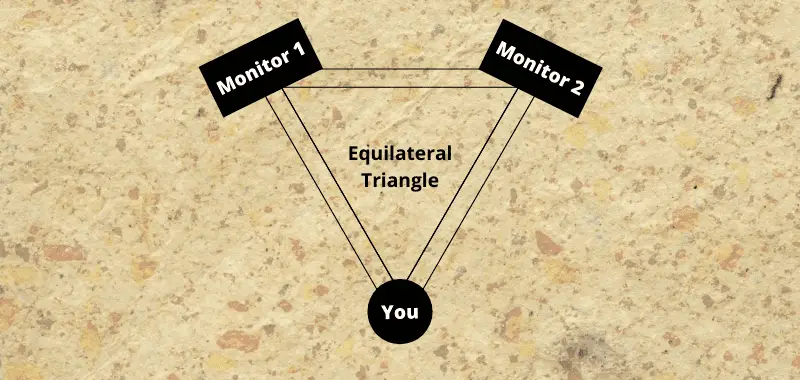
First thing first – position your speakers in their sweet spot. But the best position also depends on where you sit in front of the monitors while listening to the audio playbacks.
The best way to get a complete listening experience is to form an equilateral triangle between you and the two audio speakers on each side. In short, place yourself and the audio speakers at an equal distance from each other.
How To Calibrate Your Studio Monitors (Step By Step Guide)
Step 1: Decide A Preferred Operating Sound Level
You have a whole lot of ways to calibrate your studio but, all that gets in the way of a good setup if you are nowhere with your true sound. It’s better to stick to a 20dB headroom margin, which is a professional convention. Choosing a 20dB headroom margin gives a -20dBFS digital operation level.
You can use a well-calibrated meter scale to create a reference point. For this, you can use either analog meters or digital sample meters. In the case of analog-style meters, the reference points are given by default like – 0VU, PPM4, etc.
Step 2: Use Pink Noise For The Best Acoustic Alignment
Pink noise is a test tone that produces an equal amount of sound level across each octave. Thus, it enables you to make finely tuned acoustic adjustments, including speaker and room calibration. Pink noises sound just like a waterfall with a smooth top-end sound. Plus, these are great for acoustic treatment and are also easily available online.
Pro Tip:
It’s best to restrict the pink noise between 500 Hz – 2 kHz to minimize the reflections or low-frequency standing waves when you know your room is acoustically untreated. The idea is to reduce the measurement errors to a minimum by reducing the low-frequency standing waves or strong mid frequencies, and also the high-frequency reflections.
Besides, it is important to know that only a few meters can indicate the true RMS level. So, don’t be surprised if your pink noise plays at slightly louder than -20 dBFS.
Step 3: Test The Volume Control System
Testing your audio mixes with all kinds of sound is a great way to tell if your mix stands out on all volumes. To make this work, you need to set the volume control to a precise calibrated position so that you can work on it and create your own reference level. So, turn the volume up to test if there is any unwanted noise in your mixes. Also, make sure to test it at a low sound as well.
The idea here is to determine the quality of the output audio track. This helps you to understand how much the compressor or limiter had increased or decreased the sound of the track.
Most monitors have some kind of audio interface for volume control and dedicated pre-defined settings for this purpose. Also, the monitors are adjusted in decibels so that anyone can adjust the replay volume to understand the relative loudness of the track and adjust it accordingly.

It is safe to use an external monologue or midi controller with the monitors so that you can optimize the gain structure between the active speaker inputs (or power amps) and converter output.
As an Amazon Associate, Cleanestor earns from qualifying purchases at no additional cost to you.