Changing the audio interface in GarageBand is simple. Follow these steps for a smooth switch.
GarageBand is a powerful music creation tool. Sometimes, you need to change the audio interface for better sound quality or new equipment. Understanding how to do this can enhance your recording and production experience. This guide will walk you through the process step-by-step.
Whether you’re a beginner or seasoned user, these instructions will help you adjust your setup quickly and efficiently. Let’s dive in and make your GarageBand sessions sound even better!

Credit: www.youtube.com
Introduction To Audio Interfaces
Audio interfaces play a crucial role in digital music production. They act as a bridge between your instruments and your computer. Understanding audio interfaces is essential for any Garageband user.
Purpose Of Audio Interfaces
Audio interfaces serve to convert analog signals into digital signals. This conversion allows your computer to process the sound. They also do the reverse, converting digital signals back to analog. Thus, they enable you to hear your digital creations through speakers or headphones.
Here are some key purposes of audio interfaces:
- Improve sound quality
- Reduce latency
- Provide multiple input/output options
- Enable higher sample rates
Benefits For Garageband Users
Using an audio interface with Garageband offers several benefits. First, you will notice an immediate improvement in sound quality. This is because audio interfaces have better preamps and converters compared to built-in computer sound cards.
Second, audio interfaces reduce latency. Latency is the delay between playing a note and hearing it. Lower latency makes recording and mixing more precise and enjoyable.
Third, audio interfaces provide multiple inputs and outputs. This feature allows you to record several instruments or vocals simultaneously. You can also connect professional studio monitors for better sound playback.
Finally, audio interfaces support higher sample rates. Higher sample rates mean better audio resolution and detail. This feature is crucial for producing professional-quality music.
Here’s a quick comparison of using an audio interface versus not using one:
| Feature | With Audio Interface | Without Audio Interface |
|---|---|---|
| Sound Quality | High | Moderate |
| Latency | Low | High |
| Input/Output Options | Multiple | Limited |
| Sample Rates | Higher | Lower |
In summary, an audio interface is a valuable addition for any Garageband user. It enhances sound quality, reduces latency, and offers more flexibility.
Selecting The Right Audio Interface
Choosing the right audio interface for Garageband is crucial. It impacts the quality and ease of your music production. Not all audio interfaces are the same. Some work better with Garageband than others. Here’s what you need to know to make the best choice.
Compatibility With Garageband
Ensure the audio interface works with macOS. Garageband runs on this operating system. Check the manufacturer’s website for compatibility information. Look for interfaces that mention Garageband support. This will save you many headaches.
Key Features To Consider
Focus on the number of inputs and outputs. More inputs allow you to record multiple instruments. Outputs help in connecting speakers and headphones. Quality of preamps is essential. Better preamps mean better sound quality. Look for interfaces with low latency. This reduces the delay between playing and hearing the sound. Portability might be important. If you travel often, a compact interface will be handy. Lastly, consider the build quality. A sturdy interface will last longer.
Setting Up Your Audio Interface
Setting up your audio interface in Garageband is crucial for quality recordings. It ensures that you can capture sounds with clarity. This guide will help you connect and configure your audio interface.
Connecting To Your Computer
First, locate the USB or Thunderbolt cable that came with your audio interface. Connect one end to your audio interface and the other to your computer’s port. Ensure the connection is secure. Some audio interfaces also require an external power source. If yours does, plug it in and turn on the power.
Installing Necessary Drivers
Next, you need to install the drivers for your audio interface. These drivers help your computer communicate with the device. Visit the manufacturer’s website to download the latest drivers. Follow the instructions on the site to install them. After installation, restart your computer to ensure the drivers are properly loaded.
After restarting, open Garageband. Go to the ‘Preferences’ menu and select ‘Audio/MIDI.’ Choose your audio interface from the list of available devices. This will route all audio through your new interface. Now you are ready to start recording with high-quality sound!
Configuring Garageband Settings
Configuring Garageband settings is essential for a smooth audio production experience. By setting up your audio interface correctly, you ensure high-quality sound. Let’s dive into the steps for configuring these settings.
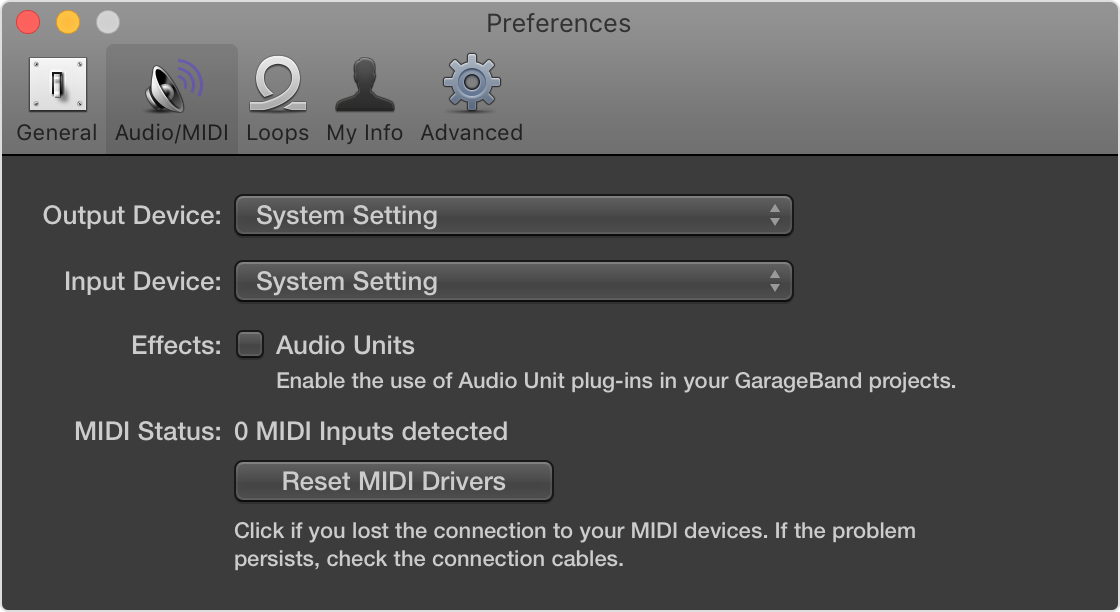
Accessing Preferences
First, you need to access Garageband’s preferences. Follow these steps:
- Open Garageband on your Mac.
- Click on Garageband in the top menu.
- Select Preferences from the dropdown menu.
Once you are in the preferences menu, you can adjust various settings. This includes your audio interface.
Selecting Your Audio Interface
After accessing preferences, you need to select your audio interface. Here’s how:
- In the preferences window, click on the Audio/MIDI tab.
- Under the Audio Output section, select your desired audio interface from the dropdown list.
- Do the same for the Audio Input section if needed.
Ensure that your audio interface is properly connected to your Mac. This ensures Garageband recognizes it.
Now, you should be able to record and play audio using your selected interface. Double-check your settings to avoid any issues.
Optimizing Audio Performance
Optimizing audio performance in Garageband is crucial for a smooth recording experience. Poor performance can lead to glitches, lag, and frustration. Let’s explore how to enhance your audio setup for the best results.
Adjusting Buffer Size
Buffer size impacts the performance of your audio interface. A smaller buffer size reduces latency but requires more processing power. For recording, set a lower buffer size. This minimizes the delay between input and output. However, this can strain your computer. If your system struggles, increase the buffer size. Larger buffer sizes are better for mixing and playback. They allow your computer to process audio smoothly.
Managing Latency Issues
Latency can be a major issue in audio production. It creates a delay between playing a note and hearing it. To manage latency, start by adjusting the buffer size. A smaller buffer reduces latency. Also, check your audio interface settings. Ensure it is set up correctly. Use direct monitoring if available. This feature lets you hear your input in real-time. Another tip is to close other applications. Running multiple programs can slow down your system. Focus on Garageband to improve performance.
Credit: support.focusrite.com
Recording With The New Interface
So, you’ve got a new audio interface and you’re ready to record with it in Garageband. This new gear can help improve your sound quality and recording experience. Let’s dive into the process of recording with your new setup.
Setting Up Tracks
First, open Garageband and create a new project. Click on the “+” button to add a new track. Choose the type of track that matches your instrument or voice. Select either “Audio” for instruments like guitar or microphone or “Software Instrument” for digital sounds.
Next, connect your instrument or microphone to the new audio interface. Make sure it’s securely plugged in. In Garageband, go to “Preferences” and select “Audio/MIDI.” Choose your new audio interface from the dropdown menu. This tells Garageband to use your new gear for recording.
Monitoring And Adjusting Levels
Once your tracks are set up, it’s time to monitor and adjust levels. Click on the track you want to record. In the Smart Controls pane, you’ll see input and output options. Make sure the correct input is selected for your audio interface.
Play your instrument or sing into the microphone. Watch the input level meter. It should move with your sound. Adjust the gain on your audio interface if needed. You want the levels to be strong but not peaking into the red.
Use headphones to listen to the playback in real-time. This helps you hear any issues and make adjustments quickly. Ensure your output levels are balanced for a clean recording.
Troubleshooting Common Issues
Changing your audio interface in GarageBand can sometimes cause issues. These problems can be frustrating. But with some simple steps, you can fix them quickly. This section covers common issues and how to troubleshoot them.
Audio Interface Not Recognized
Sometimes, GarageBand might not recognize your audio interface. First, check all connections. Ensure your cables are secure. Reconnect them if needed. Then, restart your computer. Open GarageBand and check the Preferences. Go to the Audio/MIDI tab. Select your audio interface from the list. If it still doesn’t work, try updating your audio interface drivers. Visit the manufacturer’s website for the latest drivers.
Sound Quality Problems
Experiencing poor sound quality? Start by checking your settings. Ensure the sample rate matches on both GarageBand and your audio interface. Mismatched settings can cause problems. Next, check your cables. Damaged cables can affect sound quality. Replace them if necessary. Also, avoid using USB hubs. Connect your audio interface directly to your computer. Finally, close other applications. Running many apps can affect performance.
Credit: support.apple.com
Advanced Tips And Tricks
Are you ready to take your Garageband projects to the next level? Dive into these advanced tips and tricks to get the most out of your audio interface. Whether you want to use multiple interfaces or integrate external hardware, this guide will help you enhance your music production setup.
Using Multiple Audio Interfaces
Using more than one audio interface can expand your recording capabilities. This is useful for complex projects.
- First, connect all your audio interfaces to your Mac.
- Open Audio MIDI Setup from the Applications folder.
- Click the plus button at the bottom left and choose Create Aggregate Device.
- Check the boxes next to the audio interfaces you want to use.
- Rename the new aggregate device for easy identification.
- Open Garageband and go to Preferences > Audio/MIDI.
- Select your new aggregate device as the input and output device.
Now you can record from multiple sources simultaneously. This is perfect for complex setups.
Integrating External Hardware
External hardware can add unique sounds to your projects. Here’s how to integrate it:
- Connect your external hardware to your audio interface.
- Open Garageband and create a new track.
- Choose the type of track that matches your hardware (e.g., Audio or Guitar/Bass).
- Select the input channel that matches your hardware connection.
- Adjust the input levels to avoid clipping.
- Start recording.
Using external hardware can give your music a unique edge. You can use synths, drum machines, or even vintage gear.
With these tips, you can unlock new creative possibilities in Garageband. Happy recording!
Frequently Asked Questions
How Do I Change The Audio Interface In Garageband?
To change the audio interface in GarageBand, open Preferences, select Audio/MIDI, and choose your desired interface from the dropdown menu.
Why Isn’t My Audio Interface Working In Garageband?
If your audio interface isn’t working, ensure it’s properly connected, drivers are updated, and it’s selected in GarageBand’s preferences.
Can I Use Multiple Audio Interfaces In Garageband?
GarageBand supports only one audio interface at a time. Use an aggregate device for multiple inputs.
How To Fix Audio Latency In Garageband?
To fix audio latency, adjust the buffer size in GarageBand’s Preferences under the Audio/MIDI section.
Conclusion
Changing the audio interface in GarageBand is simple with these steps. Follow the instructions to ensure smooth audio transitions. Remember to double-check your settings. This ensures optimal performance. Experiment with different interfaces to find what suits you best. Practice makes perfect.

With time, you’ll handle GarageBand like a pro. Keep creating amazing music. Enjoy exploring new sounds and features. Happy recording!
{ “@context”: “https://schema.org”, “@type”: “FAQPage”, “mainEntity”: [ { “@type”: “Question”, “name”: “How do I change the audio interface in GarageBand?”, “acceptedAnswer”: { “@type”: “Answer”, “text”: “To change the audio interface in GarageBand, open Preferences, select Audio/MIDI, and choose your desired interface from the dropdown menu.” } } , { “@type”: “Question”, “name”: “Why isn’t my audio interface working in GarageBand?”, “acceptedAnswer”: { “@type”: “Answer”, “text”: “If your audio interface isn’t working, ensure it’s properly connected, drivers are updated, and it’s selected in GarageBand’s preferences.” } } , { “@type”: “Question”, “name”: “Can I use multiple audio interfaces in GarageBand?”, “acceptedAnswer”: { “@type”: “Answer”, “text”: “GarageBand supports only one audio interface at a time. Use an aggregate device for multiple inputs.” } } , { “@type”: “Question”, “name”: “How to fix audio latency in GarageBand?”, “acceptedAnswer”: { “@type”: “Answer”, “text”: “To fix audio latency, adjust the buffer size in GarageBand’s Preferences under the Audio/MIDI section.” } } ] }As an Amazon Associate, Cleanestor earns from qualifying purchases at no additional cost to you.