Connecting your digital piano to an audio interface can improve your sound. It enhances recording quality and provides more control.
Musicians often need clear and high-quality sound for recordings or performances. Connecting a digital piano to an audio interface helps achieve this. Whether you are a beginner or a seasoned player, understanding this process is essential. It allows you to record music, use different software, and connect to other devices.
This blog will guide you through the steps, making it easy and straightforward. Let’s explore how to connect your digital piano to an audio interface efficiently.
Introduction To Digital Piano And Audio Interface
Connecting a digital piano to an audio interface can seem complex. But it offers significant benefits for musicians. This guide will explain how to connect your digital piano to an audio interface.
Purpose Of Connecting
Understanding the purpose is essential. Connecting your digital piano to an audio interface allows for better sound quality. You can record your piano playing directly onto a computer. This connection also opens up possibilities for sound editing and mixing.
Benefits Of Connection
- Improved Sound Quality: An audio interface enhances sound clarity.
- Recording Capability: Easily record your performances.
- Versatile Use: Use your digital piano with various software.
- Sound Editing: Edit and mix your sound easily.
- Live Performance: Connect to speakers for better live sound.
| Feature | Benefit |
|---|---|
| Improved Sound Quality | Enhanced sound clarity and depth |
| Recording Capability | Easy recording of performances |
| Versatile Use | Compatibility with various software |
| Sound Editing | Simple editing and mixing of sound |
| Live Performance | Better sound for live shows |

Credit: www.reddit.com
Necessary Equipment
Connecting a digital piano to an audio interface is a straightforward process. To ensure a successful connection, you need the right equipment. This section will guide you through the essential gear required for a seamless setup.
Digital Piano
Your digital piano should have the necessary output ports. Most modern digital pianos come with MIDI or USB ports. Check if your piano has these ports. If it does, you can connect it to an audio interface easily.
Audio Interface
An audio interface is crucial for capturing high-quality sound. Ensure your audio interface has MIDI or USB inputs. This allows you to connect your digital piano directly. Choose an interface with low latency for the best performance.
Cables And Adapters
To connect your digital piano to the audio interface, you need the right cables and adapters. The table below lists common cables and their uses:
| Type | Use |
|---|---|
| MIDI Cable | Used for MIDI connections |
| USB Cable | For direct USB connections |
| 1/4 Inch TRS Cable | For audio output to interface |
| 1/4 Inch to RCA Adapter | When connecting to RCA inputs |
Ensure you have the correct cables for your equipment. If your piano has MIDI ports, use a MIDI cable. For USB connections, a USB cable is needed. Double-check the ports on both your digital piano and audio interface before purchasing cables.
Setting Up The Digital Piano
Connecting your digital piano to an audio interface can enhance your recording quality. Setting up the digital piano is the first step. Ensure you follow the steps below carefully to get the best results.
Powering On
Before anything else, ensure your digital piano is powered on. Locate the power button, usually on the back or side of the piano. Press and hold it until the instrument lights up. Make sure the piano is properly plugged into a power source.
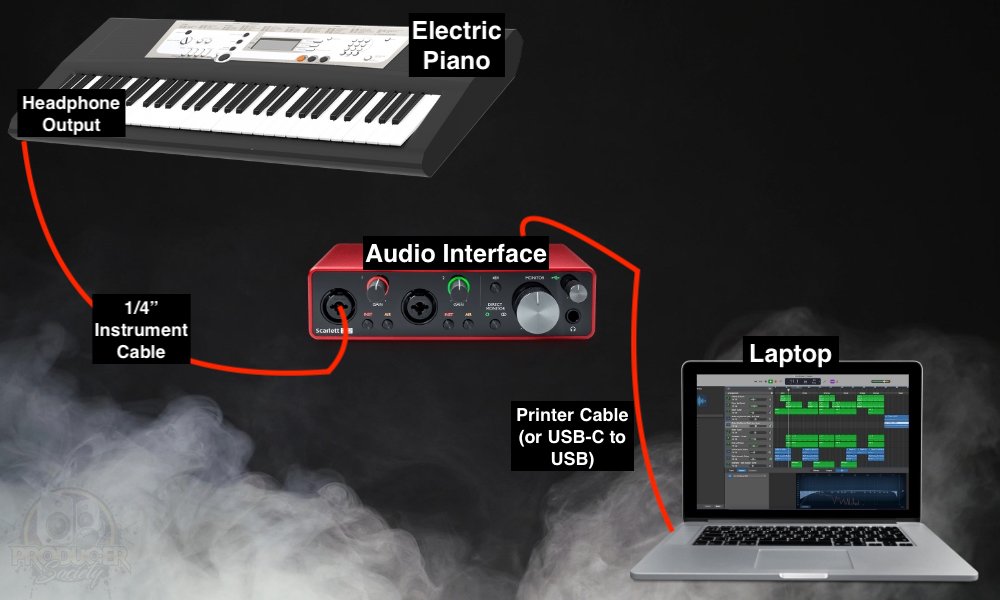
Output Settings
Next, adjust the output settings on your digital piano. Look for the output jacks, which are typically labeled as “Line Out” or “Headphone.” These jacks will connect to your audio interface.
Use a standard 1/4-inch cable to connect the output jacks to your audio interface. If your digital piano has multiple output options, choose the one best suited for your needs. For most users, the “Line Out” is ideal.
| Output Type | Recommended Use |
|---|---|
| Line Out | Best for direct connection to audio interfaces |
| Headphone Jack | Useful for private practice or monitoring |
Adjust the volume on the digital piano to a moderate level. This ensures a clean signal without distortion. You can fine-tune the volume later, once connected to the audio interface.
Some digital pianos have additional settings for output quality. Check your user manual for any specific instructions. Adjust these settings as needed to ensure the best sound quality.
Once everything is set up, you are ready to connect the audio interface. Follow the instructions provided with your interface for a seamless connection.

Credit: www.mozartproject.org
Configuring The Audio Interface
After connecting your digital piano to your audio interface, the next step is to configure the audio interface. Proper configuration ensures that your digital piano’s sound is accurately captured and transmitted to your computer. This process involves installing necessary drivers and adjusting input settings.
Installing Drivers
Before using your audio interface, you need to install the correct drivers. These drivers help your computer communicate with the audio interface effectively.
Follow these steps to install drivers:
- Visit the manufacturer’s website.
- Download the latest drivers for your specific model.
- Run the installer and follow the on-screen instructions.
- Restart your computer to complete the installation.
Installing the right drivers ensures that your audio interface works smoothly with your digital piano.
Input Settings
After installing the drivers, configure the input settings on your audio interface. This step is crucial for optimal sound quality.
Here’s how to adjust input settings:
- Open your audio interface’s control panel.
- Select the input channel connected to your digital piano.
- Set the input level to avoid clipping. A good starting point is around 50%.
- Enable any necessary features like phantom power, if required.
- Test your setup by playing a few notes on your digital piano.
Proper input settings ensure that your digital piano’s sound is clear and free from distortion.
Configuring the audio interface correctly is essential for achieving high-quality recordings. Take your time to adjust settings accurately for the best results.
Connecting Cables
Connecting your digital piano to an audio interface can enhance your music. It allows you to record, edit, and produce high-quality sound. The first step is choosing the right cables and connecting them correctly. This guide will help you do just that.
Choosing The Right Cable
Selecting the correct cable is crucial. There are different types of cables available. Here are some common options:
- USB Cable: Most digital pianos come with a USB port. This cable is easy to use and transfers both MIDI and audio data.
- MIDI Cable: For older models, MIDI cables are a good choice. They transfer only MIDI data.
- TRS Cable: This cable is for connecting the audio output directly. TRS cables carry a balanced signal, reducing noise.
Check your digital piano’s manual to see which ports it has. This will help you choose the right cable.
Connecting To Audio Interface
Once you have the right cable, connect it to your audio interface. Follow these steps:
- Locate the output port on your digital piano. It could be USB, MIDI, or audio out.
- Insert one end of the cable into this port.
- Find the corresponding input port on your audio interface.
- Connect the other end of the cable to this port.
Ensure the connections are secure. Loose connections can cause noise or poor sound quality.
Credit: ppmgoldmasale.com
Testing The Connection
After you have connected your digital piano to an audio interface, it is crucial to test the connection. Ensuring everything works properly will help you achieve the best sound quality. This involves checking the sound output and troubleshooting any issues that may arise.
Checking Sound Output
First, power on your digital piano and audio interface. Next, open your audio software on your computer. Play a few notes on your digital piano. Listen for the sound through your speakers or headphones. Check if the sound is clear and free of distortion. Adjust the volume levels on both the digital piano and the audio interface. Ensure the sound output matches your preferences.
Troubleshooting Common Issues
If you do not hear any sound, check your connections. Ensure all cables are securely plugged in. Verify that the audio interface is selected as the input device in your audio software. If the sound is distorted, lower the volume on your digital piano. Sometimes, high volume levels cause clipping or distortion. Check for any driver updates for your audio interface. Updating drivers can resolve compatibility issues.
If you experience latency, adjust the buffer size in your audio software. A smaller buffer size reduces latency but may increase CPU usage. Experiment to find the best balance. If you face persistent issues, consult the manuals of your digital piano and audio interface. They often contain troubleshooting tips specific to your devices.
Optimizing Sound Quality
Optimizing sound quality is crucial for musicians using a digital piano. Connecting your digital piano to an audio interface can elevate your sound. Achieving the best possible audio involves careful adjustments. Let’s explore the steps to ensure you get the highest quality sound.
Adjusting Volume Levels
Set your digital piano volume to a medium level. This helps avoid distortion. Adjust the audio interface input gain. Aim for a balanced signal. Too high can cause clipping. Too low may lose detail. Use the level meters on the interface. They guide you to the right setting.
Using Audio Effects
Audio effects can enhance your sound. Start with reverb for a natural feel. Experiment with delay for added depth. Equalization (EQ) can refine your tone. Boost or cut specific frequencies. Keep effects subtle. Too much can overwhelm the natural sound. Test different settings. Find what best suits your music style. Effects can bring your performance to life.
Recording And Playback
Connecting your digital piano to an audio interface opens up a new world of possibilities. Recording and playback are crucial steps in this process. You’ll be able to capture your performances and listen back with precision. Here’s how to do it effectively.
Setting Up Recording Software
First, download and install recording software on your computer. Popular options include Audacity, GarageBand, and FL Studio. Open the software and create a new project. Set the input device to your audio interface. This ensures the software captures sound from your digital piano.
Adjust the sample rate and bit depth for high-quality recordings. Use the recommended settings of 44.1 kHz and 24-bit. Connect your digital piano to the audio interface using appropriate cables. Typically, you will use a USB or MIDI connection. Make sure everything is securely connected.
Playback And Monitoring
Playback is essential for reviewing your recordings. Connect headphones or studio monitors to the audio interface. This allows you to hear the playback clearly. Open your recording software and navigate to the playback settings. Select the audio interface as the output device.
Press play on your recording software to listen to your performance. Use headphones for detailed monitoring and to avoid feedback. Adjust the volume levels to ensure balanced sound. Make any necessary changes to the recording settings and try again. This step ensures your recordings are clear and professional.
Frequently Asked Questions
How Do I Connect A Digital Piano?
To connect a digital piano, use a USB or MIDI cable. Connect the cable from the piano’s output to the audio interface’s input.
What Cables Are Needed?
You’ll need either a USB or MIDI cable. USB cables are common for modern digital pianos, while older models might require MIDI.
Can I Use A Usb Audio Interface?
Yes, you can use a USB audio interface. It converts your piano’s sound into digital audio for your computer.
Why Use An Audio Interface?
Using an audio interface improves sound quality. It reduces latency and provides better connectivity options for recording and playback.
Conclusion
Connecting your digital piano to an audio interface is simple. Just follow the steps outlined. This ensures you get the best sound quality. Remember to use the right cables. Check your connections before playing. Experiment with settings for optimal results.

Enjoy the enhanced experience. Your music will sound clearer. Happy playing!
As an Amazon Associate, Cleanestor earns from qualifying purchases at no additional cost to you.