Connecting a mixer to a laptop without an audio interface might seem tricky. But it’s possible with the right steps.
This guide will show you how to do it easily. Mixers are essential for managing sound levels. They are used in music production, podcasts, and live streaming. Often, people use an audio interface to connect a mixer to a laptop.
But not everyone has one. Luckily, there are other ways to make the connection. This means you can still get great sound quality without buying extra equipment. In this post, we will explore different methods to connect your mixer to your laptop. By the end, you’ll have the knowledge to set up your sound system effectively. Let’s dive in and learn how to make this connection work seamlessly.
Required Equipment
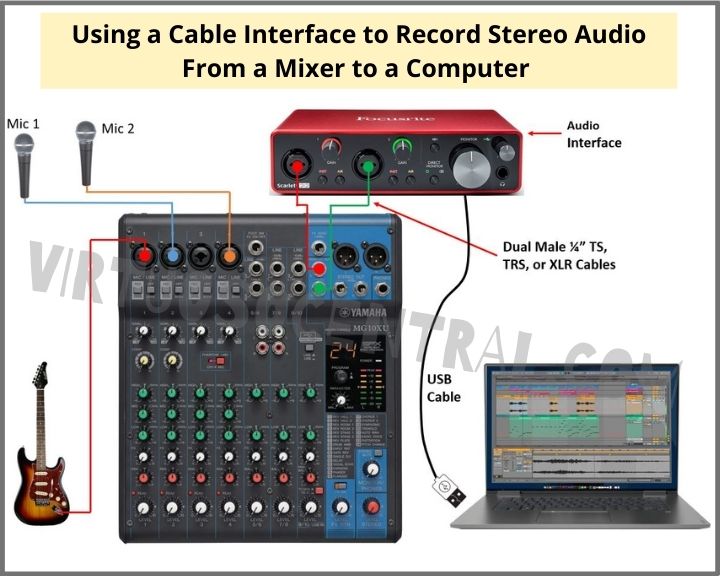
Connecting a mixer to a laptop without an audio interface requires some essential equipment. This guide will walk you through the necessary items. Let’s dive into what you’ll need to make a direct connection.
List Of Necessary Cables
- 3.5mm TRS to Dual 1/4″ TS Cable: This cable connects the mixer’s output to the laptop’s input.
- USB to 3.5mm Jack Adapter: Useful if your laptop lacks a dedicated audio input.
- RCA to 3.5mm Cable: For mixers with RCA outputs, this cable is essential.
Types Of Mixers Suitable For Direct Connection
| Type of Mixer | Description |
|---|---|
| Analog Mixers | These mixers often have RCA or 1/4″ outputs. They are simple to connect. |
| Digital Mixers | These mixers may have USB or RCA outputs. They provide better sound quality. |
| USB Mixers | These mixers can connect directly via USB. Ideal for easy setup. |
With the right equipment, you can connect your mixer to a laptop. Ensure you have the necessary cables and a compatible mixer for a smooth connection.
Credit: virtuosocentral.com
Preparing Your Laptop
Preparing your laptop is a crucial step when connecting a mixer without an audio interface. Ensuring your laptop is ready will make the process smooth and hassle-free.
Checking Audio Input Ports
First, identify the audio input ports on your laptop. Most laptops have a microphone input port. It’s usually a small, circular port marked with a microphone icon. Make sure your laptop has this port. If it doesn’t, you may need an adapter.
Installing Relevant Software
Next, install any necessary software. Some mixers need specific drivers or software to work properly with a laptop. Visit the mixer’s official website to download the latest drivers. Follow the installation instructions carefully.
Additionally, you may want to install a digital audio workstation (DAW) software. Popular options include Audacity, GarageBand, and Ableton Live. These programs help you record and edit audio on your laptop.
Connecting The Mixer
Connecting a mixer to a laptop without an audio interface can seem daunting. But with the right steps, it becomes a straightforward process. This guide will help you connect your mixer to your laptop easily and securely.
Step-by-step Connection Guide
First, gather the necessary cables. You will need a 3.5mm stereo male to dual 1/4″ male cable. This cable connects the mixer’s output to the laptop’s input.
Next, locate the mixer’s output ports. These are usually labeled as “Main Out” or “Line Out”. Plug the 1/4″ ends of the cable into these ports.
Then, find the laptop’s microphone input. This is often a small round port on the side of the laptop. Insert the 3.5mm end of the cable into this port.
Turn on the mixer. Ensure all volume levels are set to a low level to start. Gradually increase the volume to a comfortable level.
Open your audio recording or streaming software on the laptop. Select the microphone input as the audio source. Test the connection by playing a sound through the mixer.
Ensuring Secure Connections
Check all cable connections. Ensure they are firmly inserted into their respective ports. Loose connections can result in poor audio quality.
Use high-quality cables. This reduces the risk of interference and signal loss. Cheap cables can degrade audio performance.
Secure the cables to prevent accidental disconnections. Tape or cable ties can help keep cables in place. This ensures a stable and consistent connection.
Regularly inspect the cables for wear and tear. Replace any damaged cables immediately. This maintains the integrity of your audio setup.

Credit: hub.yamaha.com
Configuring Audio Settings
Connecting a mixer to your laptop without an audio interface may seem challenging. But configuring the audio settings properly can make the process smooth. Follow these steps to ensure your sound quality is top-notch.
Adjusting Input Levels
First, you need to adjust the input levels on your mixer and laptop. This ensures that the audio signal is neither too low nor too high.
- Locate the input gain controls on your mixer. Turn them to mid-level.
- Check the output levels on your mixer. Make sure they are balanced.
- On your laptop, open the audio settings. Look for the input level controls.
- Adjust the input levels to match the mixer’s output.
Setting Up Audio Preferences On Laptop
Next, you need to set up the audio preferences on your laptop. This will help the laptop recognize the mixer as the audio source.
- Open the Control Panel or System Preferences on your laptop.
- Navigate to the Sound settings.
- Select the mixer as the input device.
- Ensure the output device is set to your preferred speakers or headphones.
- Test the audio to confirm the settings are correct.
By following these steps, you can connect your mixer to your laptop without an audio interface. Properly configured audio settings will ensure clear and crisp sound quality.
Testing The Setup
Testing your setup is a crucial step to ensure everything works correctly. Once you have connected your mixer to your laptop, you need to check the sound quality and resolve any issues. Let’s dive into the steps you need to follow for a smooth setup.
Initial Sound Checks
Start by playing some audio through your mixer. Listen for any distortions or unusual sounds. Adjust the volume and balance settings to check if all channels are working. Make sure the sound is clear and free from static noise.
Troubleshooting Common Issues
If you encounter problems, start with the basic checks. Ensure all cables are securely connected. Verify that your laptop recognizes the mixer. Check the mixer’s power supply. Sometimes, restarting your laptop can solve minor issues.
If the sound is still not right, check your laptop’s audio settings. Make sure the correct input and output devices are selected. Update your audio drivers if necessary. These steps often resolve common sound issues.
Optimizing Sound Quality
Connecting a mixer to a laptop without an audio interface can be tricky. But, you can still achieve great sound quality. This section will focus on techniques to optimize your audio output. Simple adjustments can make a big difference.
Using Equalizers And Effects
An equalizer (EQ) helps you adjust the balance between different frequencies. It can significantly improve your sound.
Here are the steps to use an EQ effectively:
- Identify the main frequencies of your audio.
- Boost or cut these frequencies to enhance the sound.
- Use a graphic or parametric EQ for detailed adjustments.
Effects like reverb, delay, and compression can also enhance your audio. Apply these effects carefully. Overuse can ruin the sound.
Balancing Mixer Levels
Properly balancing mixer levels is crucial for clear sound. Unbalanced levels can cause distortion or weak audio.
Follow these steps to balance your mixer levels:
- Start with all levels at zero.
- Gradually increase the main mix level.
- Adjust individual channel levels to match the mix.
- Ensure none of the levels are clipping (going into the red).
Regularly check and adjust levels during use. This keeps your sound consistent and clear.
Practical Applications
Connecting a mixer to a laptop without an audio interface is simple. Use a 3. 5mm to dual 1/4 inch cable. Plug the 3. 5mm end into your laptop’s headphone jack and the 1/4 inch ends into the mixer’s output.
Connecting a mixer to a laptop without an audio interface can be quite useful. This setup allows you to perform various tasks. The applications range from recording music to live streaming. Understanding these practical uses can help you make the most of your equipment.Recording With Software
Recording with software is one of the main reasons to connect a mixer to a laptop. This method is cost-effective and simple. You can use software like Audacity, GarageBand, or FL Studio. These programs are user-friendly and powerful.- Ensure your mixer has a USB or 3.5mm output.
- Connect the mixer to the laptop using a USB cable or audio jack.
- Open your recording software and select the mixer as the input device.
- Test the sound levels before you start recording.
- Use headphones to monitor the audio.
- Save your work frequently to avoid data loss.
Live Streaming And Broadcasting
Live streaming and broadcasting are other important uses. Many content creators want good audio quality. A mixer can help achieve this. Streaming platforms like Twitch and YouTube Live are popular choices. Steps for Live Streaming:- Connect the mixer to the laptop.
- Open your streaming software, such as OBS or Streamlabs.
- Select the mixer as your audio input source.
- Adjust the audio levels to avoid distortion.
- Ensure your internet connection is stable.
- Use a good microphone for better sound quality.
- Engage with your audience for better interaction.

Credit: www.youtube.com
Advanced Tips
Connecting a mixer to a laptop without an audio interface can be tricky. Once you understand the basics, it’s time to delve into some advanced tips. These will help you get the best possible sound quality and a smoother experience.
Minimizing Latency
Latency can ruin your audio experience. It’s the delay between input and output sound. To reduce latency, follow these steps:
- Use a high-quality cable. Poor cables can cause signal loss and delays.
- Adjust your laptop’s buffer settings. Lower buffer sizes can reduce latency.
- Close unnecessary applications. This frees up CPU power for your audio tasks.
Using Additional Software Tools
Additional software tools can enhance your setup. Some tools to consider:
| Software | Purpose |
|---|---|
| ASIO4ALL | Reduces latency and improves audio performance. |
| Voicemeeter | Manages audio inputs and outputs effectively. |
| Equalizer APO | Customizes your sound with advanced equalizer settings. |
Install these tools and experiment with their settings. They can make a significant difference.
Frequently Asked Questions
Can I Connect A Mixer To A Laptop Without An Interface?
Yes, you can connect a mixer directly to a laptop. Use a 3. 5mm to dual RCA cable. Plug the RCA into the mixer’s output and the 3. 5mm into the laptop’s microphone input.
What Cables Are Needed For This Connection?
To connect a mixer to a laptop, you need a 3. 5mm to dual RCA cable. This allows you to connect the mixer’s output directly to the laptop’s microphone input.
Do I Need Special Software For This Setup?
No special software is required for basic audio input. However, using audio recording or mixing software can improve sound quality and control.
Will The Audio Quality Be Good Without An Interface?
The audio quality may not be as high without an interface. However, it can still be adequate for basic recording and streaming purposes.
Conclusion
Connecting a mixer to a laptop without an audio interface is simple. Follow the steps, and you’ll get great sound. No need for extra equipment. Just use cables and ports you already have. This method saves money and space. Perfect for beginners and casual users.

Now, enjoy your music or podcast with ease. Share your new skills with friends. Happy mixing!
{ “@context”: “https://schema.org”, “@type”: “FAQPage”, “mainEntity”: [ { “@type”: “Question”, “name”: “Can I connect a mixer to a laptop without an interface?”, “acceptedAnswer”: { “@type”: “Answer”, “text”: “Yes, you can connect a mixer directly to a laptop. Use a 3.5mm to dual RCA cable. Plug the RCA into the mixer’s output and the 3.5mm into the laptop’s microphone input.” } } , { “@type”: “Question”, “name”: “What cables are needed for this connection?”, “acceptedAnswer”: { “@type”: “Answer”, “text”: “To connect a mixer to a laptop, you need a 3.5mm to dual RCA cable. This allows you to connect the mixer’s output directly to the laptop’s microphone input.” } } , { “@type”: “Question”, “name”: “Do I need special software for this setup?”, “acceptedAnswer”: { “@type”: “Answer”, “text”: “No special software is required for basic audio input. However, using audio recording or mixing software can improve sound quality and control.” } } , { “@type”: “Question”, “name”: “Will the audio quality be good without an interface?”, “acceptedAnswer”: { “@type”: “Answer”, “text”: “The audio quality may not be as high without an interface. However, it can still be adequate for basic recording and streaming purposes.” } } ] }
As an Amazon Associate, Cleanestor earns from qualifying purchases at no additional cost to you.