Connecting studio headphones to your PC is simple. You need the right cables or adapters.
Let’s dive into the details. Studio headphones offer superior sound quality. Using them with your PC enhances your listening experience, whether for music, gaming, or work. But connecting them might seem tricky if you’re new to audio equipment. This guide will break down the steps you need to follow.
We’ll cover the types of connectors, necessary adapters, and troubleshooting tips. By the end, you’ll have your studio headphones working perfectly with your PC. Ready to enjoy crystal-clear audio? Let’s get started.
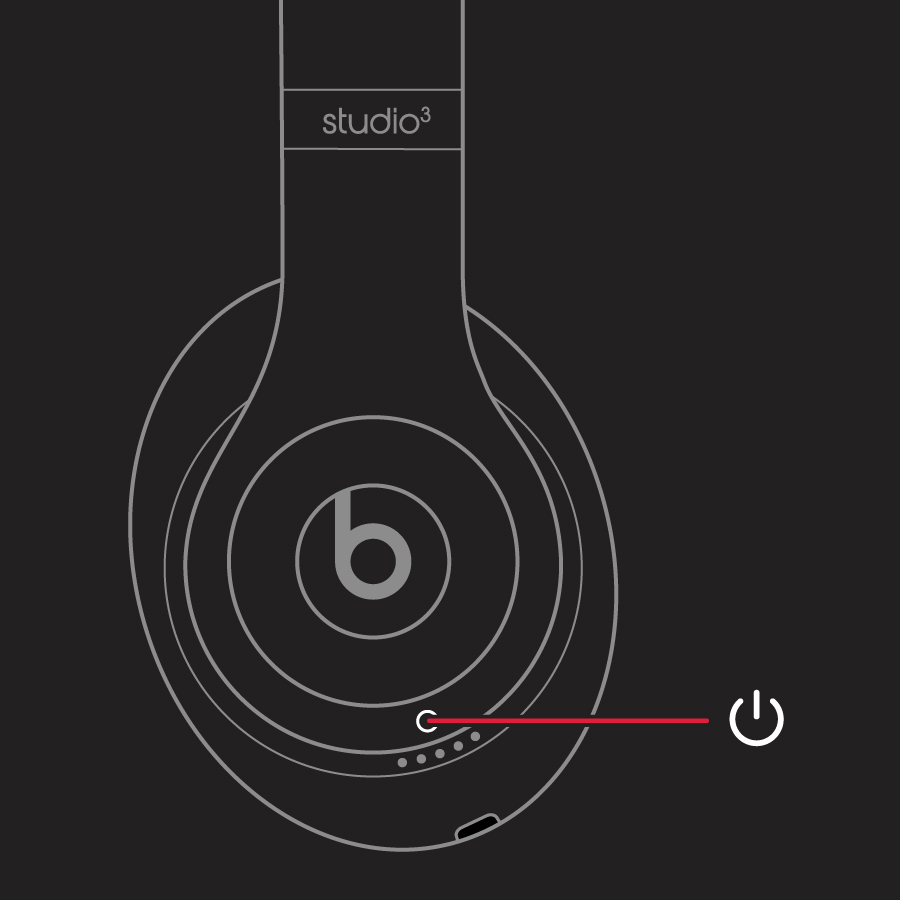
Credit: support.apple.com
Choosing The Right Studio Headphones
Choosing the right studio headphones is crucial for achieving the best sound quality. This guide will help you understand important factors to consider. Whether you are an audiophile or a beginner, selecting the right pair can make a huge difference in your audio experience.
Wired Vs. Wireless
Wired headphones are typically preferred in studios for their consistent audio quality. They connect directly to your PC, minimizing latency and interference. Wired models are often more affordable and reliable for long sessions.
Wireless headphones offer more freedom of movement. They use Bluetooth or other wireless technologies to connect to your PC. While convenient, they can sometimes suffer from slight audio delays. Consider wireless if you need mobility and fewer cables.
Impedance And Sensitivity
Impedance refers to the electrical resistance of the headphones. Studio headphones with higher impedance (above 25 ohms) usually require more power to deliver high-quality sound. They are ideal for professional studio settings where sound clarity is crucial.
Sensitivity measures how effectively the headphones convert electrical signals into sound. Higher sensitivity means louder sound at a given power level. Choose headphones with sensitivity around 90-110 dB for a balanced audio experience.
| Feature | Wired Headphones | Wireless Headphones |
|---|---|---|
| Audio Quality | Consistent | May vary |
| Latency | Low | Can be higher |
| Mobility | Limited | High |
| Price | Usually lower | Usually higher |
Both wired and wireless headphones have their pros and cons. Your choice will depend on your specific needs and preferences. Carefully consider impedance and sensitivity to ensure you get the best sound quality for your setup.
Checking Your Pc’s Audio Ports
Connecting studio headphones to a PC can seem confusing. The first step is to check your PC’s audio ports. Knowing where and how to plug in your headphones is crucial. Let’s explore the different types of audio jacks and other connection options available.
Types Of Audio Jacks
Most PCs come with a variety of audio jacks. These are usually located at the back or the front of the PC case. Here are some common types:
- 3.5mm Jack: This is the most common type. It is usually green in color.
- 6.35mm Jack: Some high-end audio interfaces may have this larger jack.
- Combination Jack: This can handle both headphones and microphone in one port.
Ensure your studio headphones have the right plug for these jacks. You might need an adapter to fit different sizes.
Usb And Bluetooth Options
Modern PCs often support USB and Bluetooth connections. These can offer better sound quality and ease of use.
USB Headphones: These are easy to connect. Simply plug the USB into an available port on your PC. USB headphones often come with built-in sound cards, which can enhance audio quality.
Bluetooth Headphones: For a wireless option, Bluetooth is great. Ensure your PC has Bluetooth capabilities. To connect, turn on Bluetooth on both devices. Then, pair your headphones with your PC. Follow the on-screen instructions to complete the setup.
| Connection Type | Advantages | Disadvantages |
|---|---|---|
| 3.5mm Jack | Widely compatible, no setup needed | Limited to wired connections |
| USB | Easy setup, built-in sound cards | Requires USB port, may need drivers |
| Bluetooth | Wireless, more freedom of movement | May have latency, requires Bluetooth support |
Choosing the right connection depends on your needs. Whether you prefer wired or wireless, knowing your options helps you get the best audio experience.
Using A 3.5mm Audio Jack
Connecting studio headphones to a PC using a 3.5mm audio jack is simple. This method is popular due to its ease and compatibility. Here’s a step-by-step guide to help you get started.
Direct Connection
Most PCs come with a 3.5mm audio jack. It’s usually located on the front or back of the computer. Follow these steps to connect your headphones directly:
- Locate the audio port on your PC. It is often marked with a headphone icon.
- Plug the 3.5mm jack of your headphones into this port.
- Once connected, your PC should recognize the headphones automatically.
- Test the audio by playing a sound or music file.
Adapter Requirements
Sometimes, studio headphones come with a larger plug. In such cases, an adapter is needed. Here’s what to do:
- Check the plug size of your headphones. If it’s larger than 3.5mm, you need a 6.35mm to 3.5mm adapter.
- Purchase a good-quality adapter. Ensure it supports both audio channels.
- Connect the headphone plug to the adapter.
- Insert the adapter into the PC’s audio jack.
- Test the setup by playing an audio file.
With these steps, you can enjoy high-quality sound from your studio headphones on your PC using a 3.5mm audio jack.
Connecting Via Usb
Connecting studio headphones to your PC can be simple and efficient. Using a USB connection is one of the easiest methods. This method offers clear sound quality and minimal setup hassles.
Usb Headphones
USB headphones are plug-and-play devices. Just connect them to your PC’s USB port. The system usually recognizes them automatically. You don’t need extra drivers or software. USB headphones often include their own built-in sound card. This can help in improving audio quality. These headphones are great for quick and easy connections.
Using A Usb Audio Interface
A USB audio interface can connect studio headphones to your PC. This device converts analog signals to digital. It offers higher sound quality than direct USB connections. Connect the audio interface to your PC using a USB cable. Then, plug your studio headphones into the interface. This setup is ideal for professional audio work. You get better control over sound quality and settings.
Pairing Bluetooth Headphones
Pairing Bluetooth headphones with a PC can seem challenging. But it’s simpler than it seems. Follow these steps for a smooth experience.
Bluetooth Setup On Windows
First, ensure your Bluetooth is on. Go to “Settings” on your PC. Select “Devices” and click on “Bluetooth & other devices.” Turn on Bluetooth if it’s off. Next, click “Add Bluetooth or other device.” Choose “Bluetooth” from the list. Your PC will start searching for devices.
Now, put your headphones in pairing mode. Check your headphone manual for instructions. Usually, you press and hold the power button. Your headphones should appear in the list on your PC. Click on them to connect. A confirmation message will appear once connected.
Troubleshooting Connection Issues
Sometimes, pairing doesn’t work. Don’t worry. First, ensure your headphones have enough battery. Low battery can cause connection issues. Next, restart your PC and headphones. This can reset the connection.
If the problem persists, remove the device from your PC’s Bluetooth list. Go back to “Bluetooth & other devices” in Settings. Find your headphones in the list. Click “Remove device.” Then, try pairing again. Updating your PC’s Bluetooth drivers can also help. Go to “Device Manager” and find “Bluetooth.” Right-click and select “Update driver.”
Lastly, check for interference. Other Bluetooth devices or Wi-Fi can interfere. Move closer to your PC and try again.
Installing Necessary Drivers
Connecting studio headphones to a PC is not always straightforward. Installing necessary drivers is a crucial step. Drivers enable your PC to recognize and communicate with your headphones. Below, we will explore both automatic and manual driver installation methods.
Automatic Driver Installation
Most modern operating systems support automatic driver installation. This feature simplifies the process. Follow these steps:
- Connect your studio headphones to the PC using the appropriate cable.
- Ensure your PC is connected to the internet.
- Wait for the system to detect and install drivers.
If the drivers are successfully installed, you will receive a notification. You can then proceed to test your headphones.
Manual Driver Download
In some cases, automatic installation may fail. You can manually download and install the necessary drivers. Here’s how:
- Visit the manufacturer’s website of your studio headphones.
- Navigate to the support or downloads section.
- Search for your headphone model and download the latest drivers.
- Open the downloaded file and follow the on-screen instructions to install.
Manual installation ensures you have the most recent and compatible drivers. Always check for updates periodically.
Adjusting Sound Settings
After connecting your studio headphones to your PC, adjusting the sound settings is crucial. This will ensure you get the best audio quality. Follow these simple steps to make sure your headphones sound perfect.
Accessing Sound Control Panel
First, you need to access the Sound Control Panel. Here’s how you do it:
- Click on the Start menu.
- Type Control Panel in the search bar.
- Open the Control Panel from the results.
- Navigate to Hardware and Sound.
- Click on Sound.
You are now in the Sound Control Panel. This is where you can adjust the audio settings.
Configuring Playback Devices
Now, you need to configure your playback devices. Follow these steps:
- In the Sound Control Panel, go to the Playback tab.
- You will see a list of playback devices. Find your headphones.
- Right-click on your headphones and select Set as Default Device.
- Click Properties to open the device settings.
- In the Properties window, go to the Advanced tab.
- Choose the highest quality format available from the drop-down menu.
- Click Apply and then OK.
Your playback device is now configured for the best audio quality.
These steps ensure your studio headphones deliver optimal sound. Enjoy your enhanced audio experience!

Credit: www.wikihow.com
Testing Your Setup
After connecting your studio headphones to your PC, the next step is testing your setup. This ensures everything is working perfectly, and you can enjoy the best audio experience. Follow these steps to verify your connection and troubleshoot any potential issues.
Playing Audio
Start by playing audio from your favorite media player or streaming service. Adjust the volume to a comfortable level. Listen for clear and balanced sound.
Try different types of audio, such as music, podcasts, or videos. This helps you confirm that the headphones handle various sounds well.
Troubleshooting Common Issues
If you hear no sound, check the headphone jack connection. Ensure it is firmly plugged into your PC. Next, verify the audio settings on your computer.
Right-click the sound icon in the taskbar and select “Open Sound settings.” Ensure your studio headphones are selected as the output device. If you still face issues, restart your PC and try again.
Check for driver updates. Outdated drivers can cause audio problems. Visit the manufacturer’s website to download the latest drivers. Install them and restart your computer.
If the sound is distorted, ensure the audio cable is not damaged. Try using a different cable. Also, test the headphones on another device to rule out hardware issues.
By following these steps, you can ensure a smooth and enjoyable audio experience with your studio headphones.
Credit: www.youtube.com
Frequently Asked Questions
How Do I Connect Studio Headphones To My Pc?
To connect studio headphones to a PC, plug them into the headphone jack. If your PC lacks a headphone jack, use an external sound card or a USB adapter.
Do I Need An Adapter For Studio Headphones?
Most studio headphones need a 1/4-inch to 1/8-inch adapter. This adapter helps connect them to a standard headphone jack on your PC.
Can I Use Studio Headphones With A Laptop?
Yes, you can use studio headphones with a laptop. Simply plug the headphones into the laptop’s headphone jack or use a USB adapter.
Why Aren’t My Studio Headphones Working On My Pc?
Ensure your headphones are properly plugged in. Check the sound settings on your PC. Also, update your audio drivers if necessary.
Conclusion
Connecting studio headphones to a PC is simple and straightforward. Follow the steps mentioned in this guide. Ensure your PC has the right ports and necessary adapters. Adjust your audio settings for the best experience. Enjoy high-quality sound and enhanced audio performance.

With the right setup, you can make the most of your studio headphones. Troubleshooting any issues will be easier with the tips provided. Now, you’re ready to experience your favorite music or work on your projects with clarity. Happy listening!
{ “@context”: “https://schema.org”, “@type”: “FAQPage”, “mainEntity”: [ { “@type”: “Question”, “name”: “How do I connect studio headphones to my PC?”, “acceptedAnswer”: { “@type”: “Answer”, “text”: “To connect studio headphones to a PC, plug them into the headphone jack. If your PC lacks a headphone jack, use an external sound card or a USB adapter.” } } , { “@type”: “Question”, “name”: “Do I need an adapter for studio headphones?”, “acceptedAnswer”: { “@type”: “Answer”, “text”: “Most studio headphones need a 1/4-inch to 1/8-inch adapter. This adapter helps connect them to a standard headphone jack on your PC.” } } , { “@type”: “Question”, “name”: “Can I use studio headphones with a laptop?”, “acceptedAnswer”: { “@type”: “Answer”, “text”: “Yes, you can use studio headphones with a laptop. Simply plug the headphones into the laptop’s headphone jack or use a USB adapter.” } } , { “@type”: “Question”, “name”: “Why aren’t my studio headphones working on my PC?”, “acceptedAnswer”: { “@type”: “Answer”, “text”: “Ensure your headphones are properly plugged in. Check the sound settings on your PC. Also, update your audio drivers if necessary.” } } ] }As an Amazon Associate, Cleanestor earns from qualifying purchases at no additional cost to you.