Connecting your turntable to studio monitors can seem tricky. But it’s simpler than you think.
Vinyl lovers know the joy of rich, analog sound. Studio monitors can enhance this experience. But how do you connect these devices? This guide will walk you through the process. Whether you’re new to vinyl or a seasoned audiophile, this information will help.
Learn what cables you need and the best setup for quality sound. Soon, you’ll enjoy your records with clear, powerful audio. Let’s dive into the steps to connect your turntable to studio monitors.
Choosing The Right Equipment
Choosing the right equipment is crucial for connecting a turntable to studio monitors. The quality of your setup influences the sound output. To ensure the best listening experience, focus on two main components: the turntable and the studio monitors. Let’s break down each component and explore the options available.
Turntable Selection
Choosing a turntable is the first step. There are many types to consider. Belt-drive turntables are common for home use. They offer good sound quality. Direct-drive turntables are often used by DJs. They start and stop quickly. Ensure the turntable has a built-in preamp. This amplifies the signal for the monitors. If not, you will need an external preamp.
Studio Monitors Options
Studio monitors are essential for accurate sound. They are different from regular speakers. They provide a flat frequency response. This means you hear the sound as it is. Look for active monitors. These have built-in amplifiers. Passive monitors need an external amplifier. Consider the size of your room. Larger rooms may need bigger monitors. Smaller rooms can use compact monitors. Brands like KRK, Yamaha, and JBL are popular. Check the specifications before buying.
Understanding Turntable Outputs
Understanding the different outputs of your turntable is crucial for connecting it to studio monitors. Turntables usually have two types of outputs: phono and line. Knowing how each works can help you set up your audio system correctly.
Phono Output
A phono output is the standard output for most turntables. It produces a weak signal. This signal requires amplification. Phono outputs also need equalization. This process corrects the sound. Without it, the audio will sound flat and lifeless. You will need a phono preamp. Some turntables have built-in preamps. Others will need an external one. Connect the phono output to the preamp first. Then connect the preamp to the studio monitors.
Line Output
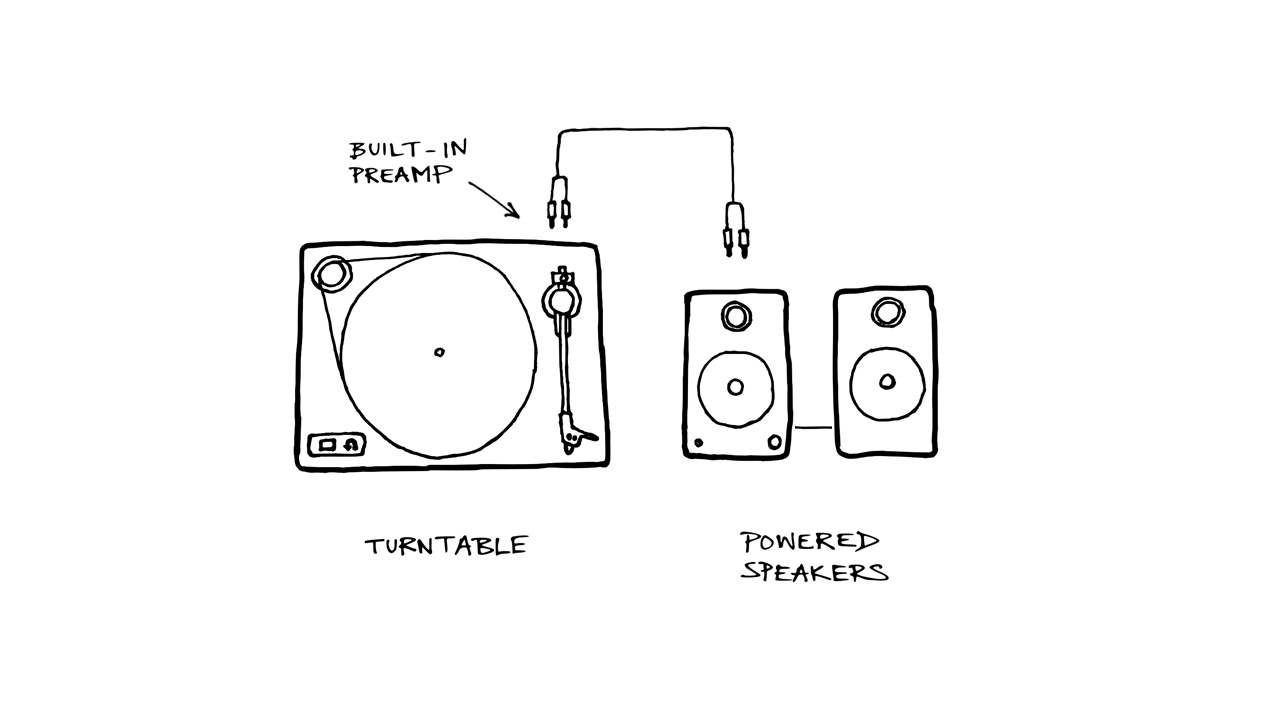
Some turntables have a line output. This output is also known as a “built-in preamp” output. It sends a stronger signal. The signal is already amplified and equalized. This makes it easier to connect to studio monitors. You can connect the line output directly to the monitors. You do not need an external preamp. Check if your turntable has a switch to choose between phono and line output. This option provides flexibility in connecting your audio devices.
Preamp Necessities
Connecting a turntable to studio monitors requires a preamp. Preamps boost the weak signal from the turntable. This makes it suitable for studio monitors. There are two main types of preamps: built-in and external.
Built-in Preamps
Some turntables come with built-in preamps. This means you can connect them directly to studio monitors. Check if your turntable has a built-in preamp. Look for a switch labeled “Phono/Line”. If it does, you have a built-in preamp. Switch it to “Line” mode. Use RCA cables to connect the turntable to your monitors.
| Turntable Type | Connection Method |
|---|---|
| Built-in Preamp | Direct connection with RCA cables |
| No Built-in Preamp | Requires external preamp |
External Preamps
If your turntable lacks a built-in preamp, you need an external preamp. An external preamp boosts the signal before it reaches the monitors. Connect the turntable’s RCA output to the preamp’s input. Then, connect the preamp’s output to the studio monitors.
Here are the steps:
- Connect the turntable to the preamp.
- Connect the preamp to the studio monitors.
Choosing the right preamp is crucial. Look for a preamp that matches your turntable’s specifications. External preamps offer more control and better sound quality. They are ideal for professional setups.
Connecting Cables
Connecting your turntable to studio monitors requires the right cables. Cables transmit the sound from your turntable to your speakers. Let’s look at two types of cables you might use: RCA cables and XLR cables.
Rca Cables
RCA cables are common for turntables. These cables have two connectors, one red and one white. The red cable carries the right audio channel. The white cable carries the left audio channel. Plug the RCA cables into the output jacks on your turntable. The other ends go into your studio monitor inputs. Make sure the colors match. The red plug goes into the red jack. The white plug goes into the white jack.
Xlr Cables
XLR cables are often used in professional audio setups. They have three pins and offer balanced connections. This means they can reduce noise and interference. To use XLR cables, you may need a phono preamp with XLR outputs. Connect the turntable to the preamp with RCA cables. Then use XLR cables to connect the preamp to your studio monitors. This setup provides a clean and clear sound.
Setting Up The Turntable
Connecting a turntable to studio monitors starts with setting up the turntable correctly. This step ensures the best sound quality and a smooth listening experience. Follow these steps to set up your turntable.
Positioning The Turntable
Find a stable, vibration-free spot for your turntable. Avoid placing it near speakers or other sources of vibration. These vibrations can affect sound quality. Use a sturdy table or shelf. Ensure the surface can support the turntable’s weight.
Keep your turntable away from direct sunlight and heat sources. Excess heat can warp records and damage the turntable. Ensure there is enough space around the turntable for proper air circulation.
Leveling The Turntable
Leveling the turntable is crucial for accurate playback. Use a spirit level to check if the turntable is perfectly horizontal. Most turntables have adjustable feet. Adjust these feet until the turntable is level.
If your turntable doesn’t have adjustable feet, use small shims. Place them under the feet to level the turntable. Double-check the level after each adjustment. This ensures the best sound quality and minimizes record wear.
Credit: uturnaudio.com
Connecting To Studio Monitors
Connecting a turntable to studio monitors can enhance your listening experience. Studio monitors offer superior sound quality and clarity. They let you hear the true sound of your vinyl records. Let’s explore the methods to connect them.
Direct Connection
Most modern turntables come with built-in preamps. This feature allows direct connection to studio monitors. Check if your turntable has a built-in preamp. Look for a switch labeled “Phono/Line.” Set it to “Line” mode.
Use RCA cables to connect the turntable to the studio monitors. Plug the RCA cables into the “Output” ports of the turntable. Connect the other end to the studio monitors. Ensure the monitors are set to the right input mode. This method is simple and effective.
Using An Audio Interface
An audio interface can offer more control over your sound. It acts as a bridge between the turntable and studio monitors. Connect the turntable to the audio interface using RCA cables. Then, use balanced TRS cables to connect the audio interface to the studio monitors.
Ensure the audio interface is powered on. Set the input levels to avoid distortion. This method can enhance sound quality. It also allows for easy adjustments.
Audio interfaces often come with software. This software can provide extra features. It can help you fine-tune your sound. This method is ideal for audiophiles.
Adjusting Audio Settings
Connecting your turntable to studio monitors is only part of the process. To get the best sound, you need to adjust your audio settings. Proper volume control and equalization can make a big difference. Let’s dive into these important adjustments.
Volume Control
Start by setting the volume on your studio monitors to a low level. This helps prevent damage to your speakers. Gradually increase the volume until you reach a comfortable listening level. Avoid setting it too high to prevent distortion.
Use your turntable’s volume control, if available. This can help you fine-tune the sound without overloading your monitors. Remember, balance is key. Keep the volume consistent across all your audio equipment.
Equalization
Equalization (EQ) can greatly improve your listening experience. Most turntables have a built-in preamp with basic EQ settings. Use these to adjust the bass, midrange, and treble frequencies.
Follow these steps for optimal EQ settings:
- Start with all EQ settings at neutral (flat).
- Listen to a familiar record and note any imbalances.
- Adjust the bass to enhance the lower frequencies.
- Increase the midrange for clearer vocals and instruments.
- Boost the treble for sharper, crisper sounds.
Take your time with these adjustments. Small changes can have a big impact. Use your ears to find the perfect balance.
Additional Tips
- Use quality cables to connect your turntable and studio monitors.
- Place your monitors at ear level for the best sound.
- Consider using a dedicated phono preamp for better audio quality.
By following these steps, you can enjoy the rich, warm sound of your vinyl records. Adjusting your audio settings is essential for the best listening experience.
Credit: www.klipsch.com
Troubleshooting Common Issues
Connecting a turntable to studio monitors can sometimes lead to issues. These problems can disrupt your listening experience. This section will help you troubleshoot common issues.
Hum And Noise
Hum and noise are common problems when connecting a turntable to studio monitors. These sounds can be annoying and degrade audio quality. Here are some steps to fix them:
- Ensure all cables are securely connected. Loose connections can cause noise.
- Keep power and audio cables separate. This helps to reduce interference.
- Ground your turntable. An ungrounded turntable can produce a hum.
- Check for faulty cables. Replace them if you suspect any damage.
Signal Distortion
Signal distortion can make your music sound unpleasant. This issue can be due to several factors. Here’s how to address it:
- Verify that your turntable’s output matches your studio monitor’s input. Mismatched levels can cause distortion.
- Ensure your turntable’s cartridge is clean. A dirty cartridge can affect sound quality.
- Avoid overloading your preamp. Set your preamp’s gain to a suitable level.
- Check your stylus for wear. A worn stylus can distort the signal. Replace it if needed.
By following these steps, you can enjoy clear, high-quality sound from your turntable and studio monitors.

Credit: m.youtube.com
Frequently Asked Questions
How Do I Connect A Turntable To Studio Monitors?
To connect a turntable to studio monitors, you need a phono preamp. Connect the turntable to the preamp, then the preamp to the monitors.
Do I Need A Preamp For My Turntable?
Yes, most turntables need a phono preamp. The preamp amplifies the turntable’s signal, making it suitable for studio monitors.
Can I Use Rca Cables For This Connection?
Yes, RCA cables are commonly used. Connect the turntable to the preamp with RCA cables, then to the monitors.
What If My Turntable Has A Built-in Preamp?
If your turntable has a built-in preamp, connect it directly to the studio monitors. No external preamp is needed.
Conclusion
Connecting your turntable to studio monitors enhances your music experience. Follow the steps outlined for clear sound. Use quality cables and ensure proper grounding. Test your setup to confirm everything works smoothly. Enjoy your vinyl collection with better sound quality.

This simple setup makes a big difference. Happy listening!
As an Amazon Associate, Cleanestor earns from qualifying purchases at no additional cost to you.