Connecting an XLR mic to a PC without an audio interface is possible. You need the right tools and a bit of know-how.
This guide will show you how. Many people think you need an audio interface for good sound. But that’s not always true. You can still get quality audio without extra gear. This is great news if you’re on a budget or just starting out.
We’ll explore simple methods and tools to make this connection. You’ll see that it’s easier than you might think. By the end, you’ll be ready to use your XLR mic with your PC. Let’s dive in and find the best solution for you!
Introduction To Xlr Mics
XLR mics are popular in the audio world. They are known for their high-quality sound and durability. Many professionals use them for recording music, podcasts, and live performances. But what exactly makes them stand out? Let’s explore.
Why Xlr Mics Are Popular
XLR mics offer balanced audio. This means less noise and interference in recordings. They use three pins to transfer sound. This ensures a clean and clear signal. The connectors are also sturdy, making them reliable for long-term use.
Another reason for their popularity is their compatibility. XLR mics work with many audio devices. This includes mixers, preamps, and audio interfaces. They are a go-to choice for professionals who need top-notch audio quality.
Common Uses For Xlr Mics
XLR mics are versatile. They are used in many settings. Here are some common uses:
- Music Recording: Musicians use XLR mics in studios. They capture every detail of the performance.
- Podcasts: Podcasters prefer XLR mics for their clear sound. They make voices sound natural and professional.
- Live Performances: Live events need reliable equipment. XLR mics are perfect for concerts and speeches.
They are also used in broadcasting. Radio hosts and TV presenters rely on them. The consistent quality makes them ideal for any professional setting.
Credit: producersociety.com
Challenges Of Connecting Xlr Mics To Pc
Connecting an XLR mic to a PC without an audio interface presents some challenges. The XLR mic is designed for professional audio equipment. PCs, on the other hand, are not naturally equipped for this connection. This mismatch can lead to several issues that users must navigate. Understanding these challenges is key to finding effective solutions.
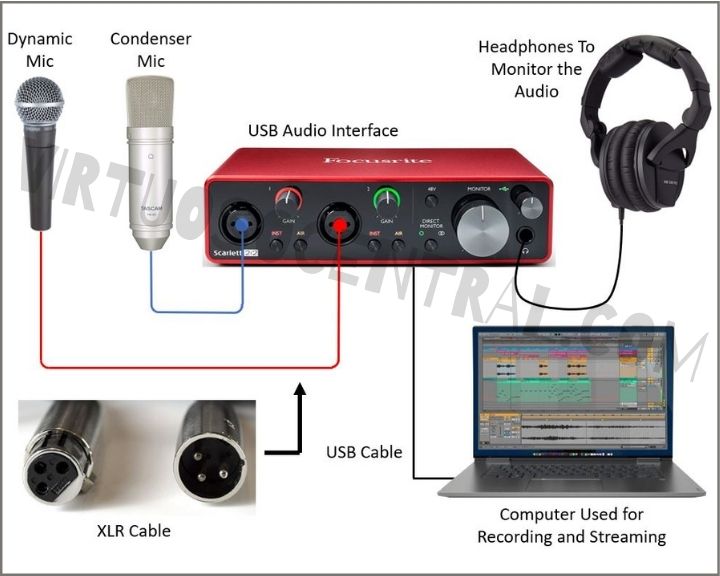
Why An Audio Interface Is Commonly Used
An audio interface converts analog signals to digital. It bridges the gap between the XLR mic and the PC. The interface provides the necessary power and connectivity. It ensures the audio quality is maintained. Most professional setups use an audio interface. It simplifies the connection process and enhances audio performance.
Potential Issues Without An Interface
Without an interface, the XLR mic may not get enough power. This can lead to weak or no sound. PCs lack the proper inputs for XLR connections. Adapters exist but can degrade audio quality. There might be unwanted noise or distortion. The mic’s full potential might not be realized. Proper impedance matching is also crucial. Incorrect matching can affect the sound output.
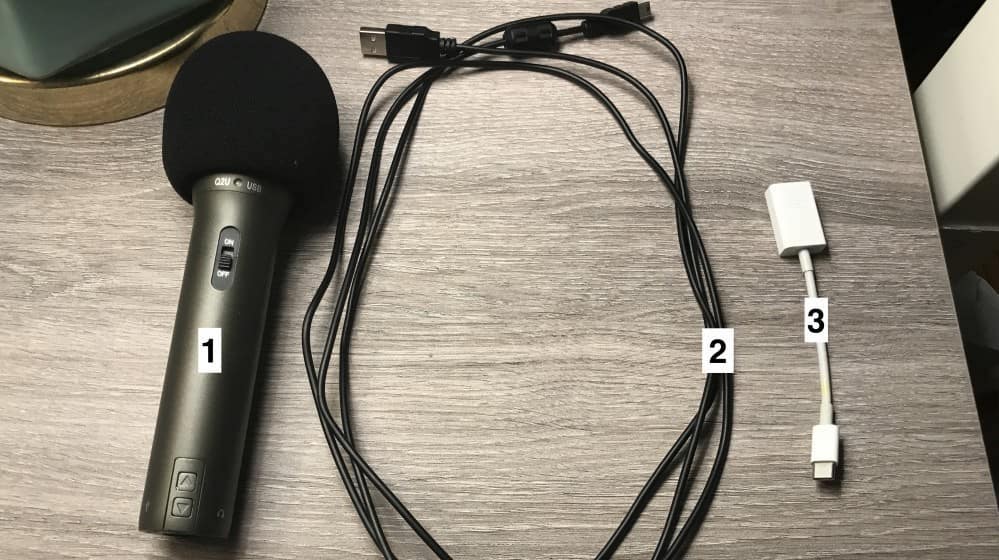
Necessary Equipment
Connecting an XLR microphone to your PC without an audio interface can seem challenging. But with the right equipment, it’s quite simple. To help you get started, we’ll outline the necessary equipment needed. Let’s dive into the essential tools you need for this setup.
Xlr To Usb Adapter
An XLR to USB adapter is crucial for connecting your XLR mic to a PC. This adapter converts the analog signal from your microphone into a digital signal. It allows the mic to communicate with your computer. Look for an adapter with good reviews and solid build quality. This ensures reliable performance and durability.
Phantom Power Supply
Many XLR microphones require phantom power to operate. A phantom power supply provides the necessary power to the microphone. It ensures the mic works properly and delivers clear audio. Some adapters include built-in phantom power. But if yours doesn’t, a standalone phantom power supply is essential.
Credit: virtuosocentral.com
Setting Up Xlr To Usb Adapter
Connecting an XLR mic to a PC without an audio interface is simple with an XLR to USB adapter. Plug the XLR end into the microphone and the USB end into the computer. This setup allows for easy recording.
Connecting an XLR mic to a PC without an audio interface can seem difficult. Using an XLR to USB adapter, you can easily connect your mic to your computer. This setup is simple and effective, providing clear audio quality. Let’s walk through the steps to get your mic up and running.Choosing The Right Adapter
Not all adapters are the same. Some offer better sound quality than others. Look for adapters with good reviews and high ratings. Make sure the adapter supports your mic’s specifications. Check the compatibility with your operating system. Many adapters work with both Windows and macOS.Connecting The Adapter To Your Pc
First, plug the XLR end of the adapter into your mic. Make sure the connection is secure. Next, connect the USB end of the adapter to your PC’s USB port. Your computer should recognize the new device. You might need to install drivers. Follow the prompts on your screen if necessary. Open your recording software and select the adapter as your input device. Test your mic to ensure it’s working properly. Now you’re ready to start recording. Enjoy your new setup! “`Providing Phantom Power
Connecting an XLR mic to a PC without an audio interface can seem tricky. One crucial aspect is providing phantom power. Phantom power is essential to power condenser microphones, which many professionals prefer for their high-quality sound. If your mic requires phantom power, you need to ensure it gets the right voltage to operate correctly.
Importance Of Phantom Power
Phantom power is typically 48 volts and is necessary for condenser mics. Without it, the mic won’t work. Dynamic mics don’t need phantom power, but most condenser mics do. Ensuring your mic gets this power is crucial for recording quality audio.
Phantom power travels through the same XLR cable that carries the audio signal. It is called “phantom” because it doesn’t require extra cables. This makes it convenient and essential for many audio setups.
Using An External Phantom Power Supply
If you don’t have an audio interface, you can use an external phantom power supply. This device provides the necessary power to your mic. Here’s how you can set it up:
- Connect your XLR mic to the input of the phantom power supply.
- Use another XLR cable to connect the output of the phantom power supply to your PC’s mic input. You might need an XLR to 3.5mm adapter if your PC has a 3.5mm mic input.
- Ensure the phantom power supply is turned on and providing 48 volts.
Using an external phantom power supply is a simple and effective solution. It allows you to use your high-quality XLR mic with your PC, even without an audio interface.
Below is a table that summarizes the steps for using an external phantom power supply:
| Step | Description |
|---|---|
| 1 | Connect XLR mic to phantom power supply input. |
| 2 | Connect phantom power supply output to PC mic input. |
| 3 | Turn on the phantom power supply. |
Following these steps ensures your mic gets the necessary power. This setup helps you achieve the best audio quality possible without an audio interface.
Software Configuration
Connecting an XLR mic to a PC without an audio interface can be tricky. Once the hardware is set up, configuring the software is the next crucial step. Proper software configuration ensures the mic delivers high-quality sound.
Choosing The Right Audio Software
First, select the right audio software. Popular choices include Audacity, GarageBand, and Adobe Audition. These programs help manage audio input and output.
- Audacity: Free and open-source. Ideal for beginners.
- GarageBand: Great for Mac users. Offers advanced features.
- Adobe Audition: Professional software. Suitable for detailed editing.
Choose a program based on your needs and experience level. Download and install the software from a trusted source.
Setting Up Audio Levels
Once the software is installed, set up your audio levels. Open the audio software and locate the input settings. Ensure the XLR mic is selected as the input device.
- Go to Preferences or Settings.
- Select Audio or Input settings.
- Choose the XLR mic from the list of devices.
Next, adjust the input volume. Speak into the mic and watch the level meter. The ideal range is between -6dB to -12dB. If the levels are too high, reduce the input volume. If too low, increase it.
Avoid clipping, which occurs when the audio levels are too high and cause distortion. Regularly check the levels while recording to maintain optimal sound quality.
Testing Your Setup
After connecting your XLR mic to your PC without an audio interface, it’s crucial to test your setup. Proper testing ensures everything works as expected. This guide will walk you through the process.
Running Initial Tests
Start by opening your PC’s sound settings. Ensure your mic is recognized. Speak into the mic and watch for any signal or movement in the input levels. This indicates your mic is working.
Use a simple recording software. Record your voice for a few seconds. Playback the recording to check for clarity and volume. Adjust the mic levels if needed.
Troubleshooting Common Issues
No sound? Check your connections. Make sure everything is plugged in properly. Verify the mic is not muted in the sound settings.
Low volume? Adjust the input levels in your PC’s sound settings. Ensure the mic is positioned correctly. Speak directly into it for the best results.
Static or noise? Move the mic away from electronic devices. Interference can cause unwanted noise. Try a different USB port if using a USB adapter.
Alternative Methods
Connecting an XLR mic to a PC without an audio interface can seem tricky. But there are several alternative methods to achieve this. You can use a mixer or opt for direct connection options. Let’s explore these methods in detail.
Using A Mixer
A mixer is a versatile tool for connecting your XLR mic to a PC. Mixers can adjust audio levels, add effects, and combine multiple audio sources. To connect your XLR mic to a mixer, plug the mic into an XLR input on the mixer. Then, connect the mixer’s output to your PC using a USB cable. This setup provides better control over your audio quality. It also allows you to mix different audio sources seamlessly.
Direct Connection Options
If you don’t have a mixer, direct connection options are available. One method is using an XLR to USB cable. This special cable has an XLR connector on one end and a USB connector on the other. Simply plug the XLR end into your mic and the USB end into your PC. This method is simple and cost-effective. Another option is using an XLR to 3.5mm adapter. Plug the XLR end into your mic and the 3.5mm end into your PC’s microphone input. While this method is straightforward, it may not offer the best audio quality. But it works in a pinch.

Credit: www.youtube.com
Frequently Asked Questions
How Can I Connect Xlr Mic To Pc?
You can connect an XLR mic to a PC using an XLR to USB adapter. This adapter converts the XLR signal to a USB signal, allowing it to be recognized by your computer.
Do I Need Software For Xlr To Pc Connection?
Yes, you may need software. Some XLR to USB adapters come with drivers or software for optimal performance. Always check the manufacturer’s instructions.
Is The Sound Quality Good Without An Audio Interface?
The sound quality can be good but not as high as with an audio interface. An XLR to USB adapter provides a decent quality but lacks some advanced features.
Can I Use Phantom Power With Xlr To Usb Adapter?
Some XLR to USB adapters provide phantom power. Check the specifications of your adapter to ensure it supports phantom power for condenser mics.
Conclusion
Connecting an XLR mic to your PC without an audio interface is possible. Follow simple steps and you’ll enjoy better audio quality. Use an XLR-to-USB cable for the job. Adjust your computer settings for optimal performance. This method is affordable and practical.

No need for expensive equipment. Now, record or stream with ease. Enjoy clear sound without the hassle. Your PC setup just got an upgrade. Happy recording!
{ “@context”: “https://schema.org”, “@type”: “FAQPage”, “mainEntity”: [ { “@type”: “Question”, “name”: “How can I connect XLR mic to PC?”, “acceptedAnswer”: { “@type”: “Answer”, “text”: “You can connect an XLR mic to a PC using an XLR to USB adapter. This adapter converts the XLR signal to a USB signal, allowing it to be recognized by your computer.” } } , { “@type”: “Question”, “name”: “Do I need software for XLR to PC connection?”, “acceptedAnswer”: { “@type”: “Answer”, “text”: “Yes, you may need software. Some XLR to USB adapters come with drivers or software for optimal performance. Always check the manufacturer’s instructions.” } } , { “@type”: “Question”, “name”: “Is the sound quality good without an audio interface?”, “acceptedAnswer”: { “@type”: “Answer”, “text”: “The sound quality can be good but not as high as with an audio interface. An XLR to USB adapter provides a decent quality but lacks some advanced features.” } } , { “@type”: “Question”, “name”: “Can I use phantom power with XLR to USB adapter?”, “acceptedAnswer”: { “@type”: “Answer”, “text”: “Some XLR to USB adapters provide phantom power. Check the specifications of your adapter to ensure it supports phantom power for condenser mics.” } } ] }As an Amazon Associate, Cleanestor earns from qualifying purchases at no additional cost to you.