Connecting a Yamaha keyboard to an audio interface is easy. You need a few simple steps and the right gear.
Whether you’re a beginner or a seasoned musician, knowing how to connect your Yamaha keyboard to an audio interface can make a big difference in your recordings. This setup enhances your sound quality and gives you more control over your music production.
With the right connection, you can record your performances with better clarity and detail. This guide will walk you through the process, ensuring you have everything you need to get started. Ready to take your music to the next level? Let’s dive in!
Introduction To Yamaha Keyboard Connectivity
Connecting your Yamaha keyboard to an audio interface can enhance your music production. This connection allows you to record high-quality sound. It also makes it easier to integrate with other music equipment.
Importance Of Audio Interfaces
Audio interfaces play a crucial role in music production. They convert analog signals from your keyboard to digital signals. This ensures that your computer can process these signals accurately. An audio interface provides better sound quality than a standard computer sound card. This improvement is vital for professional recordings.
Benefits Of Proper Connection
A proper connection between your Yamaha keyboard and audio interface offers many benefits. It reduces noise and interference, ensuring clear sound. It also allows for real-time monitoring, so you can hear exactly what you play. This is helpful during recording sessions.
Additionally, a good connection ensures that your keyboard’s full sound range is captured. This includes all the nuances and dynamics. Proper connectivity can make a noticeable difference in your recordings. It helps in achieving a more polished and professional final product.
Credit: www.youtube.com
Required Equipment
Connecting your Yamaha keyboard to an audio interface is a simple process. You need the right equipment. This section covers what you need to get started.
Yamaha Keyboard Models
Different Yamaha keyboard models offer various features. Some popular models include the Yamaha PSR series, the Yamaha YDP series, and the Yamaha P series. Each model has its own unique set of inputs and outputs. Make sure you know your keyboard model. This will help you choose the right cables and adapters.
Types Of Audio Interfaces
Audio interfaces come in various types. Some popular ones are USB audio interfaces, FireWire audio interfaces, and Thunderbolt audio interfaces. USB interfaces are the most common and easy to use. FireWire interfaces offer better performance but need a special port. Thunderbolt interfaces provide high-speed connections but are more expensive. Choose an interface that fits your needs and budget.
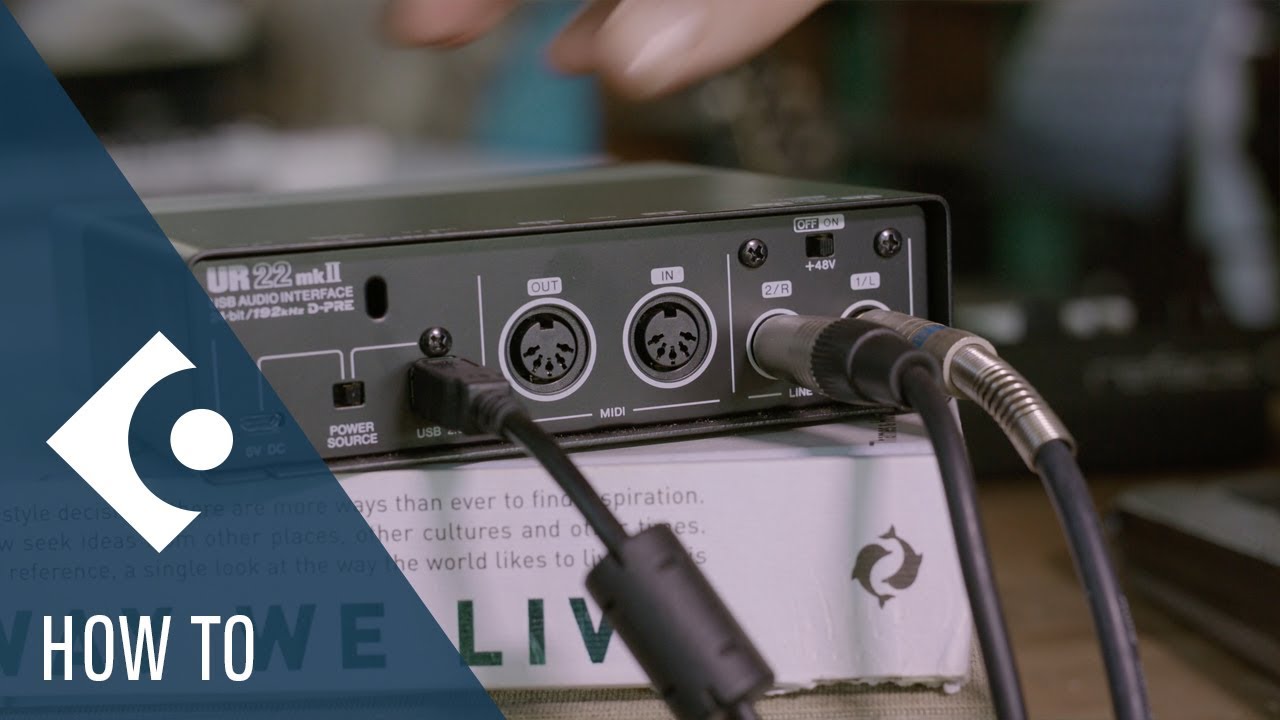
Choosing The Right Cables
Choosing the right cables for your Yamaha keyboard and audio interface is crucial. The correct cables ensure clear sound and a smooth connection. This section will guide you through the different types of audio cables and compatibility considerations.
Audio Cable Types
There are several types of audio cables available. Each serves a different purpose. The most common ones include TRS, TS, and XLR cables. TRS cables are often used for balanced signals. This reduces noise and interference. TS cables are for unbalanced signals. They are suitable for short distances. XLR cables are used for professional audio equipment. They also provide balanced signals and are more durable.
Compatibility Considerations
Before purchasing cables, check the ports on your Yamaha keyboard and audio interface. Ensure they match the cable types you plan to use. Some keyboards have multiple output options. These may include 1/4 inch jacks or MIDI ports. Verify that your audio interface supports these connections. It’s also important to consider the length of the cables. Longer cables can cause signal loss. Shorter cables are ideal for home studios.
Credit: ppmgoldmasale.com
Setting Up The Audio Interface
Setting up your audio interface is a crucial step in connecting your Yamaha keyboard. This process ensures a smooth flow of high-quality sound from your keyboard to your computer. Follow these steps to set up your audio interface correctly.
Connecting To Power Source
First, locate the power adapter that came with your audio interface. Plug the adapter into a nearby power outlet. Then, connect the other end of the adapter to the power input on your audio interface. Ensure the connection is secure. This step is essential for powering up your device.
Connecting To Computer
Next, use a USB cable to connect your audio interface to your computer. One end of the USB cable should go into the USB port on your audio interface. The other end should plug into an available USB port on your computer. Your computer should recognize the new device automatically. If it does not, install the necessary drivers from the audio interface’s website.
Once connected, open your computer’s sound settings. Select the audio interface as your input and output device. This ensures your computer uses the audio interface for sound processing.
Connecting Yamaha Keyboard To Interface
Connecting your Yamaha keyboard to an audio interface opens up many possibilities for your music. It allows you to record, edit, and enhance your sound quality. This guide will help you with easy steps to make this connection. Follow these methods to ensure a smooth setup.
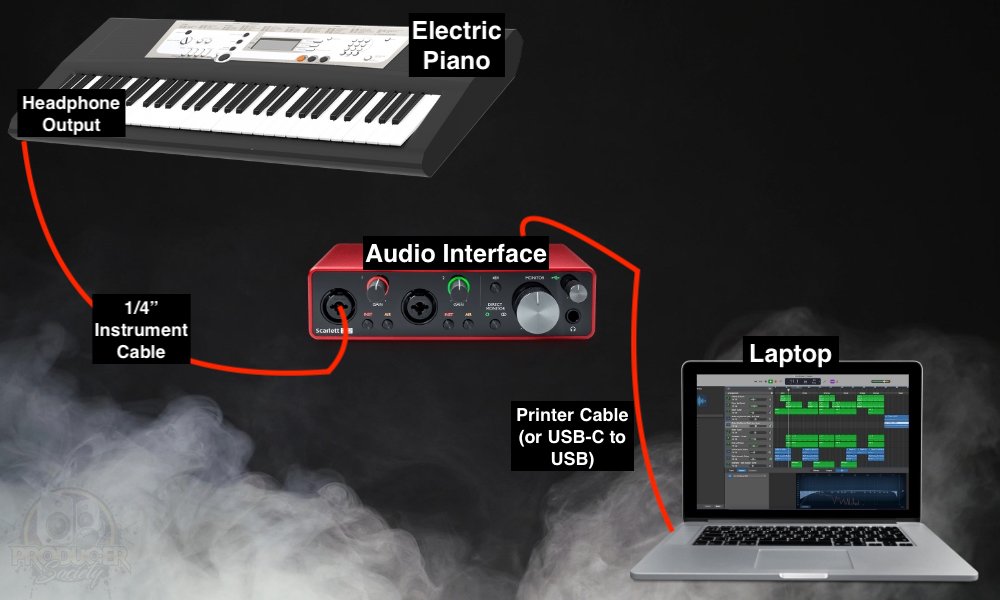
Using Line Outputs
Most Yamaha keyboards come with line outputs. These outputs are usually labeled as “L/Mono” and “R.” You can use these to connect your keyboard to the audio interface.
- Take a 1/4-inch TS cable.
- Plug one end into the “L/Mono” output on your keyboard.
- Plug the other end into the input on your audio interface.
- If you want stereo sound, use two 1/4-inch TS cables.
- Connect one to the “L/Mono” output and the other to the “R” output.
- Plug both cables into the left and right inputs of your audio interface.
Make sure the audio interface is connected to your computer. Check the sound levels and make adjustments as needed.
Using Midi Connections
Another way to connect your Yamaha keyboard is by using MIDI connections. MIDI stands for Musical Instrument Digital Interface. It allows you to control virtual instruments and software on your computer.
| Step | Action |
|---|---|
| 1 | Find the MIDI out port on your Yamaha keyboard. |
| 2 | Connect a MIDI cable to the MIDI out port. |
| 3 | Plug the other end of the MIDI cable into the MIDI in port on your audio interface. |
| 4 | If your audio interface connects via USB, plug it into your computer. |
| 5 | Install any necessary drivers or software. |
MIDI connections transmit data, not audio. You’ll need software to hear the sound. Adjust settings in your Digital Audio Workstation (DAW) to complete the setup.

Credit: www.mozartproject.org
Configuring Software Settings
Configuring software settings is crucial for a smooth connection between your Yamaha keyboard and audio interface. This step ensures that your hardware and software communicate effectively. Follow the steps below to configure your software settings properly.
Installing Drivers
First, download the necessary drivers for your Yamaha keyboard. Visit the Yamaha website and find the correct drivers for your model. Download and install them on your computer. This allows your computer to recognize your keyboard.
After installing, restart your computer. This helps the system to load the new drivers. Once restarted, connect your Yamaha keyboard to the computer using a USB cable. Your computer should detect the keyboard automatically.
Setting Up Daw
Open your Digital Audio Workstation (DAW) software. Check the settings to ensure your Yamaha keyboard is recognized. Go to the ‘Preferences’ or ‘Settings’ menu in your DAW. Look for the ‘MIDI’ or ‘Audio’ settings.
Select your Yamaha keyboard from the list of input devices. This will enable your DAW to receive signals from your keyboard. Make sure to save your settings before closing the menu.
Test your setup by playing some notes on your keyboard. Your DAW should receive and display the input. If everything works, you are ready to start creating music.
Testing The Connection
Testing the connection between your Yamaha keyboard and audio interface is crucial. This step ensures that your setup works correctly. Follow these steps to check if everything is in order.
Checking Signal Flow
First, turn on your Yamaha keyboard and audio interface. Play a few notes on your keyboard. Watch the audio interface for any signal indicators. These lights show if a signal is present. If the lights blink, the connection is likely correct. Next, listen through your headphones or speakers. You should hear the sound from your keyboard. Ensure the volume is not muted or too low. Check both the keyboard and audio interface volume controls.
Troubleshooting Common Issues
If you see no signal or hear no sound, don’t worry. There are a few common issues to check. Ensure all cables are plugged in firmly. Loose cables can cause no signal. Check if the audio interface is selected as the input device on your computer. Sometimes, the computer might default to another input. Restart both the keyboard and the audio interface. This can sometimes fix connection issues. Also, check for any software updates. Outdated drivers can cause problems.
Optimizing Audio Quality
Connecting your Yamaha keyboard to an audio interface is just the first step. To get the best sound, you need to optimize the audio quality. This involves adjusting gain levels and using effects and plugins effectively. By doing so, you can ensure a clear, professional sound.
Adjusting Gain Levels
Start by setting the gain on your audio interface. Too much gain can cause distortion. Too little can make the sound weak. Turn the gain knob until the level is just right. Aim for a balance where the sound is clear and strong.
Check the meter levels on your interface. They should not hit the red zone. If they do, lower the gain slightly. This prevents clipping and keeps the audio clean. Adjusting gain levels is crucial for maintaining audio quality.
Using Effects And Plugins
Effects and plugins can enhance your keyboard sound. Reverb, delay, and EQ are common choices. Reverb can add depth to your sound. Delay can create interesting echoes. EQ helps to balance frequencies.
Experiment with different settings. Start with subtle effects and increase as needed. Too much can overwhelm the original sound. Plugins can also help in recording sessions. They can simulate different environments and instruments.
Use plugins to add warmth or clarity. Test various options to find what works best. Effects and plugins can greatly improve your audio quality when used correctly.
Conclusion And Tips
Connecting your Yamaha keyboard to an audio interface can enhance your music production. It ensures better sound quality and more control over your recordings. Let’s wrap up with some helpful tips to maintain your equipment and explore advanced features.
Maintaining Equipment
Regularly check your cables. Ensure they are not frayed or damaged. Keep your keyboard and audio interface dust-free. Use a soft cloth to clean them. Avoid placing heavy objects on your equipment. This prevents unnecessary wear and tear. Store your devices in a cool, dry place. Protect them from extreme temperatures and humidity.
Exploring Advanced Features
Read the manuals for your Yamaha keyboard and audio interface. Learn about their advanced functions. Experiment with different settings. Try various sound effects and recording options. Use software tools that complement your devices. Many digital audio workstations offer great compatibility. Enhance your music production skills. Practice regularly and explore new techniques.
Frequently Asked Questions
How To Connect Yamaha Keyboard To Audio Interface?
To connect your Yamaha keyboard to an audio interface, use a standard 1/4 inch audio cable. Plug one end into the keyboard’s output and the other into the audio interface’s input. Ensure both devices are powered on.
What Cables Do I Need For Connection?
You need a standard 1/4 inch TRS or TS cable. This cable connects the keyboard’s output to the audio interface’s input. Make sure the cable is of good quality for optimal sound.
Can I Use A Usb Connection?
Yes, many Yamaha keyboards support USB connections. Connect the keyboard to the audio interface or computer using a USB cable. Ensure the correct drivers are installed for seamless operation.
Do I Need Any Software?
Yes, you may need DAW (Digital Audio Workstation) software. This software helps you record and manage the audio from your keyboard. Popular options include Ableton Live, FL Studio, and Logic Pro.
Conclusion
Connecting your Yamaha keyboard to an audio interface is simple. Follow the steps and enjoy better sound quality. Ensure you have the right cables and settings. This setup enhances your music experience. Practice and experiment with different sounds. You will notice the improvement in your recordings.

Remember, patience and practice lead to great results. Happy playing!
{ “@context”: “https://schema.org”, “@type”: “FAQPage”, “mainEntity”: [ { “@type”: “Question”, “name”: “How to connect Yamaha keyboard to audio interface?”, “acceptedAnswer”: { “@type”: “Answer”, “text”: “To connect your Yamaha keyboard to an audio interface, use a standard 1/4 inch audio cable. Plug one end into the keyboard’s output and the other into the audio interface’s input. Ensure both devices are powered on.” } } , { “@type”: “Question”, “name”: “What cables do I need for connection?”, “acceptedAnswer”: { “@type”: “Answer”, “text”: “You need a standard 1/4 inch TRS or TS cable. This cable connects the keyboard’s output to the audio interface’s input. Make sure the cable is of good quality for optimal sound.” } } , { “@type”: “Question”, “name”: “Can I use a USB connection?”, “acceptedAnswer”: { “@type”: “Answer”, “text”: “Yes, many Yamaha keyboards support USB connections. Connect the keyboard to the audio interface or computer using a USB cable. Ensure the correct drivers are installed for seamless operation.” } } , { “@type”: “Question”, “name”: “Do I need any software?”, “acceptedAnswer”: { “@type”: “Answer”, “text”: “Yes, you may need DAW (Digital Audio Workstation) software. This software helps you record and manage the audio from your keyboard. Popular options include Ableton Live, FL Studio, and Logic Pro.” } } ] }As an Amazon Associate, Cleanestor earns from qualifying purchases at no additional cost to you.