Drawing a xylophone may seem challenging, but it’s easier than you think. With a few steps, you can create a realistic xylophone on paper.
In this guide, we will walk you through the simple steps to draw a xylophone. Whether you’re a beginner or have some drawing experience, you’ll find this tutorial helpful. A xylophone, with its unique bars and mallets, can be a fun and educational subject to draw.
Follow along, and by the end, you will have a detailed drawing of a xylophone that you can be proud of. Let’s get started on this creative journey together!
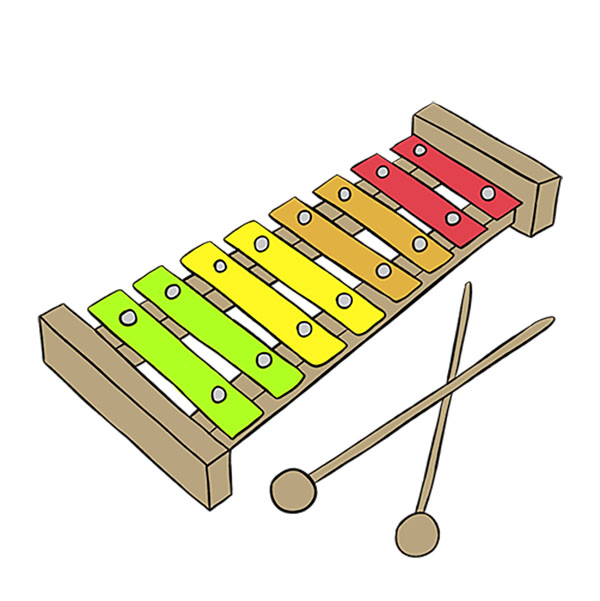
Credit: howtodrawforkids.com
Materials Needed
Starting a drawing project requires some essential materials. This guide will help you gather the right tools for drawing a xylophone. Let’s explore the materials needed to ensure you have everything ready for your creative journey.
Drawing Tools
Before you begin, make sure you have these drawing tools:
- Pencil – A basic tool for sketching and outlining.
- Eraser – For correcting mistakes and refining your drawing.
- Ruler – To draw straight lines and measure accurately.
- Colored Pencils or Markers – To add vibrant colors to your xylophone drawing.
- Paper – Good quality paper for a smooth drawing surface.
Reference Images
Using reference images can greatly enhance your drawing. Here are some tips:
- Search Online – Look for clear images of xylophones.
- Books – Find art books with detailed pictures.
- Photos – Use photos of real xylophones for accuracy.
Having multiple images will help you understand the xylophone’s structure. These references will guide your drawing, making it more realistic.
| Material | Purpose |
|---|---|
| Pencil | Sketching and outlining |
| Eraser | Correcting mistakes |
| Ruler | Drawing straight lines |
| Colored Pencils | Adding color |
| Paper | Drawing surface |
Basic Shapes
Drawing a xylophone can be a fun and creative process. Start with the basic shapes to make it easier. This part will help you outline the frame and position the bars accurately. Follow these steps to get the perfect xylophone design.
Outline The Frame
The frame is the first part. Begin by drawing a large rectangle. This will be the base. The rectangle should be wide and long enough to hold the bars. Remember, the xylophone’s frame is like a table, holding everything in place.
Next, draw two small rectangles at each end of the large rectangle. These will be the stands. Make sure they are equal in size. The stands should extend below the large rectangle, giving the frame support.
Now, add two diagonal lines from the top corners of the large rectangle. These lines should meet the small rectangles. This creates the angle of the frame. Your xylophone should look like a table with angled legs now.
Positioning The Bars
Bars are the main part of a xylophone. They produce the sound. Start by drawing a series of narrow rectangles inside the large rectangle. These will be your bars. Make sure they are evenly spaced and parallel to each other.
Each bar should be slightly shorter than the one before it. This creates the xylophone’s distinct look. The shortest bar should be at the end closest to you. The longest bar should be at the far end. This arrangement allows the bars to produce different pitches.
Make sure the bars sit on top of the frame. They should not touch the small rectangles at the ends. This ensures a clean and accurate look. Double-check your spacing to ensure uniformity.
Now you have outlined the basic shapes. The frame and the bars are in place. Your xylophone drawing is taking shape!
Adding Details
Adding details to your xylophone drawing will make it more realistic and visually appealing. Focus on the individual bars, connecting elements, and other small features. This section will guide you through these steps.
Drawing The Bars
The bars are the xylophone’s main feature. Start by drawing rectangles of varying lengths. The longest bar should be at the left, with each subsequent bar getting shorter. Use a ruler to keep the edges straight.
Next, add depth by giving each bar a 3D look. Draw a line from each corner of the bars towards the right and connect them. This makes the bars look more like solid objects rather than flat rectangles.
To add more detail, draw two small circles at the top of each bar. These represent the screws or pins that hold the bars in place. Don’t forget to add small lines across each bar to represent the sound grooves.
Connecting Elements
After you have the bars, focus on the connecting elements. Draw the frame that holds the bars together. Start with two parallel lines that run underneath the bars. These lines should be slightly curved to show the frame’s structure.
Next, draw small vertical lines from the bottom of each bar to the frame. These lines represent the supports. Make sure they align with the small circles you drew earlier.
To complete the frame, add crossbars at each end. These should connect to the vertical supports. Draw small circles or screws at each intersection for added detail.
Finally, add the xylophone’s legs. Draw two lines from each end of the frame down to the surface. Give them a slight angle to show stability. Add small circles at the bottom to represent wheels or rubber feet.
Your xylophone drawing is now detailed and realistic. Keep refining the lines and adding small touches to perfect your artwork.
Shading And Texture
Shading and texture bring your xylophone drawing to life. They add depth and realism, making your artwork more appealing. By focusing on shadows and wood grain, your xylophone will look more three-dimensional and realistic.
Applying Shadows
Start by identifying the light source in your drawing. This will help determine where the shadows fall. Shadows add depth and make the xylophone look real.
Use a soft pencil to lightly shade areas away from the light. Gradually build up the darkness. Pay attention to the edges of each bar. The shadow should be darkest where the bars overlap.
Blend the shadows gently with a blending stump or your finger. This will soften the transitions and create a smooth look.
Adding Wood Grain
Wood grain adds texture to the xylophone bars. Begin by drawing light, parallel lines along each bar. Keep the lines close together and vary their length.
Some lines can be slightly curved to mimic the natural grain of wood. Add a few knots or irregularities for a more realistic effect.
Use a darker pencil to enhance some lines. This creates contrast and makes the texture stand out. Blend lightly to keep the wood grain subtle and natural.
Coloring The Xylophone
After sketching your xylophone, it’s time to add colors. Coloring the xylophone can bring your drawing to life. It highlights the instrument’s charm and makes it more appealing. Follow these tips to make your xylophone look vibrant and realistic.
Choosing Colors
Selecting the right colors is crucial. Xylophones are often colorful. You can use bright colors like red, yellow, green, and blue. Think of a rainbow. Each bar of the xylophone can be a different color. This makes the drawing more exciting and fun to look at.
| Color | Bar Position |
|---|---|
| Red | First |
| Orange | Second |
| Yellow | Third |
| Green | Fourth |
| Blue | Fifth |
| Purple | Sixth |
Color Application Techniques
Applying colors evenly is important. Use colored pencils for a smooth finish. Start by lightly coloring in each bar. Build up layers to add depth. Avoid pressing too hard. This keeps the colors even and prevents smudging.
Outline each bar with a darker shade. This adds dimension. For example, if you colored a bar blue, outline it with a darker blue. This technique makes each bar stand out. It gives your xylophone a 3D effect.
Don’t forget to color the mallets. They can be a neutral color like brown or black. Add a bit of shading to show the roundness of the mallet heads.
- Light layers to avoid smudging
- Darker outlines for depth
- Shading for a 3D effect
Adding final touches enhances the overall look. Erase any stray marks. Make sure each bar is evenly colored. Your xylophone should now look vibrant and lively.

Credit: www.youtube.com
Final Touches
Adding the final touches to your xylophone drawing can make a big difference. With just a few more strokes, your xylophone can look polished and realistic. This last step is crucial. Let’s explore some techniques to perfect your drawing.
Highlighting
Start by adding highlights to your xylophone. Use a white pencil or eraser to create light reflections. Focus on the metallic parts and wooden bars. Highlights make these areas look shiny and three-dimensional. They should be subtle yet noticeable.
Examine your light source. Place highlights where the light would naturally hit the instrument. This technique adds depth and realism to your drawing. Don’t overdo it. Too many highlights can look unnatural.
Refining Edges
Now, refine the edges of your xylophone. Clean up any rough lines with a sharp pencil or fine-tipped pen. Smooth edges make your drawing look neat and professional. Pay close attention to the outlines of the bars and frame.
Consistency is key. Ensure all edges are evenly refined. Check for any stray marks or smudges. Erase them carefully. This step may seem small, but it greatly enhances the overall appearance of your drawing.
Common Mistakes
Drawing a xylophone can be a fun and rewarding experience. However, beginners often make common mistakes that can hinder their progress. Understanding these mistakes can significantly improve your drawing skills. Let’s explore some of the common pitfalls and how to avoid them.
Avoiding Proportion Errors
One of the most frequent mistakes is getting the proportions wrong. Each bar of the xylophone should have a consistent width. If some bars are wider or narrower, the xylophone will look uneven. Use a ruler or straightedge to ensure uniformity.
Another common issue is the length of the bars. Each bar should gradually decrease in length. Ensure you measure each bar carefully. This will help maintain the correct proportions throughout the drawing.
Consistent Shading
Shading can add depth and realism to your xylophone drawing. Inconsistent shading is a common error. Ensure you apply even pressure while shading to avoid dark and light patches. This creates a uniform look.
Another shading mistake is not following the light source. Always determine where your light source is. Shade accordingly to create a realistic three-dimensional effect. Consistency in shading can make a significant difference in the final result.
Credit: www.drawingnow.com
Showcasing Your Art
Drawing a xylophone is a fun and creative activity. But what do you do once your artwork is complete? Showcasing your art is a great way to share your talent with others. It helps you gain confidence and receive valuable feedback. Below, we explore two effective ways to showcase your xylophone drawing.
Sharing On Social Media
Social media platforms are perfect for sharing your art. Start by taking a clear photo of your xylophone drawing. Use natural light for the best results. Upload the photo to your social media accounts. Write a short description about your drawing process. Engage with your audience by asking questions. Reply to comments to build a community around your art.
Creating A Portfolio
A portfolio is a collection of your best artwork. It showcases your progress and skills. Begin by choosing your best xylophone drawings. Use a website builder to create an online portfolio. Arrange your artwork in a visually pleasing manner. Add descriptions to each piece to share your creative journey. Regularly update your portfolio with new drawings. This helps you track your improvement over time.
Frequently Asked Questions
What Tools Do I Need To Draw A Xylophone?
To draw a xylophone, you’ll need paper, pencils, an eraser, and colored pencils or markers.
How Do I Start Drawing A Xylophone?
Begin by sketching a horizontal rectangle. This will serve as the base of your xylophone.
What Details Should I Include In My Xylophone Drawing?
Include bars of varying lengths on the base, and draw mallets to add realism.
How Can I Add Color To My Xylophone Drawing?
Use vibrant colors for the bars and subtle shades for the base to make it eye-catching.
Conclusion
Drawing a xylophone can be fun and rewarding. Follow the steps, and you’ll see improvement. Practice regularly to refine your skills. Remember to be patient with yourself. Each drawing will get better with time. Share your creations with friends and family.

Enjoy the process and have fun! Happy drawing!
{ “@context”: “https://schema.org”, “@type”: “FAQPage”, “mainEntity”: [ { “@type”: “Question”, “name”: “What tools do I need to draw a xylophone?”, “acceptedAnswer”: { “@type”: “Answer”, “text”: “To draw a xylophone, you’ll need paper, pencils, an eraser, and colored pencils or markers.” } } , { “@type”: “Question”, “name”: “How do I start drawing a xylophone?”, “acceptedAnswer”: { “@type”: “Answer”, “text”: “Begin by sketching a horizontal rectangle. This will serve as the base of your xylophone.” } } , { “@type”: “Question”, “name”: “What details should I include in my xylophone drawing?”, “acceptedAnswer”: { “@type”: “Answer”, “text”: “Include bars of varying lengths on the base, and draw mallets to add realism.” } } , { “@type”: “Question”, “name”: “How can I add color to my xylophone drawing?”, “acceptedAnswer”: { “@type”: “Answer”, “text”: “Use vibrant colors for the bars and subtle shades for the base to make it eye-catching.” } } ] }As an Amazon Associate, Cleanestor earns from qualifying purchases at no additional cost to you.