Equalizing a kick drum can transform your track. It brings clarity and punch.
A well-EQ’d kick drum is the heartbeat of your mix. It can make or break the overall sound. Knowing how to properly EQ a kick drum is essential for any music producer. Whether you’re working on electronic music, rock, or any other genre, the kick drum needs to stand out without overpowering other elements.
This guide will help you understand the basics of EQ’ing a kick drum. You’ll learn how to enhance its presence and make it fit perfectly within your mix. Ready to give your kick drum the attention it deserves? Let’s dive in.
Introduction To Kick Drum Eq
Properly equalizing (EQing) a kick drum can make or break your track. A well-EQ’d kick drum provides the foundation. It adds depth and clarity to your music. Understanding the basics of EQ can help you achieve the perfect kick sound. Let’s dive into the essentials.
Importance Of Eq
The importance of EQ in mixing cannot be overstated. Without EQ, sounds can clash and create a muddy mix. Here are a few key reasons why EQ is crucial for your kick drum:
- Defines the Low-End: A good kick drum EQ enhances the low frequencies. It gives your track a solid foundation.
- Clarifies the Mix: Proper EQing ensures each instrument has its own space. This avoids frequency masking.
- Balances Frequencies: EQ helps balance the kick drum with other elements. This leads to a more cohesive mix.
Basic Concepts
Before diving into EQ settings, understand some basic concepts. These concepts will guide your EQ process for the kick drum:
| Concept | Description |
|---|---|
| Frequency Ranges | Low, mid, and high frequencies each play a role in the kick drum sound. |
| Cutting and Boosting | Cutting removes unwanted frequencies. Boosting enhances desired ones. |
| Q Factor | The Q factor controls the width of the frequency band. A higher Q narrows the band. |
Let’s break down these concepts further:
- Start by identifying the fundamental frequency of your kick drum. This is usually between 50-100 Hz.
- Use a narrow Q factor to cut unwanted frequencies. This cleans up the sound.
- Boost frequencies around 60-90 Hz for more punch. Avoid overdoing it to prevent muddiness.
- Add a slight boost around 3-5 kHz. This adds click and presence to the kick.
These steps provide a starting point. Tweak settings based on your specific track.
Setting Up Your Tools
Setting up your tools is the first step in EQing a kick drum. The right tools will ensure you get the best sound possible. This section will guide you through the essentials.
Choosing The Right Software
Begin by selecting the right software for your needs. Many options are available. Popular choices include Ableton Live, FL Studio, and Logic Pro. These programs offer powerful EQ tools. They are user-friendly and widely supported. Ensure your software is up to date for the best performance.
Essential Equipment
Next, gather the essential equipment for EQing. You will need a good pair of headphones. Studio monitors are also important. They help you hear the true sound of your kick drum. A quality audio interface is crucial. It ensures clear sound transmission from your computer to your speakers. A stable computer setup is also necessary. It should handle your software without lag.
Analyzing The Kick Drum
Analyzing the kick drum is the first step to achieving a well-balanced mix. Understanding its frequency range and identifying problem areas ensures your kick drum stands out without overpowering other elements. Let’s break down the process.
Frequency Ranges
The kick drum spans a wide frequency range. Knowing these ranges helps you make informed EQ decisions.
| Frequency Range | Characteristics |
|---|---|
| Sub-bass (20-60 Hz) | Gives the kick its deep, thumping feel. |
| Bass (60-100 Hz) | Adds weight and power to the kick. |
| Low-mids (100-250 Hz) | Provides body and fullness. |
| High-mids (2.5-5 kHz) | Brings out the punch and attack. |
| Highs (5-10 kHz) | Adds clarity and presence. |
Identifying Problem Areas
Identifying and addressing problem areas ensures your kick drum sounds clean and tight.
- Muddiness: Too much energy in the low-mids (100-250 Hz) can cause muddiness. Use a narrow Q to cut these frequencies.
- Lack of Punch: If your kick lacks punch, boost around the high-mids (2.5-5 kHz). This adds attack and presence.
- Clashing Frequencies: The kick drum might clash with the bass guitar. Use a spectrum analyzer to identify overlapping frequencies. Cut these frequencies in one instrument to create space.
Addressing these issues ensures your kick drum sits well in the mix. Proper EQ enhances its presence without overpowering other elements.

Credit: www.musicguymixing.com
Boosting Key Frequencies
Boosting key frequencies in a kick drum can change the sound completely. It’s important to know which frequencies to boost for a punchy, clear kick drum. This section will guide you on how to boost key frequencies for the best results.
Low-end Boost
To add power to your kick drum, boost the low-end frequencies. Focus on the 50-60 Hz range. This range gives the kick its deep thump. Be careful not to overdo it. Too much boost can make the mix muddy. Use a narrow Q to target specific frequencies.
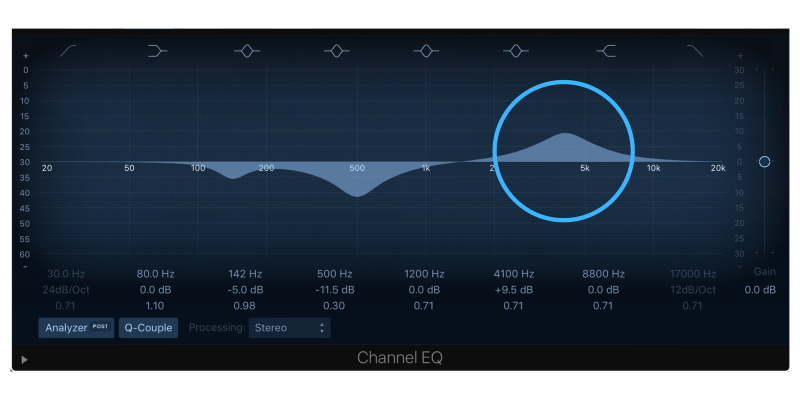
High-end Presence
To make the kick drum stand out, boost the high-end frequencies. Look at the 3-5 kHz range. This range adds a click or snap to the kick. It helps the kick cut through the mix. Start with a small boost. Listen carefully and adjust as needed.
Cutting Unwanted Frequencies
To achieve a clean and punchy kick drum sound, cutting unwanted frequencies is crucial. These frequencies often clutter the mix and reduce clarity. By focusing on specific areas, you can enhance the kick drum’s impact.
Removing Muddy Frequencies
Muddy frequencies typically range between 200Hz and 500Hz. These frequencies can make the kick drum sound dull and unclear.
Use an equalizer to identify and reduce these frequencies. Start by applying a narrow Q and sweeping through the range. Listen for areas where the sound becomes less clear or more cluttered.
Once identified, reduce these frequencies by 3-6 dB. This will help to clean up the mix and bring more definition to the kick drum.
Handling Resonances
Resonances can cause the kick drum to sound boomy or hollow. These often occur in the lower midrange or upper bass frequencies.
To handle these, use a parametric EQ. Look for resonant frequencies by sweeping through the range with a narrow Q. When a resonance is found, it will sound exaggerated.
Cut the identified resonant frequencies by 2-4 dB. This will help to tighten the sound and remove unwanted ringing or hollow tones.
| Frequency Range | Action |
|---|---|
| 200Hz – 500Hz | Reduce muddy frequencies by 3-6 dB |
| Lower Midrange | Cut resonances by 2-4 dB |
| Upper Bass | Handle resonances by 2-4 dB |
By carefully cutting unwanted frequencies, you enhance the kick drum’s clarity and presence. This step is vital for achieving a professional and polished mix.
Using Compression
Using compression on a kick drum can shape its sound. It can add punch and control its dynamics. By compressing the kick, you can make it stand out in a mix. Let’s explore the types of compression and how to set attack and release.
Types Of Compression
There are two main types of compression: VCA and FET. VCA compressors are versatile. They provide clean and precise control. FET compressors add warmth and character. They can make a kick drum sound fuller and more aggressive.
Setting Attack And Release
The attack setting controls how quickly the compressor reacts. A fast attack tames transients, making the kick smoother. A slow attack lets the initial punch through, adding impact. The release setting affects how long the compressor holds the signal. A fast release restores dynamics quickly. A slow release maintains compression longer, adding sustain to the kick.
Experiment with these settings. Find the balance that suits your mix. The right compression settings can make your kick drum sound tight and powerful.
Layering Kick Drums
Layering kick drums can bring depth and power to your tracks. By combining different kick drum sounds, you can create a unique and full-bodied tone. This technique adds complexity and interest to your music. Let’s explore how to layer kick drums effectively.
Blending Different Sounds
Start with two or more kick drum samples. Choose sounds that complement each other. For example, one kick might have a strong low end, while another has a sharp attack. This balance will create a fuller sound.
Next, adjust the volume of each kick. Ensure no single kick overpowers the others. The goal is to blend them into one cohesive sound. Use equalization (EQ) to carve out frequencies. This helps each kick find its place in the mix.
Phase Alignment
Phase alignment is critical when layering kicks. If the kicks are out of phase, they can cancel each other out. This will result in a weak and thin sound.
To align phases, zoom in on the waveforms of your kicks. Ensure the peaks and troughs match. If they don’t, invert the phase of one kick. This adjustment will help the kicks work together.
Use your ears and trust your judgment. Listen carefully to how the kicks interact. Proper phase alignment will give you a strong and punchy kick drum sound.

Credit: www.youtube.com
Final Adjustments
Final adjustments are crucial to achieving the perfect kick drum sound. These tweaks ensure your kick drum sits well in the mix. Let’s dive into the final adjustments needed.
Balancing With Other Instruments
Ensure the kick drum does not overpower other instruments. Use a mixing console to balance levels. Pay attention to the bass guitar and snare drum. Both compete for the same frequency range.
- Lower the kick drum volume if it masks the bass.
- Increase the kick drum volume if it gets lost in the mix.
- Use EQ to carve out space for each instrument.
Check the kick drum in context. Listen to the entire mix. Make subtle adjustments as needed.
Applying Effects
Applying effects can add character to the kick drum. Use effects sparingly to avoid a muddy mix.
- Compression: Use a compressor to control the dynamics. Set a slow attack and fast release. This maintains the punch of the kick.
- Reverb: Add a small amount of reverb. This adds depth without overwhelming the mix. Choose a short decay time.
- Saturation: Use saturation to add warmth. Apply it gently to avoid distortion.
Check the effects in the context of the mix. Ensure they enhance rather than detract.
Final adjustments are about fine-tuning. Balancing levels and applying effects can make a big difference. Keep your ears fresh. Take breaks. Listen to your mix on different systems. Your kick drum will sound great in the end.
Credit: mastering.com
Frequently Asked Questions
How Do I Eq A Kick Drum?
To EQ a kick drum, start with a low-cut filter. Boost around 60-100 Hz for thump, and cut around 200-300 Hz to reduce muddiness.
What Frequency Should I Boost For Punch?
Boost the frequency range between 3-5 kHz for a punchy kick drum. This helps the kick drum cut through the mix.
How Can I Reduce Kick Drum Muddiness?
To reduce muddiness, use a narrow EQ cut around 200-300 Hz. This will help clean up the low-mid frequencies.
What Is The Purpose Of A Low-cut Filter?
A low-cut filter removes unwanted low-end frequencies. This creates space for other instruments in the mix and keeps the kick drum tight.
Conclusion
A well-EQ’d kick drum makes a huge difference in your mix. Focus on clarity and punch. Always trust your ears and experiment with settings. Small adjustments can lead to big improvements. Remember, every mix is unique. Practice and patience will help you achieve the sound you desire.

Keep learning and refining your technique. Happy mixing!
As an Amazon Associate, Cleanestor earns from qualifying purchases at no additional cost to you.