Creating an Indian flute is a fascinating and rewarding process. It involves careful selection of materials and precise craftsmanship.
Indian flutes, also known as bansuris, hold a special place in traditional music. These flutes are made from bamboo and produce enchanting melodies. Making your own bansuri can deepen your appreciation for Indian music. It allows you to connect with a rich cultural heritage.
This guide will walk you through the steps to create your own Indian flute. You’ll learn about the tools and techniques needed. Whether you’re a musician or a craft enthusiast, you’ll find this process both enjoyable and educational. Let’s dive into the art of making an Indian flute and discover the beauty of its sound.
Introduction To Indian Flute
The Indian flute, known as the bansuri, holds a special place in Indian music. It is a simple but enchanting instrument. Its soothing sounds have been a part of Indian culture for centuries.
Origins And History
The Indian flute has a rich history that dates back thousands of years. It is often associated with the god Krishna, who is depicted playing the flute. Ancient scriptures and paintings show the flute as an important part of Indian heritage.
Originally made from bamboo, the bansuri has been used in classical, folk, and devotional music. Its simple design and natural materials make it unique. The bansuri’s timeless appeal continues to captivate listeners.
Types Of Indian Flutes
| Type | Material | Usage |
|---|---|---|
| Bansuri | Bamboo | Classical and folk music |
| Venu | Bamboo | South Indian classical music |
| Algoza | Wood | Folk music, especially in Punjab |
There are several types of Indian flutes, each with its own characteristics. The bansuri is the most popular and is used in North Indian classical music. The venu is similar but is used in South Indian music.
Another type is the algoza, which consists of two flutes played simultaneously. It is often used in Punjabi folk music. Each type of flute has a unique sound and playing style.
Understanding these types helps in choosing the right flute for your musical journey.

Credit: m.youtube.com
Materials Needed
Creating an Indian flute, or bansuri, is a beautiful and rewarding experience. The first step is to gather the right materials. This ensures the flute sounds perfect and lasts long. Below, we explore the necessary materials in detail.
Wood Selection
The wood selection is crucial in making a high-quality Indian flute. Choose a type of wood that is sturdy yet easy to work with. Popular choices include:
- Bamboo: Lightweight and traditional.
- Teak: Durable and rich in tone.
- Rosewood: Offers a unique sound.
Ensure the wood is free of cracks and knots. This helps in creating a smooth and resonant sound.
Tools And Supplies
Having the right tools and supplies is essential. Here is a list of tools and supplies you will need:
| Tool/Supply | Purpose |
|---|---|
| Handsaw | To cut the wood to size. |
| Drill | To make holes for the finger placements. |
| Sandpaper | To smooth the surface of the wood. |
| Measuring Tape | To measure the length and placement of holes. |
| Fine File | To refine the holes and edges. |
| Wood Finish | To protect and polish the flute. |
These tools and supplies ensure your flute looks and sounds professional. Make sure to handle tools with care to avoid accidents.
Preparing The Wood
Creating an Indian flute begins with preparing the wood. This step is crucial. The quality of the wood affects the sound. Proper preparation ensures the flute produces a beautiful tone. Let’s dive into the key steps involved.
Cutting The Wood
First, select a piece of bamboo or hardwood. Measure the desired length for your flute. Use a saw to cut the wood to this length. Ensure the cut is straight and clean. This helps in the next steps.
Sanding And Smoothing
Next, sand the wood to remove rough edges. Start with coarse sandpaper. Gradually use finer sandpaper for a smooth finish. This process takes time but is essential. Smooth wood feels better and sounds clearer.
Check the wood regularly while sanding. Ensure all surfaces are even. Smooth out any imperfections. This preparation makes a big difference. A well-prepared flute looks and plays beautifully.
Creating The Bore
Creating the bore is an essential step in making an Indian flute. The bore is the hollow part of the flute where the air travels. This process requires precision and patience. A well-made bore ensures a clear and melodious sound.
Drilling The Bore
Start by marking the center of the bamboo. Use a sharp drill bit to make a small hole. Slowly increase the size of the drill bit. This prevents cracks in the bamboo. Drill the hole to the desired diameter. Ensure the hole is straight and smooth. Smooth out any rough edges inside the bore.
Ensuring Proper Length
Measure the length of the flute carefully. The length affects the pitch and sound. Use a ruler or measuring tape. Mark the exact length needed. Cut the bamboo to the marked length. Ensure the cut is straight and clean. Double-check the length to avoid mistakes.
Tuning The Flute
Tuning the Flute is an important step in making an Indian flute. A well-tuned flute will produce a beautiful, melodious sound. This process involves careful adjustments to ensure the right pitch and tone. Let’s explore how to position the holes and adjust the pitch to achieve perfect tuning.
Positioning The Holes
Properly positioning the holes is crucial for accurate tuning. Use a measuring tape to mark the positions for the holes. Make sure the marks are evenly spaced. This will help in producing consistent notes.
Follow these steps to position the holes:
- Measure the total length of the flute.
- Divide the length into equal sections.
- Mark the positions using a pencil.
- Double-check the marks for accuracy.
Once the marks are made, you can start drilling the holes. Be precise to ensure the notes are in tune.
Adjusting The Pitch
Adjusting the pitch is the next step after positioning the holes. This step ensures each note is at the correct pitch. You can fine-tune the pitch by slightly enlarging or reducing the size of the holes.
Here’s how to adjust the pitch:
- Play a note to test the pitch.
- If the pitch is too high, slightly enlarge the hole.
- If the pitch is too low, reduce the hole size using a filler.
- Retest the note after each adjustment.
Continue this process for each hole. Patience is key in achieving perfect tuning.
| Step | Description |
|---|---|
| 1 | Mark the positions for the holes. |
| 2 | Drill the holes precisely. |
| 3 | Test and adjust the pitch. |
By following these steps, you can create a beautifully tuned Indian flute. The key is to take your time and be precise with each step.
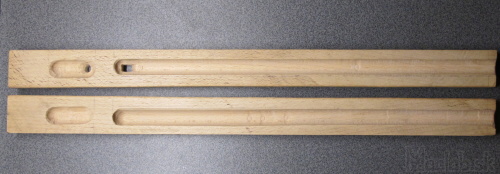
Credit: www.maclab.sk
Finishing Touches
After crafting the basic structure of your Indian flute, the final steps are crucial. These finishing touches enhance the flute’s look and feel. This stage involves polishing the surface and adding decorative elements. Both steps add beauty and value to your handmade instrument.
Polishing The Surface
The first step in finishing your Indian flute is polishing. Sand the surface with fine-grit sandpaper. This removes any rough spots and smooths the wood. Start with a coarse grit and move to finer grits. This ensures the surface is even and smooth.
Once the sanding is complete, wipe the flute with a damp cloth. This removes dust and small particles. Next, apply a wood polish or oil. Use a soft cloth to rub the polish into the wood. This brings out the natural beauty of the wood and provides a protective layer.
Adding Decorative Elements
Now, it’s time to add decorative elements. These can include carvings, paint, or beads. Carvings can be simple lines or intricate patterns. Use a small carving tool to etch designs into the wood. Paint can add color and personality. Choose non-toxic paints for safety.
Beads and strings can also enhance the flute’s appearance. Wrap colorful strings around the flute’s body. Attach beads to the ends of the strings. These decorations can reflect personal style or cultural significance. Ensure all decorations are securely attached.
These finishing touches make your Indian flute unique. They transform a simple instrument into a work of art. Enjoy the process and take pride in your creation.
Playing The Indian Flute
Playing the Indian flute, also known as the bansuri, is a beautiful experience. The soulful melodies can evoke deep emotions. To play the bansuri, you need to master some basic techniques. This includes finger placement and breath control. Let’s explore these essential skills.
Basic Finger Techniques
Proper finger placement is crucial for producing clear notes. Start with your left hand. Place your index finger on the first hole. Your middle finger goes on the second hole. The ring finger covers the third hole. The right hand follows the same pattern for the remaining holes.
- Index Finger: First hole
- Middle Finger: Second hole
- Ring Finger: Third hole
Make sure your fingers completely cover the holes. Any gaps will affect the sound quality. Practice moving your fingers smoothly. This will help in playing faster and more complex pieces.
Breath Control
Breath control is vital for playing the Indian flute. It determines the volume and tone of the notes. Begin with a steady, gentle breath. Blow across the flute’s mouthpiece, not directly into it. This creates a smooth, airy sound.
- Take a deep breath from your diaphragm.
- Exhale slowly and evenly.
- Maintain a consistent airflow.
Practice long, sustained notes first. This will help you build breath control. Over time, you can experiment with dynamics. Try playing softly and then louder. This adds expression to your music.
Remember, patience is key. Both finger techniques and breath control require time and practice. Enjoy the journey of learning. The Indian flute is a rewarding instrument.
Maintenance And Care
Maintaining and caring for your Indian flute ensures its longevity and sound quality. This section covers essential steps to keep your instrument in top condition.
Cleaning The Flute
Regular cleaning is vital for your Indian flute. Follow these steps:
- Use a soft, dry cloth to wipe the outer surface.
- For the inner surface, use a cleaning rod wrapped with a cloth.
- Ensure no moisture is left inside the flute.
- Avoid using water or chemicals, as they can damage the wood.
Cleaning after every use helps to maintain the flute’s integrity and sound.
Storing Properly
Proper storage is crucial for preserving your flute. Keep these tips in mind:
- Store the flute in a dry, cool place.
- Avoid direct sunlight or heat sources.
- Use a protective case to prevent dust and damage.
- Ensure the case is lined with soft material to avoid scratches.
Proper storage prevents warping and maintains the flute’s quality over time.
| Action | Frequency | Tools Needed |
|---|---|---|
| Cleaning outer surface | After each use | Soft, dry cloth |
| Cleaning inner surface | After each use | Cleaning rod, cloth |
| Storing | Always | Protective case |

Credit: www.pinterest.com
Frequently Asked Questions
What Materials Are Needed To Make An Indian Flute?
To make an Indian flute, you’ll need bamboo, sandpaper, a drill, and a tuner. Bamboo is the primary material. Sandpaper smooths it. A drill makes holes. A tuner ensures accurate sound.
How Do I Choose The Right Bamboo?
Choose bamboo that is straight and free of cracks. It should be about 2-3 cm in diameter. This ensures durability and sound quality.
How Do You Tune An Indian Flute?
Tuning involves adjusting the size and placement of the holes. Use a tuner for accuracy. Start by drilling small holes and enlarge them as needed.
What Is The Best Length For An Indian Flute?
The best length is typically 14-22 inches. Longer flutes produce deeper tones. Choose a length based on the desired pitch and comfort.
Conclusion
Creating an Indian flute can be a rewarding experience. Follow the steps carefully. Gather the right materials, and use precise measurements. Pay attention to detail while crafting. Practice makes perfect, so keep refining your skills. Enjoy the soothing music from your handmade flute.

Share your musical journey with friends and family. Embrace the culture and history behind the instrument. Happy flute making!
As an Amazon Associate, Cleanestor earns from qualifying purchases at no additional cost to you.