
To mic a cajon drum, start with a clear plan. Choose the right microphone and placement.
Miking a cajon drum can seem tricky. But with the right steps, you can capture its unique sound perfectly. Cajon drums are popular for their versatility and rich tones. They are used in various music genres, from flamenco to folk.
Proper miking is crucial to bring out the best sound. Whether you’re recording in a studio or performing live, the right mic setup makes a big difference. In this guide, we’ll explore simple techniques to mic a cajon drum effectively. You’ll learn about the best microphones to use and how to position them for optimal sound. Let’s dive in and make your cajon drum sound amazing!
Credit: www.soundonsound.com
Introduction To Cajon Miking
The cajon drum is a versatile instrument. It is popular in various music genres. Miking a cajon drum can seem tricky. But with the right techniques, it becomes easy. This guide will help you understand the basics of cajon miking. Let’s dive into the world of cajon miking and make your drum sound great.
Why Proper Miking Matters
Proper miking is crucial for a cajon drum. It ensures the best sound quality. Here are some reasons why it matters:
- Captures accurate tones: Proper miking captures the true sound of the cajon.
- Enhances live performances: It makes your performance sound professional.
- Improves recording quality: Good miking results in better recordings.
Overview Of Cajon Drums
The cajon drum originated from Peru. It’s known for its box-like shape. Here are some key features:
| Feature | Description |
|---|---|
| Material | Usually made from wood. |
| Sound | Produces deep bass and crisp snare sounds. |
| Playing style | Played by sitting on it and striking the front face. |
Understanding these basics helps in miking the cajon effectively. Each part of the cajon produces different sounds. So, you must know where to place the mics for the best results.
By following these tips, you can achieve great sound quality. Happy drumming!
Choosing The Right Microphone
Choosing the right microphone for your cajon drum is crucial. The right mic captures the unique sound of your instrument. This section will guide you through the options. Let’s explore dynamic and condenser mics and recommend some models.
Dynamic Vs. Condenser Mics
Both dynamic and condenser mics have their pros and cons. Understanding these will help you make a better choice.
| Type | Pros | Cons |
|---|---|---|
| Dynamic Mics |
|
|
| Condenser Mics |
|
|
Recommended Microphone Models
Here are some recommended models for both dynamic and condenser mics. These models are perfect for cajon drums.
- Dynamic Mics:
- Shure SM57: A reliable and durable mic. Ideal for live settings.
- Audix i5: Known for its clear sound and affordability.
- Condenser Mics:
- Rode NT1-A: Excellent for studio recordings. Very sensitive.
- AKG C214: Offers a wide frequency range. Great for detailed sound.
Microphone Placement Techniques
Microphone placement can greatly impact the sound of your cajon drum. Understanding different techniques can help capture the best audio. Let’s explore two common methods: front placement and rear placement.
Front Placement
Placing the microphone in front of the cajon captures the high-end frequencies. Position the mic about 6 inches from the sound hole. Angle it slightly downward to reduce unwanted noise. This setup highlights the slap and pop sounds.
Consider using a condenser microphone for this technique. It picks up detailed and crisp sounds. Make sure the mic is stable to avoid any movement. This placement works well for live performances.
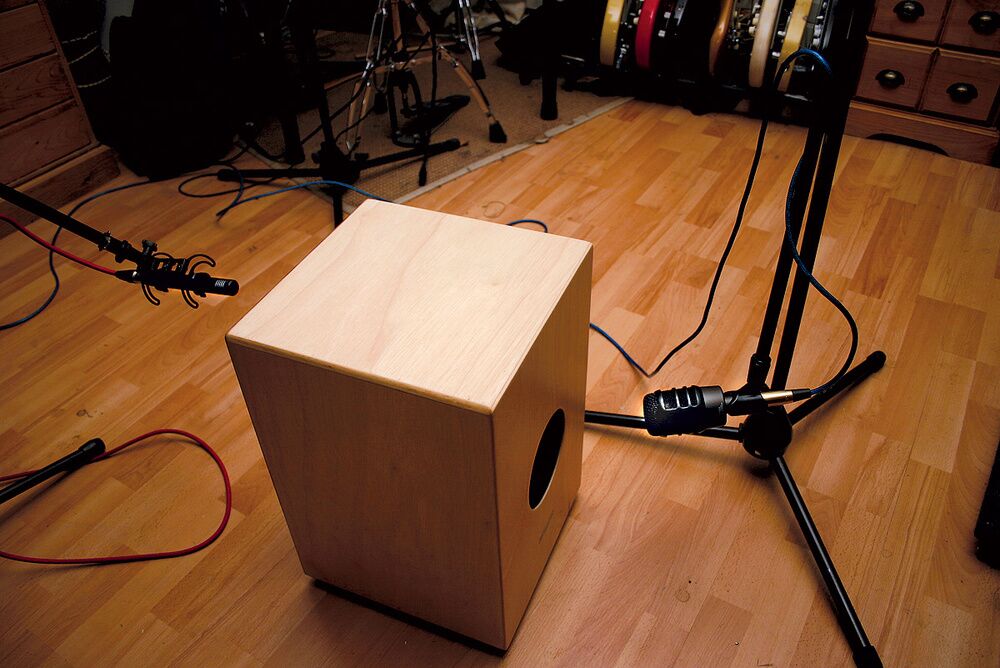
Rear Placement
Rear placement focuses on the low-end frequencies of the cajon. Place the microphone at the back, near the sound hole. Distance should be around 8 inches. This captures the deep bass tones effectively.
Dynamic microphones are often used for this technique. They handle the strong bass vibrations better. Ensure the mic is securely positioned. This setup is ideal for recording sessions.

Credit: theproaudiofiles.com
Blending Multiple Microphones
Blending multiple microphones can enhance the sound of your cajon drum. It provides a fuller, more dynamic audio experience. By using both front and rear mics, you capture the full range of the instrument. This method can help in studio recordings and live performances.
Combining Front And Rear Mics
Position a front mic to capture the attack and high frequencies. Place it near the top of the cajon. This mic should focus on the front plate where hands strike. This captures the crisp, detailed sounds.
Use a rear mic to capture the low frequencies and bass tones. Place it at the back or inside the sound hole. This mic should focus on the deep, resonant sounds. Together, these mics offer a balanced sound profile.
Phase Issues And Solutions
Phase issues can occur when using multiple mics. Sounds arriving at different times cause this problem. It leads to a hollow or thin sound. The solution is simple. Adjust the placement of your mics.
Start by ensuring both mics are the same distance from the cajon. Use the phase invert switch on your audio interface. This can correct phase issues immediately. Another option is to use software plugins. These tools help align the phase in your DAW.
Room Acoustics
Room acoustics play a vital role in micing a cajon drum. The sound of the room can either enhance or detract from the drum’s natural tone. Understanding and optimizing room acoustics can help you achieve a clear and balanced sound.
Optimizing Room Sound
To optimize room sound, start by assessing the space. Hard surfaces like wood floors and walls can cause reflections. These reflections might distort the sound of the cajon. Consider adding soft materials. Rugs, curtains, and acoustic panels can absorb excess reflections. This will help maintain the natural tone of the cajon.
Experiment with mic placement. Place the mic at different angles and distances. This can help capture the best sound. Try recording and listening back. Adjust until you find the sweet spot. A good room setup can make a big difference.
Dealing With Unwanted Noise
Unwanted noise can ruin a good recording. Identify any noise sources in the room. This includes air conditioners, fans, or outside traffic. Turn off or minimize these noise sources. This will help achieve a clean recording.
Use isolation techniques to reduce noise. Place the cajon on a foam pad or carpet. This can prevent vibrations from affecting the mic. Consider using a dynamic mic. Dynamic mics are less sensitive to background noise. This helps focus on the sound of the cajon.
Using Eq And Compression
Using EQ and Compression is essential to get a great sound from your cajon drum. These tools help shape the tone and control the dynamics. This section will cover the basic EQ settings and compression tips for a cajon drum. You’ll learn how to make your cajon sound balanced and professional.
Basic Eq Settings
Start with a low cut filter to remove unwanted rumble. Set it around 50 Hz. Boost the low-mid frequencies between 100 and 200 Hz. This adds warmth and body to the sound. Cut around 300 to 500 Hz to reduce any boxy tones. For a crisp sound, add a slight boost around 5 kHz. This enhances the slap and finger hits. Be gentle with these adjustments. Small changes can make a big difference.
Compression Tips
Compression helps control the dynamics of the cajon. Use a fast attack time to catch the initial hits. Set the release time to match the natural decay of the drum. A ratio of 4:1 works well for most situations. Adjust the threshold so the compressor engages only on the louder hits. This smooths out the performance without squashing the sound. Make sure the gain reduction is not too aggressive. Aim for a balance between control and natural dynamics.
Live Performance Tips
Live performances bring a different dynamic to playing the cajon drum. Mic placement, feedback control, and monitoring are crucial. These tips will help you deliver a stellar performance every time.
Feedback Control
Feedback can ruin a live performance. Place your mic at the sound hole for a clear and balanced sound. Keep it at least 6 inches away to avoid feedback. Avoid pointing the mic directly at speakers. This prevents unwanted noise and keeps the sound crisp. Use a low-cut filter to reduce low-frequency feedback. This helps in maintaining a clear sound.
Monitoring For Cajon Players
Proper monitoring is key for cajon players. Use in-ear monitors to hear yourself clearly. This ensures you stay in sync with other musicians. Place a monitor speaker near you if in-ear monitors aren’t available. Angle it towards you for the best sound. Balance your mix. Ensure you can hear the cajon and other instruments. This helps in delivering a tight performance.

Credit: www.soundonsound.com
Recording Studio Tips
Recording a cajon drum in a studio can be both fun and challenging. Getting the best sound requires understanding the instrument and using the right techniques. Here are some tips to help you capture the best sound and enhance it in post-production.
Capturing The Best Sound
To capture the best sound, positioning the microphone is crucial. Place a dynamic mic about 4 inches from the front tapa (the playing surface). This placement captures the slap and bass tones effectively.
Consider using a condenser mic to capture the higher frequencies. Position it about 12 inches away from the front tapa. This setup captures the nuances of the cajon.
Here’s a simple table to illustrate the mic placements:
| Mic Type | Position | Purpose |
|---|---|---|
| Dynamic Mic | 4 inches from front tapa | Capture slap and bass tones |
| Condenser Mic | 12 inches from front tapa | Capture higher frequencies |
Use an overhead mic to capture the room sound. This gives a natural feel to your recording. Position it 3 feet above the cajon.
Post-production Enhancements
After recording, post-production enhances the sound quality. Start by EQing your tracks. Boost the low frequencies to enhance the bass tones. Cut the mids slightly to reduce any muddiness.
Apply a light compression to even out the dynamics. This helps in balancing the loud and soft hits.
Consider adding a touch of reverb. This gives depth and space to your recording.
- Boost low frequencies
- Cut mids slightly
- Light compression
- Touch of reverb
These steps help in creating a polished and professional sound. Experiment with different settings to find the sweet spot for your cajon.
Frequently Asked Questions
What Is The Best Mic For A Cajon Drum?
A condenser mic is often best for a cajon drum. It captures a wide range of frequencies and details.
Where To Place The Mic On A Cajon Drum?
Place the mic near the sound hole for the best bass response. Adjust based on desired sound.
Can You Use A Dynamic Mic For A Cajon?
Yes, a dynamic mic can be used for a cajon. It handles high sound pressure levels well.
How To Reduce Feedback When Micing A Cajon?
Use a cardioid mic pattern to reduce feedback. Position the mic away from monitors and speakers.
Conclusion
Miking a cajon drum can enhance your music. Position your mic carefully. Experiment with different placements. Adjust levels to find the best sound. Consider using two mics for better coverage. Always test and tweak settings. Now, you’re ready to capture that perfect cajon sound.

Keep practicing and refining your technique. Your efforts will pay off. Happy drumming!
As an Amazon Associate, Cleanestor earns from qualifying purchases at no additional cost to you.