
Mixing drums can seem complex. It’s crucial for a great sound.
Drum mixing shapes the rhythm and energy of a track. A well-mixed drum set can bring a song to life, making it more engaging and dynamic. Whether you’re a beginner or have some experience, understanding the basics of drum mixing will improve your music production skills.
This guide will help you learn how to balance different drum elements, apply effects, and achieve a professional sound. Dive in to discover the techniques and tips that can transform your drum tracks and enhance your overall mix.
Credit: mastering.com
Introduction To Drum Mixing
Drum mixing is a crucial part of music production. It brings rhythm and energy to your track. A good drum mix makes your song stand out. Whether you are a beginner or experienced, learning to mix drums can improve your music. This guide will help you understand the basics and set clear goals for your mix.
Importance Of Drum Mixing
Drums are the backbone of many genres. They drive the song forward and set the mood. A well-mixed drum kit can enhance the overall sound. It ensures each drum element is heard clearly. Without proper mixing, drums can sound flat and lifeless. Good drum mixing creates a balanced, dynamic, and powerful track.
Setting Goals For Your Mix
Before you start mixing, set clear goals. Think about the sound you want to achieve. Do you want your drums to be punchy and aggressive or smooth and subtle? Write down your goals to stay focused. Here are some goals to consider:
- Achieve a balanced sound
- Ensure each drum element is clear
- Create a dynamic and powerful mix
- Match the drums to the song’s style
Setting goals helps you stay on track. It makes the mixing process easier and more efficient.

Credit: www.youtube.com
Preparing Your Drum Tracks
Getting your drum tracks ready is crucial for a clean mix. The process involves organizing your session and cleaning up tracks. This ensures a smooth workflow and better sound quality. Let’s dive into these steps.
Organizing Your Session
First, you need to organize your session. Proper organization helps you stay focused. Follow these steps:
- Label each track: Name all drum tracks clearly. For example, “Kick,” “Snare,” and “Hi-Hat.”
- Color-code tracks: Use different colors for each drum type. This makes them easy to identify.
- Create groups: Group similar tracks together. For example, group all toms together.
- Set track order: Arrange tracks in a logical order. For example, kick at the top, followed by snare, then toms.
Organizing your session saves time. It also helps you find problems quickly.
Cleaning Up Tracks
Cleaning up tracks is the next step. This involves removing unwanted noise and improving sound quality. Follow these steps:
- Remove noise: Use a noise gate to cut out background noise. This keeps your tracks clean.
- Edit out silence: Remove silent parts from the tracks. This prevents bleed from other instruments.
- Apply EQ: Use equalization to remove unwanted frequencies. For example, cut low frequencies on hi-hats.
- Check phase: Ensure all tracks are in phase. Out-of-phase tracks can cause sound issues.
Cleaning up tracks makes a huge difference. It ensures the drums sound tight and professional.
By following these steps, you prepare your drum tracks for a great mix. This foundation is key to achieving a polished sound.
Balancing Levels
Balancing levels is crucial in drum mixing. It ensures each drum element fits well with the rest of the track. Properly balanced levels create a clear and dynamic sound. This section will guide you through setting initial levels and adjusting volume balance.
Setting Initial Levels
Start with the kick drum. It often forms the foundation of your drum mix. Set its level so it is clear but not overpowering. Use a reference track to compare if needed.
Next, move to the snare drum. It should complement the kick. Ensure it stands out without clashing. Adjust the level until it fits well with the kick.
Hi-hats and cymbals come next. They usually require lower levels. They add brightness and rhythm but should not dominate the mix.
Finally, bring in the toms and other percussion elements. Adjust their levels to add depth without overwhelming the primary drums.
Adjusting Volume Balance
Once you set initial levels, it’s time to fine-tune the balance. Listen to the mix as a whole. Check if any element is too loud or too soft.
Use the mute and solo functions to isolate elements. Adjust their levels individually. Bring them back into the mix and listen again.
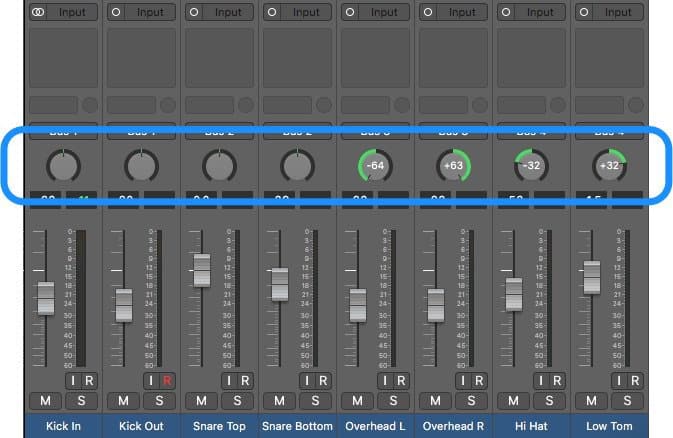
Pan the drums to create space. Place the hi-hats slightly to the left or right. Toms can be panned across the stereo field. This technique helps in achieving a balanced mix.
Keep checking the mix at different volumes. Low volumes can reveal if any drum is too loud. High volumes can show if any drum is too soft.
Automation can help in adjusting levels dynamically. Use it for sections where the drum levels need to change over time.
Eq Techniques
Understanding EQ techniques is crucial to achieving a clean drum mix. EQ, or equalization, helps shape the sound of each drum element. This process involves removing unwanted frequencies and enhancing key frequencies. Let’s dive into these methods.
Removing Unwanted Frequencies
Start by identifying unwanted frequencies in your drum tracks. Use a high-pass filter to cut out low-end rumble. This filter removes frequencies below a certain point, usually around 20-40 Hz. Next, apply a low-pass filter to remove high-end noise. Set this filter around 10-12 kHz. Listen for any muddy or harsh sounds. Use a narrow EQ band to cut these specific frequencies. This step helps clean up the mix.
Enhancing Key Frequencies
Enhancing key frequencies makes your drums stand out. First, find the fundamental frequency of each drum. For a kick drum, boost around 60-100 Hz. This adds punch. For a snare drum, enhance around 200-250 Hz. This adds body. Add some brightness by boosting around 5-7 kHz. This range highlights the snap. Be careful not to overdo it. Use small boosts to keep the sound natural.
Compression Essentials
Compression is a crucial aspect of drum mixing. It helps in controlling the dynamics, adding punch, and ensuring the drums sit well in the mix. Understanding how to use compression effectively can transform your drum tracks from amateur to professional. This section covers the essentials you need to know about compression.
Understanding Compression
Compression reduces the dynamic range of an audio signal. This means it lowers the volume of the loudest parts and raises the volume of the quietest parts. The result is a more consistent and controlled sound.
Key terms to understand include:
- Threshold: The level at which compression starts.
- Ratio: The amount of compression applied.
- Attack: How quickly compression starts.
- Release: How quickly compression stops.
Applying Compression To Drums
Each drum element (kick, snare, toms, cymbals) may need different compression settings. Here’s a simple guide:
| Drum Element | Recommended Settings |
|---|---|
| Kick |
|
| Snare |
|
| Toms |
|
| Cymbals |
|
Adjust these settings based on your mix. Always trust your ears and make small adjustments. Your goal is to make each drum element clear and punchy without losing its natural sound.

Credit: www.youtube.com
Adding Reverb And Effects
Adding reverb and effects to your drum mix can transform your sound. These tools help create a sense of space and depth. Reverb and effects can make your drums feel larger than life. They can also help them sit better in the mix.
Choosing The Right Reverb
Choosing the right reverb is crucial. Different types of reverb create different atmospheres. Plate reverb can add a smooth, lush feel. Room reverb can make your drums sound like they are in a small room. Hall reverb can give a grand, spacious sound. Test different types to see which suits your mix.
Adjust the reverb settings to fit your track. Pay attention to decay time and pre-delay. Longer decay times can make the drums sound distant. Shorter decay times keep them closer. Pre-delay can add a sense of space without muddying the mix. Experiment to find the perfect balance.
Using Effects For Depth
Effects can add depth and interest to your drum mix. Delay can create a sense of echo and space. Try using a subtle delay on your snare or hi-hats. It can make them pop without overwhelming the mix.
Chorus effects can add a thicker, richer sound. This can be great for toms or cymbals. Be careful not to overdo it. Too much chorus can make the mix sound messy.
Distortion can add grit and power to your drums. Use it sparingly to avoid ruining the clarity. A touch of distortion on the kick or snare can add punch and character.
Remember, the goal is to enhance, not overpower. Use these effects in moderation. Listen to how they impact the overall mix.
Panning For Clarity
Mixing drums can be a challenging task. One key aspect is panning. Proper panning ensures each drum element is clear and distinct in the mix. This method helps avoid clutter and enhances the overall listening experience.
Panning Strategies
Effective panning creates a balanced and engaging drum mix. Different strategies can help achieve this:
- Center the Kick and Snare: These elements are the backbone of the drum kit. Keep them in the center for a solid foundation.
- Spread the Toms: Pan them slightly left and right. This creates a more realistic stereo image.
- Hi-Hats and Cymbals: Place them slightly to one side. This adds width to the mix.
Creating A Stereo Image
A stereo image enhances the depth and space in your drum mix. Here’s how to create it:
- Use Overheads: Capture the entire kit with stereo overhead mics. Pan these hard left and right.
- Room Mics: Place room mics at a distance. This captures the natural reverb and ambiance.
- Balance Levels: Ensure each panned element has the right volume. This maintains clarity and prevents overcrowding.
Below is a table summarizing common panning positions:
| Drum Element | Panning Position |
|---|---|
| Kick | Center |
| Snare | Center |
| Hi-Hat | Slightly Left/Right |
| Toms | Left and Right |
| Overheads | Hard Left and Right |
| Room Mics | Left and Right |
These panning techniques can help your drum mix sound clear and professional. Experiment with different positions to find what works best for your mix.
Finalizing The Drum Mix
Finalizing the drum mix is crucial. This step can make your track stand out. You have balanced the levels, set the panning, and added effects. Now, it’s time to fine-tune your mix and prepare it for export.
Fine-tuning The Mix
Listen to your mix at different volumes. This helps catch any hidden issues. Adjust the EQ settings. Make sure each drum element fits well. Pay attention to the kick and snare. They should be clear and punchy. Check the reverb and delay settings. Ensure they add depth without muddying the mix.
Use compression wisely. It can control dynamics and add punch. Avoid over-compression. It can squash your drums. Use a reference track. Compare your mix to a professional one. This helps maintain quality. Take breaks. Fresh ears catch mistakes better.
Exporting Your Mix
Once happy with your mix, it’s time to export. Choose the right file format. WAV is common for high quality. Set the sample rate. 44.1 kHz is standard for most music. Ensure the bit depth is correct. 24-bit provides a good balance of quality and file size.
Check your levels. Avoid clipping. Clipping can distort your mix. Use normalization if needed. This ensures consistent volume. Name your file clearly. Include the date and version. This helps with organization. Save your project. You may need to make changes later.
Frequently Asked Questions
How Do You Eq Drums Effectively?
To EQ drums effectively, start by cutting unwanted frequencies. Boost the fundamental frequencies of each drum. Use a high-pass filter for clarity. Experiment with different frequencies to find the sweet spot.
What Is The Best Reverb For Drums?
The best reverb for drums depends on the genre. Plate reverb works well for rock. Room reverb suits jazz. Experiment to find what fits your mix.
How Do You Compress Drums?
Compress drums by setting a fast attack and release. Use a ratio of 4:1 for punch. Adjust the threshold until you achieve the desired effect.
How Can I Make My Drums Punchy?
To make drums punchy, use parallel compression. Add a transient shaper. Boost the mid frequencies slightly. Ensure each drum sound is clear and distinct.
Conclusion
Mixing drums can seem hard. But with practice, it gets easier. Focus on balance and clarity. Trust your ears. Experiment with different techniques. Don’t be afraid to make mistakes. Listen to your mix on different speakers. This helps catch any issues.

Remember, mixing is both art and skill. Keep learning and improving. Your drum mixes will get better over time. Happy mixing!
{ “@context”: “https://schema.org”, “@type”: “FAQPage”, “mainEntity”: [ { “@type”: “Question”, “name”: “How do you EQ drums effectively?”, “acceptedAnswer”: { “@type”: “Answer”, “text”: “To EQ drums effectively, start by cutting unwanted frequencies. Boost the fundamental frequencies of each drum. Use a high-pass filter for clarity. Experiment with different frequencies to find the sweet spot.” } } , { “@type”: “Question”, “name”: “What is the best reverb for drums?”, “acceptedAnswer”: { “@type”: “Answer”, “text”: “The best reverb for drums depends on the genre. Plate reverb works well for rock. Room reverb suits jazz. Experiment to find what fits your mix.” } } , { “@type”: “Question”, “name”: “How do you compress drums?”, “acceptedAnswer”: { “@type”: “Answer”, “text”: “Compress drums by setting a fast attack and release. Use a ratio of 4:1 for punch. Adjust the threshold until you achieve the desired effect.” } } , { “@type”: “Question”, “name”: “How can I make my drums punchy?”, “acceptedAnswer”: { “@type”: “Answer”, “text”: “To make drums punchy, use parallel compression. Add a transient shaper. Boost the mid frequencies slightly. Ensure each drum sound is clear and distinct.” } } ] }As an Amazon Associate, Cleanestor earns from qualifying purchases at no additional cost to you.