Panning drums is essential for a great mix. It creates space and clarity.
Understanding how to pan drums can transform your music production. Panning involves placing each drum sound in the stereo field, making your mix sound more dynamic and professional. Whether you’re a beginner or have some experience, learning this technique can take your tracks to the next level.
In this guide, we’ll explore the basics and give you practical tips. You will learn how to make your drum tracks stand out and achieve a balanced, immersive sound. Get ready to enhance your mixing skills with effective drum panning techniques.
Introduction To Drum Panning
Welcome to the world of drum panning! Properly panning drums can add depth and clarity to your music. It can make your mix sound more professional and engaging. In this section, we will explore the basics of drum panning.
Importance Of Panning
Panning is crucial in creating a balanced mix. It helps in placing each drum element in the stereo field. This allows listeners to distinguish each sound clearly. Without proper panning, the mix can sound cluttered. Panning adds spatial dimension to your drums. It makes the listening experience more enjoyable.
Basic Concepts
Panning refers to distributing sound across the left and right speakers. Imagine your drum kit in front of you. Each drum has its place in the stereo field. The kick drum is usually centered. The snare can be slightly off-center. Hi-hats and cymbals are often panned to the sides. Toms can be spread across the stereo field. This placement mimics a real drum kit setup.
Start with a simple approach. Keep the kick and snare in the center. Pan the hi-hats to the left or right. Spread the toms from left to right. Experiment with different placements. Adjust until you find a balance that sounds good. Always trust your ears.
Equipment Needed
Panning drums is an important technique for creating space in your mix. To start, you need some essential equipment and software. Here’s a detailed guide on what you need.
Essential Gear
First, you need a good pair of studio headphones. They help you hear details clearly. Next, get studio monitors. They provide an accurate sound picture. A reliable audio interface is also crucial. It connects your computer to your audio gear. A quality MIDI controller can be helpful too. It allows for easy adjustments and controls.
Software Options
Several software options can help with panning drums. Digital Audio Workstations (DAWs) like Ableton Live and FL Studio are popular choices. They have built-in panning tools. Logic Pro and Pro Tools also offer robust features. These DAWs let you control the stereo field effectively. For advanced users, plugins like Waves S1 Stereo Imager can be beneficial. They provide detailed control over panning.
Setting Up Your Mix
Setting up your mix correctly is essential for achieving a balanced sound. It ensures that each element of your drum kit is distinct and clear. This section will guide you through the initial setup and organizing your tracks.
Initial Setup
The initial setup of your mix is the foundation. Start by opening your Digital Audio Workstation (DAW). Import your drum tracks into separate channels. Label each channel appropriately, such as kick, snare, hi-hat, toms, and cymbals. This helps you keep track of each element.
Next, set the levels for each track. Ensure that none of the tracks are peaking. Adjust the faders so that the drums are at a similar volume level. This prevents any one element from overpowering the rest.
Organizing Tracks
Organizing your tracks is crucial for an efficient workflow. Group similar elements together. For example:
| Group | Tracks |
|---|---|
| Kick Drum | Kick In, Kick Out |
| Snare Drum | Snare Top, Snare Bottom |
| Toms | High Tom, Mid Tom, Floor Tom |
| Cymbals | Hi-Hat, Ride, Crash |
Once grouped, create sub-mixes for each group. This allows you to adjust the levels of the entire group together. It also simplifies panning and effects processing.
Use color coding to visually differentiate the groups. For instance, use blue for kicks, green for snares, and yellow for cymbals. This makes it easier to locate tracks quickly.
With everything organized, the next step is panning. By setting up your mix properly, you ensure that each drum element has its own space in the stereo field. This creates a clearer and more professional sound.

Credit: www.musicguymixing.com
Panning Techniques
Panning techniques are essential for creating a balanced and dynamic mix. Proper panning can make your drums sound more natural and immersive. Let’s explore some effective panning techniques to enhance your drum mix.
Stereo Image
The stereo image is the perceived spatial location of sounds in a mix. A wide stereo image makes the mix feel spacious and engaging. To create a wide stereo image for drums, follow these steps:
- Pan the hi-hats and cymbals to the left and right.
- Place the snare and kick drum in the center.
- Spread the toms across the stereo field.
This technique helps each drum element occupy its own space. The result is a clearer and more defined mix.
Lcr Panning
LCR panning stands for Left, Center, Right panning. This technique divides the stereo field into three distinct areas. Here is how to use LCR panning for drums:
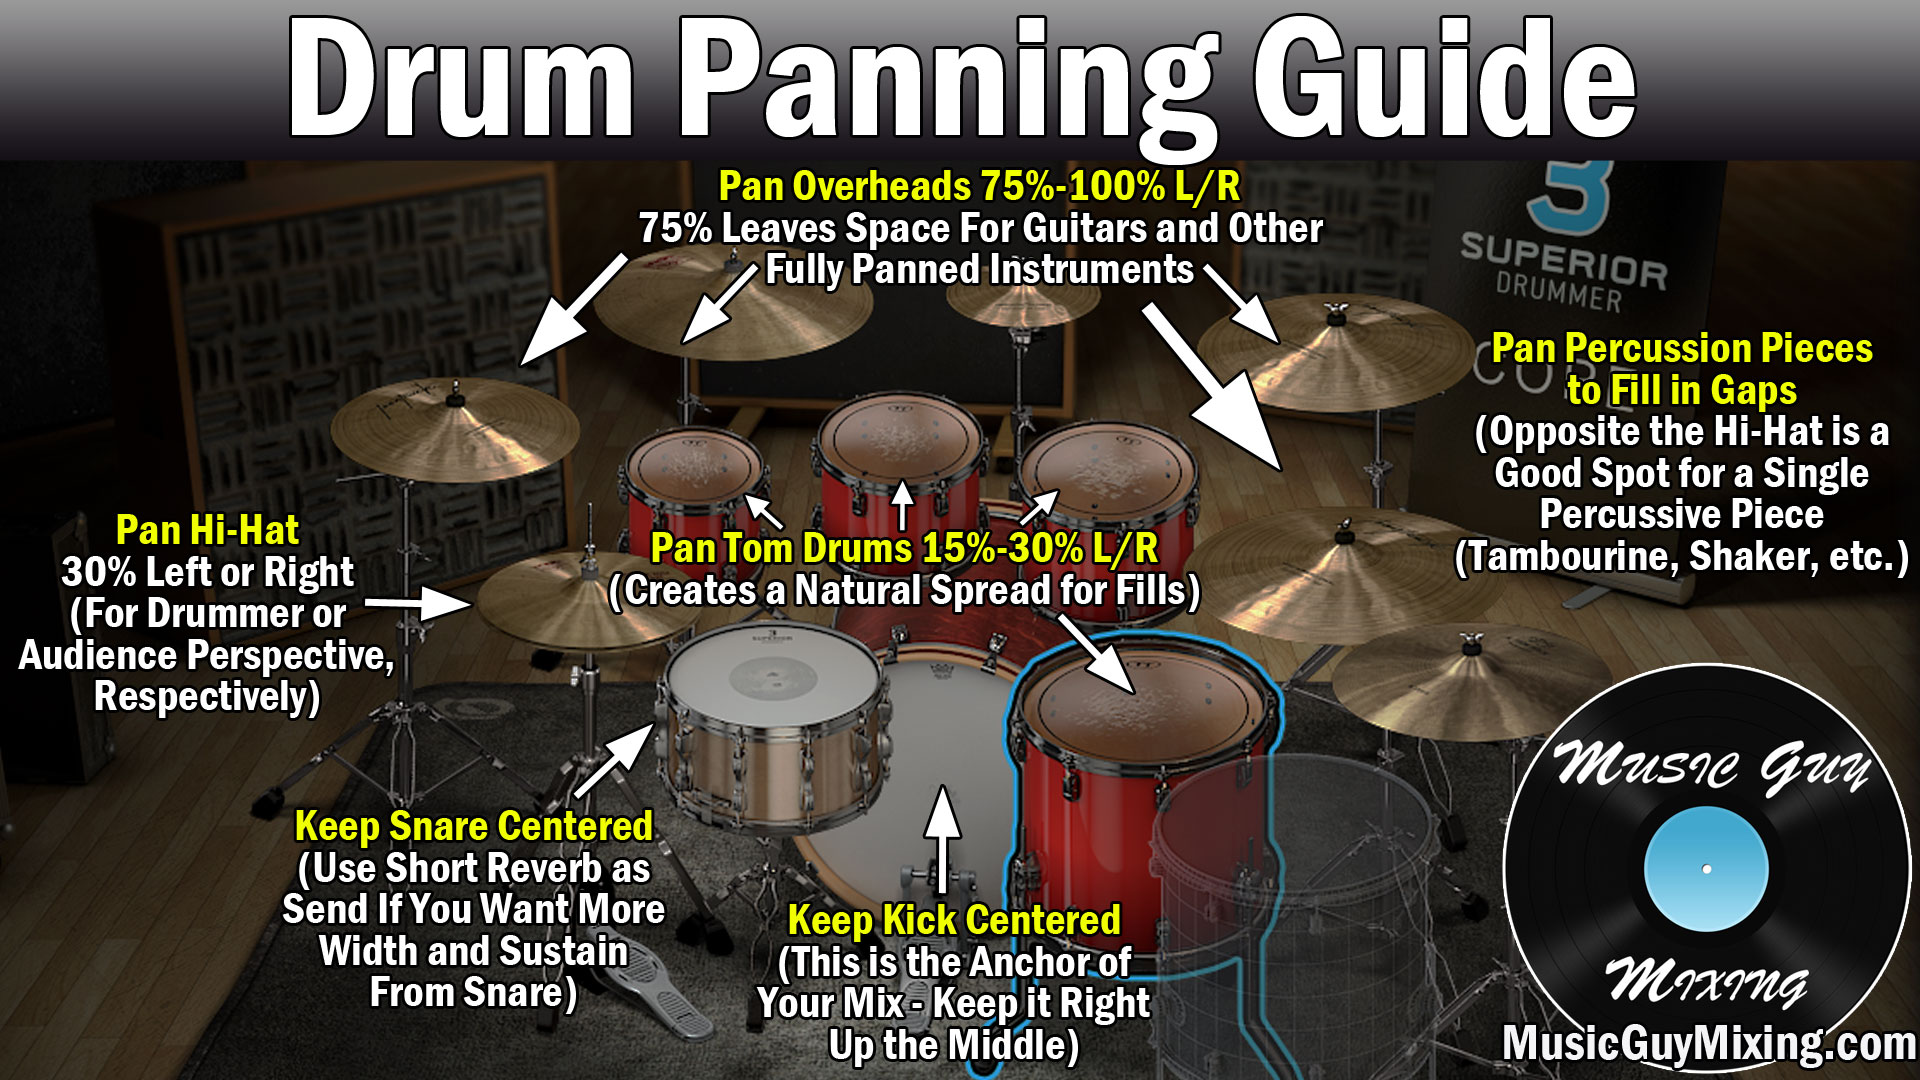
- Place the kick and snare drum in the center.
- Pan the hi-hats and overheads to the extreme left and right.
- Position the toms to the left and right, but not all the way.
LCR panning creates a focused and powerful drum sound. It is straightforward and effective for many genres.
Panning Individual Drum Elements
Understanding panning individual drum elements can significantly enhance your mix’s clarity and depth. Properly panning drums can create space and balance, making each element more distinct. Let’s explore panning techniques for different drum elements.
Kick Drum
The kick drum is the heartbeat of your track. Center it in the mix. This ensures it stays powerful and consistent. Panning the kick off-center can make the mix sound unbalanced. Keep it straight down the middle.
Snare Drum
The snare drum provides the backbeat. Like the kick, it usually stays in the center. Some mixes slightly pan the snare to the left or right for a unique feel. Try a subtle approach to avoid losing its impact.
Hi-hats
Hi-hats add rhythm and texture. Pan them slightly to the left or right. This creates space for other elements. Experiment with the position to find the sweet spot. Avoid extreme panning to keep the mix natural.
Toms
Toms often have a stereo spread. Imagine the drummer’s perspective. Pan high toms to the left and low toms to the right. This creates a realistic stereo image. Adjust the panning to match the drum kit’s setup.
Cymbals
Cymbals, like crashes and rides, should have a wide stereo spread. Pan them left and right to create a sense of space. This widens the mix and adds depth. Be mindful of not over-panning to maintain balance.
Credit: www.musicguymixing.com
Balancing The Mix
Balancing the mix is essential to achieve a professional drum sound. Proper panning ensures each drum element fits well in the stereo field. This enhances the listener’s experience and creates a sense of space. Let’s explore how to balance the mix effectively.
Level Adjustment
Start by adjusting the levels of each drum element. Ensure that the kick and snare are prominent. These are the backbone of your drum mix. The hi-hats and cymbals should be audible but not overpowering. Toms should be clear but blend well with the rest of the kit. Use faders to achieve the right balance.
Eq And Compression
EQ each drum element to carve out its own space. Boost the low end for the kick to add punch. Cut mid frequencies to reduce muddiness. For the snare, enhance the mid-high frequencies. This adds snap and presence. Hi-hats and cymbals benefit from high-frequency boosts. This makes them shimmer without being harsh.
Compression helps control the dynamics of your drums. Apply it to even out the volume of each element. Use a fast attack for the kick and snare. This captures the initial hit and controls the sustain. For overheads and room mics, use a slower attack. This retains the natural sound while controlling peaks. Proper EQ and compression make your drum mix tight and balanced.
Creative Panning Effects
Creative panning effects can elevate your drum tracks. They add a new dimension to your sound. By using different techniques, you can make your drums stand out. It creates a more immersive experience for your listeners. Let’s explore some ways to achieve this.
Automation
Automation allows you to change the position of the drums over time. This can create movement and energy in your track. You can automate the panning of individual drum hits. Or you can automate the entire drum kit. This keeps your listeners engaged. It’s a simple yet effective technique.
Reverb And Delay
Reverb and delay effects can also be panned. This creates space and depth in your drum mix. You can pan the reverb to one side and the delay to the other. This makes the drums feel more dynamic. It’s a great way to add texture and interest.
Common Mistakes To Avoid
Panning drums can enhance the stereo image of your mix. But avoid common mistakes. These mistakes can ruin your mix and confuse listeners. Let’s discuss these mistakes. Learn how to avoid them for a clean, balanced sound.
Over-panning
Over-panning is a common mistake. This happens when you pan too far left or right. It can make the mix sound unbalanced. The listener may miss important sounds. Keep the panning subtle. Aim for a natural stereo image.
Phase Issues
Phase issues can occur during panning. This happens when two signals cancel each other out. It can make the drums sound weak or hollow. Use a phase meter to check for phase issues. Keep an eye on the signals. Ensure they are in phase for a strong, clear sound.
Finalizing Your Mix
Finalizing your drum mix is crucial. It ensures every element sounds balanced and professional. Attention to detail in this stage can make your mix stand out. Here, we will cover key steps such as listening tests and exporting the track.
Listening Tests
Listening tests are essential. They help you spot any issues in your mix. Follow these steps:
- Change listening environments: Check your mix on different devices. Use studio monitors, headphones, and even your car speakers.
- Volume levels: Listen at different volumes. This can reveal hidden problems.
- Take breaks: Rest your ears. Fresh ears can catch mistakes you missed before.
Repeat these steps until your mix sounds balanced everywhere.
Exporting The Track
Once satisfied with your mix, it’s time to export. Follow these steps for optimal results:
- File format: Use a high-quality format like WAV or AIFF.
- Bit depth: Choose 24-bit for better sound quality.
- Sample rate: Opt for 44.1 kHz or higher.
Save your project in multiple formats. Create backups to prevent data loss.
By following these steps, you ensure your drum mix is ready for any platform.

Credit: www.audiorecording.me
Frequently Asked Questions
What Does Panning Drums Mean?
Panning drums refers to the placement of drum sounds in the stereo field. It creates a sense of space and direction.
How Do You Pan Drums Correctly?
To pan drums correctly, place each drum element in a unique spot. This ensures clarity and separation in the mix.
Why Is Panning Drums Important?
Panning drums is important for creating a balanced mix. It helps listeners identify and enjoy different drum elements clearly.
What Is The Best Panning For Drums?
The best panning for drums involves placing the kick and snare in the center. Spread other elements like hi-hats and toms.
Conclusion
Panning drums enhances your mix. It creates depth and clarity. Remember to start with a balanced stereo image. Experiment with different panning positions. Listen carefully to how each change affects your mix. Practice makes perfect. Keep tweaking until you find what works best.

Your ears are your best tool. Trust them. Enjoy the creative process. Happy mixing!
{ “@context”: “https://schema.org”, “@type”: “FAQPage”, “mainEntity”: [ { “@type”: “Question”, “name”: “What does panning drums mean?”, “acceptedAnswer”: { “@type”: “Answer”, “text”: “Panning drums refers to the placement of drum sounds in the stereo field. It creates a sense of space and direction.” } } , { “@type”: “Question”, “name”: “How do you pan drums correctly?”, “acceptedAnswer”: { “@type”: “Answer”, “text”: “To pan drums correctly, place each drum element in a unique spot. This ensures clarity and separation in the mix.” } } , { “@type”: “Question”, “name”: “Why is panning drums important?”, “acceptedAnswer”: { “@type”: “Answer”, “text”: “Panning drums is important for creating a balanced mix. It helps listeners identify and enjoy different drum elements clearly.” } } , { “@type”: “Question”, “name”: “What is the best panning for drums?”, “acceptedAnswer”: { “@type”: “Answer”, “text”: “The best panning for drums involves placing the kick and snare in the center. Spread other elements like hi-hats and toms.” } } ] }As an Amazon Associate, Cleanestor earns from qualifying purchases at no additional cost to you.