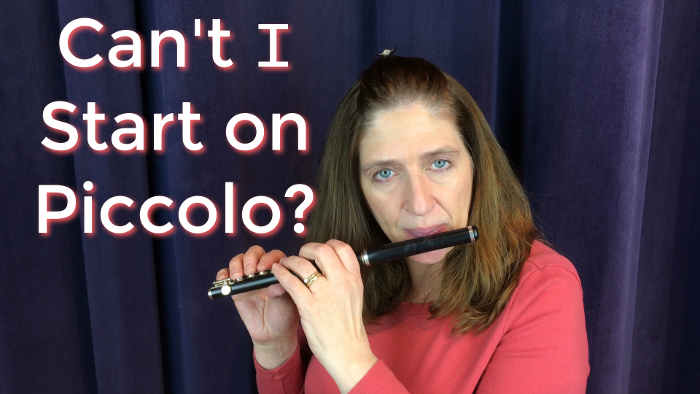
Learning to play the piccolo flute can be exciting and rewarding. It offers a unique sound and adds a special touch to musical pieces.
The piccolo flute, though small, has a powerful presence in orchestras and bands. Its bright, piercing sound can cut through the ensemble, making it a standout instrument. But how do you start playing this tiny flute? This guide will walk you through the basics.
From holding the instrument correctly to producing your first notes, you’ll gain a solid foundation. Whether you’re a beginner or looking to add to your musical skills, playing the piccolo can be a joyful experience. Let’s explore the steps to master this charming instrument.

Credit: www.youtube.com
Introduction To Piccolo Flute
The piccolo flute, often simply called the piccolo, is a small version of the flute. It produces a high-pitched sound that is distinct and bright. This instrument is a staple in orchestras and military bands. It adds a unique sparkle to musical pieces. Learning to play the piccolo is a rewarding journey for any musician.
History Of The Piccolo
The piccolo has a rich history. Its origins trace back to the early 18th century. Initially, it was used in military music. The piccolo’s sharp sound carried well outdoors. Later, it became part of the symphony orchestra. Famous composers, like Beethoven, included it in their works. The piccolo evolved over time. Early piccolos were made of wood. Modern piccolos are often made of metal or a combination of materials.
Differences From Regular Flute
The piccolo is smaller than the regular flute. It is about half the size. This size difference affects its sound. The piccolo plays an octave higher than the flute. Its tone is brighter and more piercing. The fingerings are similar to the flute. Yet, the piccolo requires more precise breath control. Playing the piccolo can be more demanding. It requires a good ear and strong control. Musicians often start with the flute before moving to the piccolo. Both instruments share a similar structure. Yet, the piccolo’s smaller size creates unique challenges.
Choosing The Right Piccolo
Choosing the right piccolo is crucial for your musical journey. The piccolo’s unique sound adds depth and charm to any performance. To make the best choice, consider the piccolo’s materials, brands, and your budget. Each factor plays a significant role in your final decision.
Materials And Brands
Piccolos come in various materials like wood, plastic, and metal. Wooden piccolos offer a warm, rich tone. They are often preferred by professional players. Plastic piccolos are more affordable and durable. They are great for beginners. Metal piccolos produce a bright, clear sound. They are perfect for outdoor performances. Popular brands include Yamaha, Gemeinhardt, and Pearl. Yamaha piccolos are known for their reliability. Gemeinhardt provides a range of options for different skill levels. Pearl is praised for its quality craftsmanship.
Budget Considerations
Your budget is important in choosing the right piccolo. Piccolos can range from $100 to $4000. Beginner piccolos are usually less expensive. They cost between $100 and $500. Intermediate piccolos range from $500 to $1500. Professional piccolos can cost $2000 or more. Consider how much you are willing to spend. Remember to balance cost with quality. A well-made piccolo will last longer and provide a better playing experience.
Basic Piccolo Assembly
Learning to play the piccolo starts with proper assembly. A correctly assembled piccolo ensures optimal sound and playability. Let’s break down the basic steps of assembling your piccolo.
Parts Of The Piccolo
The piccolo consists of three main parts: the head joint, the body, and the foot joint. Each part plays a crucial role in producing sound.
The head joint is the top part with the mouthpiece. The body holds the keys you press to create notes. The foot joint is the smallest part at the bottom.
Proper Assembly Techniques
Start by gently wiping each part with a soft cloth. This removes any dust or debris. Align the head joint with the body. Twist slightly to connect them.
Next, attach the foot joint to the body. Ensure the alignment is straight. Never force the pieces together. This could damage the piccolo.
Check the alignment of the keys and the embouchure hole. They should be in a straight line. This ensures proper airflow and sound production.
After assembly, gently test the keys. Make sure they move freely. Your piccolo is now ready to play!
Credit: doctorflute.com
Holding The Piccolo
Playing the piccolo requires proper technique, and the first step is learning how to hold the instrument correctly. Holding the piccolo the right way ensures comfort and ease, allowing you to play more effectively. Let’s dive into the essentials of hand positioning and posture tips for holding the piccolo.
Hand Positioning
Correct hand positioning is crucial for playing the piccolo. Follow these steps to ensure your hands are positioned correctly:
- Place your left hand on the top part of the piccolo.
- Your left thumb should rest under the instrument, supporting it.
- Position your left index finger on the first key.
- Let your other fingers rest naturally on the keys below.
- For your right hand, place your thumb under the body of the piccolo.
- Your right index finger should be on the first key from the bottom.
- The other fingers of your right hand should rest on the remaining keys.
Ensure your fingers are relaxed and not tense. This will help you play smoothly and avoid strain.
Posture Tips
Proper posture is key to playing the piccolo comfortably. Here are some tips to help you maintain good posture:
- Sit up straight with your back slightly away from the chair.
- Keep your feet flat on the floor for stability.
- Hold the piccolo at a slight angle, not too close to your body.
- Ensure your shoulders are relaxed, not raised.
- Keep your head level and look straight ahead.
Maintaining good posture helps you play the piccolo efficiently and prevents fatigue. Practice these tips daily to develop good habits.
Producing Your First Sound
Producing your first sound on the piccolo flute can be thrilling. This tiny instrument requires precise technique. Let’s break down the process into simple steps.
Embouchure Formation
First, shape your lips to create a small opening. Think of whispering the word “poo.” This helps form the right embouchure. Keep your lips firm, not tight. Place the piccolo against your lower lip. The hole should align with the center of your lips. Maintain a relaxed, yet controlled, mouth position.
Blowing Techniques
Next, focus on your blowing technique. Blow a steady, gentle stream of air. Aim the air across the hole, not directly into it. Use your diaphragm to control the airflow. Start with a soft breath. Gradually increase the intensity. Listen for a clear, steady sound. Adjust your embouchure and blowing angle if needed.
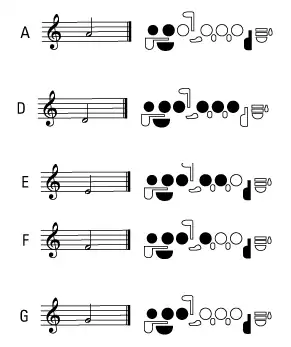
Learning Piccolo Fingerings
Learning piccolo fingerings is a crucial step in mastering this unique instrument. The piccolo, smaller than a standard flute, produces higher and brighter notes. Understanding its fingerings can help you play it more effectively and beautifully. Let’s delve into the basics and advanced fingerings for the piccolo flute.
Basic Fingerings
Begin with the fundamental finger placements. Start by familiarizing yourself with the notes of the C major scale. For the low D, place your thumb on the back key. Use the first three fingers of your left hand on the top three keys. Your right-hand fingers should cover the bottom three keys. For an E, lift your right-hand ring finger. Continue this process for each note, lifting the necessary fingers while keeping others in place.
Practice these basic fingerings regularly. Developing muscle memory is essential. Consistent practice will make transitioning between notes smoother. Use a fingering chart for visual aid. Many resources are available online, providing clear diagrams. This will help you understand where each finger goes for different notes.
Advanced Fingerings
Once comfortable with the basics, move to advanced fingerings. These fingerings help with playing sharps, flats, and higher notes. For a high G, place your thumb on the back key. Use the first two fingers of your left hand, and the first two fingers of your right hand. This fingering is slightly different from the standard flute.
Next, learn trills and alternate fingerings. Trills involve rapid alternation between two notes. Practice trilling on notes like C to D or E to F. Each trill requires specific finger movements. Alternate fingerings help with difficult transitions and tuning issues. They provide more options for playing certain notes.
Always refer to advanced fingering charts. They are excellent resources for learning these complex fingerings. Advanced charts show variations and how to play less common notes. Remember, practice is key. Dedicate time each day to practice both basic and advanced fingerings. Over time, your proficiency with the piccolo flute will improve.
Playing Simple Melodies
Playing simple melodies on the piccolo flute can be a joyful experience. With practice, you will be able to play your favorite tunes. This section will guide you through the basics.
Reading Music Sheets
Start with learning to read music sheets. Music sheets guide you in playing notes. Each note represents a sound you will play on the piccolo. Begin with easy songs that use simple notes. Look for songs that you know. This helps you understand the connection between the notes and the melody.
Practice Exercises
Practice exercises are vital. They help you improve your skills. Start with scales. Scales are sequences of notes played in order. They help you understand the range of the piccolo. Play them slowly at first. Gradually increase your speed. Next, try simple melodies. Play them repeatedly. Focus on getting the notes right.
Record yourself playing. Listen to the recordings. This helps you identify mistakes. Correct them in your next practice session. Consistent practice is key. Play every day, even if for a short time.
Credit: teds-list.com
Maintenance And Care
Maintaining and caring for your piccolo flute is essential. Regular upkeep ensures a longer lifespan and better sound quality. By following simple steps, you can keep your instrument in top condition.
Cleaning Tips
Clean your piccolo flute after each use. Use a soft cloth to remove fingerprints and dust. Run a cleaning rod with a cloth through the body. This helps remove moisture and debris inside.
Never use harsh chemicals or water. These can damage the piccolo. Instead, use a special cleaning solution made for woodwind instruments. Keep the keys clean and dry to prevent rust and corrosion.
Storage Advice
Store your piccolo flute in a hard case. This protects it from damage. Avoid leaving it in extreme temperatures or humidity. These conditions can harm the wood or metal parts.
Keep the case in a safe, dry place. Do not place heavy objects on top of it. Use silica gel packets inside the case to control moisture levels.
Frequently Asked Questions
What Is A Piccolo Flute?
A piccolo is a small, high-pitched flute. It is half the size of a standard flute. It plays an octave higher.
How Do You Hold A Piccolo?
Hold the piccolo horizontally. Place your left hand near the mouthpiece. Use your right hand to support the body.
How Do You Produce Sound On A Piccolo?
Blow across the mouthpiece’s hole. Position your lips correctly. Adjust your breath to create a clear sound.
What Are The Key Differences Between Piccolo And Flute?
The piccolo is smaller and higher-pitched. It requires more precise breath control. It has a different embouchure technique.
Conclusion
Playing the piccolo flute can be fun and rewarding. Start with the basics. Practice daily for steady progress. Focus on your breath control and finger placement. Listen to great piccolo players for inspiration. Stay patient and enjoy the process. Over time, your skills will improve.

You’ll find joy in the music you create. Remember, persistence is key. Keep playing and learning. Happy playing!
As an Amazon Associate, Cleanestor earns from qualifying purchases at no additional cost to you.