Programming drums can seem challenging. But it’s a skill you can learn.
In this guide, you’ll discover the essential steps to program drums effectively. Whether you’re a beginner or looking to refine your skills, understanding drum programming is crucial. It’s the backbone of many music genres, from rock to electronic. With the right techniques, you can create beats that sound professional and captivating.
We will break down the process into simple, manageable steps. By the end, you’ll feel confident in your drum programming abilities. Ready to dive in? Let’s get started and make those beats come alive!

Credit: geargods.net
Introduction To Drum Programming
Drum programming is an essential skill for music producers. It involves creating drum patterns using software. These patterns form the backbone of many music genres. Understanding drum programming can enhance your music production.
Importance Of Drum Programming
Drum programming offers flexibility. You can create complex rhythms. It allows for precise control over each drum hit. This control can help you create unique sounds. Good drum programming can make your tracks stand out. It provides a solid foundation for other instruments.
With programmed drums, you can easily edit and refine your patterns. This helps in achieving the perfect sound. It also saves time compared to recording live drums. Many genres rely heavily on programmed drums. This makes it a valuable skill for any producer.
Basic Concepts
Understanding the basics is crucial. Start with a simple drum machine or software. Learn the different drum sounds: kick, snare, hi-hat. Each sound has its role. The kick drum provides the beat. The snare adds rhythm. Hi-hats create texture and fill gaps.
Next, learn about time signatures. Most music uses a 4/4 time signature. This means four beats in a measure. Place your drum hits within these beats. Experiment with different patterns. Try variations to see what sounds best. Always keep your audience in mind. Simple patterns often work best. As you gain confidence, explore more complex rhythms.
Choosing The Right Software
Choosing the right software is crucial for programming drums. The software you select can impact the quality of your drum tracks. It also affects the ease of your workflow.
Many options are available in the market today. Each has its unique features. Understanding these options helps you make an informed choice.
Popular Daws
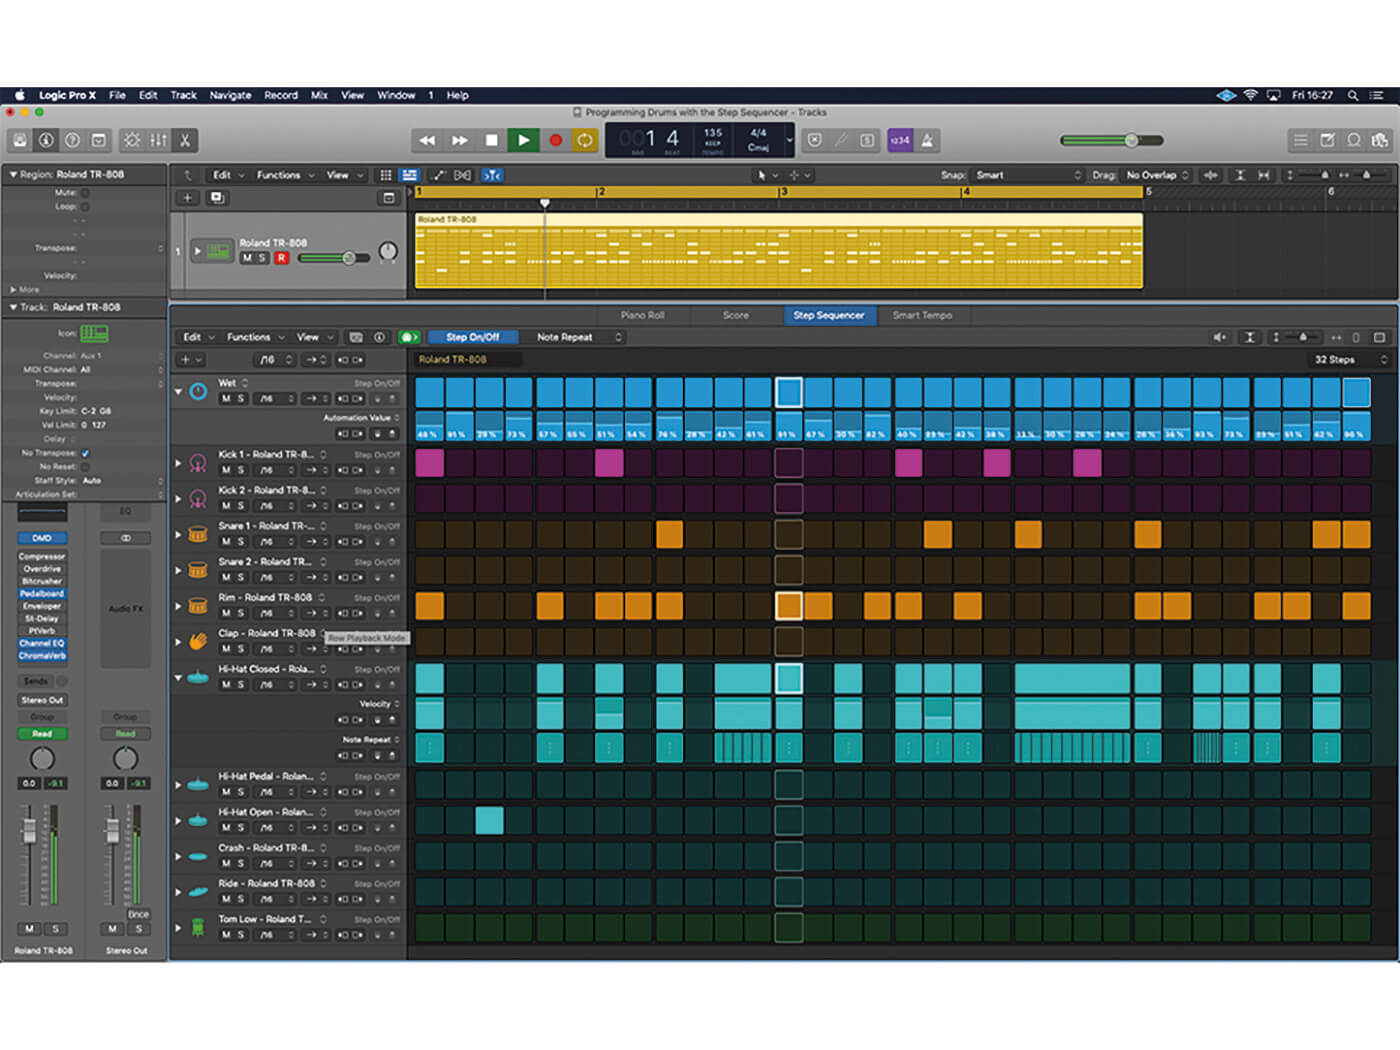
Digital Audio Workstations (DAWs) are essential for drum programming. Popular DAWs include Ableton Live, FL Studio, and Logic Pro X. Ableton Live is known for its user-friendly interface. It is great for beginners. FL Studio offers a range of tools for drum creation. Many producers prefer it for electronic music.
Logic Pro X is popular among Mac users. It has powerful drum programming features. Each DAW has strengths and weaknesses. Your choice depends on your needs.
Vst Plugins For Drums
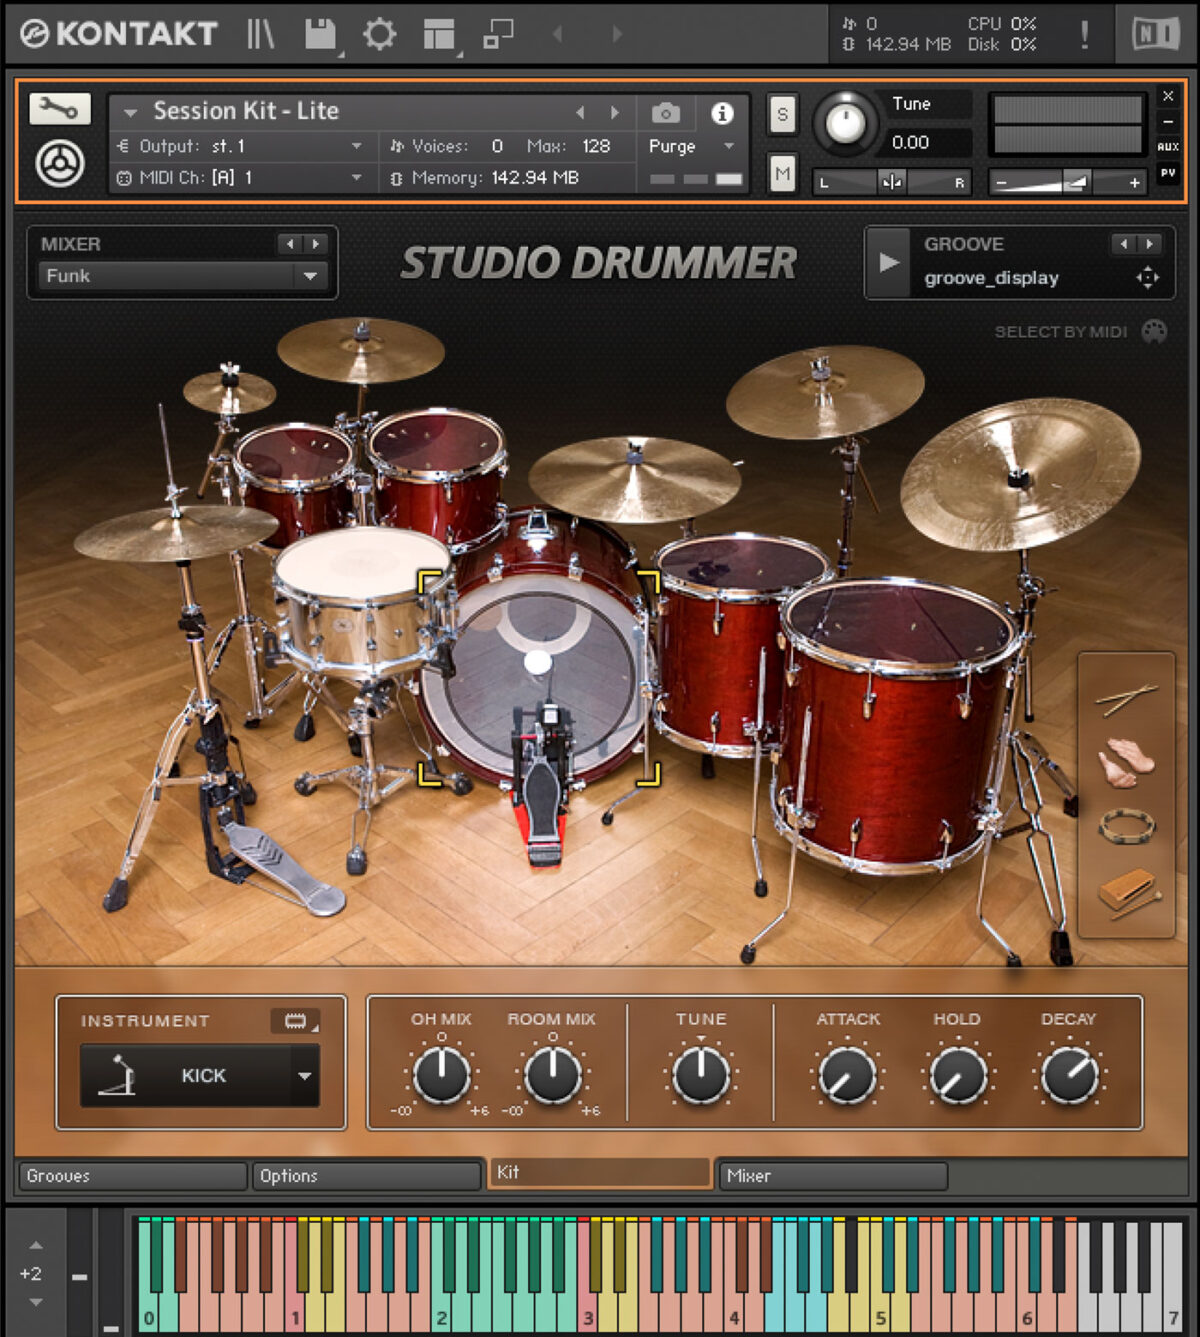
VST plugins enhance your drum programming experience. They offer a variety of drum sounds and effects. Superior Drummer and EZDrummer are popular choices. Superior Drummer provides high-quality drum sounds. It is suitable for professionals.
EZDrummer is user-friendly. It caters to both beginners and advanced users. Battery by Native Instruments is another great option. It offers a vast library of drum samples.
Selecting the right VST plugins is essential. It impacts the sound quality of your drum tracks. Choose plugins that align with your musical style.
Setting Up Your Drum Kit
Setting up your drum kit is the first step to creating great music. A well-organized drum kit helps you produce clear and powerful beats. Let’s break down the essential steps in setting up your drum kit effectively.
Selecting Drum Sounds
Choosing the right drum sounds is crucial. It sets the tone for your music. Here are some tips:
- Snare Drum: Look for a crisp and punchy sound.
- Bass Drum: Choose a deep and booming tone.
- Hi-Hats: Go for sharp and clean sounds.
- Toms: Opt for full and resonant tones.
- Cymbals: Pick bright and shimmering sounds.
Experiment with different samples. Find what fits best with your music style. You can use drum sample packs or create your own sounds.
Mapping Your Kit
Mapping your kit means assigning sounds to specific pads or keys. This makes it easier to play your drum kit. Follow these steps:
- Open Your DAW: Use software like Ableton, FL Studio, or Logic Pro.
- Load Drum Rack: Insert a drum rack or sampler.
- Assign Sounds: Drag and drop drum sounds to pads or keys.
- Test Your Kit: Play each pad to ensure correct mapping.
- Adjust Levels: Balance the volume of each sound.
Proper mapping helps you play more naturally. It also makes your workflow smoother.
To summarize, setting up your drum kit involves selecting the right sounds and mapping them correctly. This foundation will help you create better drum tracks. Happy drumming!
Credit: musictech.com
Creating Drum Patterns
Creating drum patterns is an essential skill for any music producer. Whether you are a beginner or experienced, understanding the basics and complexities of drum programming can elevate your tracks. This guide will help you create compelling drum patterns, starting from basic rhythms to more complex patterns.
Basic Rhythms
Start with a simple kick and snare pattern. Place the kick on the first and third beats. The snare goes on the second and fourth beats. This creates a steady, familiar rhythm. Add hi-hats in between to fill the gaps. Keep the hi-hats consistent for a smooth flow.
Experiment with different velocities. This adds dynamics to your pattern. Try varying the volume of each hit. It makes the drum pattern more human-like. Listen carefully to each change. Small adjustments can make a big difference.
Complex Patterns
Once you master basic rhythms, move to complex patterns. Start by adding ghost notes. These are softer hits that add texture. Place them between the main beats. It creates a fuller sound. Add syncopation to your rhythms. This means placing hits off the main beat. It gives your pattern a unique feel.
Use different drum sounds. Layering different percussion can make your pattern richer. Experiment with different drums like toms, claps, and cymbals. Each adds its own flavor. Try polyrhythms for an advanced touch. This involves playing two different rhythms at the same time. It sounds complex but can be very rewarding.
Layering And Texturing
Layering and texturing in drum programming can transform a simple beat into a rich, dynamic rhythm. By combining different sounds and textures, you can create depth and complexity in your drum tracks. This technique involves adding various elements to your core beat, including percussion and effects, to achieve a fuller sound.
Adding Percussion
Adding percussion elements can enhance your drum patterns. These elements can include shakers, tambourines, and congas. By layering these sounds, you can add groove and interest to your beat.
- Shakers: Add a subtle, rhythmic texture.
- Tambourines: Create a bright, lively sound.
- Congas: Add a warm, organic feel.
Experiment with different percussion instruments. Try placing them at various points in your beat. This can add variety and keep listeners engaged.
Using Effects
Effects can dramatically change the texture of your drums. Reverb, delay, and distortion are common effects used to shape drum sounds.
| Effect | Purpose |
|---|---|
| Reverb | Adds space and depth. |
| Delay | Creates echo and rhythm. |
| Distortion | Gives a gritty, raw sound. |
Use reverb to simulate different environments. Try a small room for tight sounds or a large hall for expansive effects. Delay can make your drums sound more complex by adding echoes. Distortion can add an edge, making your drums stand out more.
Remember, less is often more. Use effects sparingly to avoid muddying your mix. Carefully balance each layer and texture to maintain clarity and impact.
Editing And Refining
Editing and refining your drum tracks is crucial. It can make the difference between a robotic pattern and a groove that feels alive. This process involves adjusting the timing, ensuring beats hit the right spots, and adding subtle nuances for a more natural sound. Let’s dive into the two key aspects: Quantizing Beats and Humanizing Drums.
Quantizing Beats
Quantizing is aligning your drum hits to a grid. This ensures they are perfectly in time. It is especially useful if your initial performance is a bit off. Here’s how you can do it:
- Select the drum track.
- Open the quantize function in your DAW.
- Choose the note value (e.g., 1/8, 1/16).
- Apply the quantize function.
After quantizing, listen to the track. Ensure the beats are tight but not too mechanical. This is where Humanizing Drums comes in.
Humanizing Drums
Humanizing adds subtle variations to your drum patterns. This makes them sound more natural. Here are some methods:
- Vary the velocity: Change the volume of each hit slightly.
- Adjust the timing: Move some hits slightly off the grid.
- Layer samples: Combine different drum sounds for a richer texture.
Consider the following table for a quick reference:
| Technique | Description |
|---|---|
| Vary Velocity | Change the volume of hits to mimic human playing. |
| Adjust Timing | Move hits slightly off the grid for a natural feel. |
| Layer Samples | Combine different drum sounds for depth and texture. |
By combining quantizing and humanizing, you can create drum patterns that are both tight and natural. This balance is key to professional-sounding drum tracks. Experiment with these techniques and listen to how your drums evolve.
Mixing Drums
Mixing drums is an essential part of music production. Well-mixed drums can make your track sound professional. The goal is to balance each drum element. This ensures clarity and impact. Below, we will cover two main techniques: EQ and Compression, and Balancing Levels.
Eq And Compression
EQ is used to shape the drum sound. It adjusts the frequency balance. For example, boost the kick drum’s low end. This gives it more punch. Cut unwanted frequencies to reduce muddiness.
Compression controls the dynamic range. It evens out the drum hits. This makes the drums sound tighter. Set the attack and release times carefully. A fast attack can make the drums sound flat.
| Drum Element | Suggested EQ | Suggested Compression |
|---|---|---|
| Kick | Boost 60-100Hz, Cut 250-400Hz | Slow attack, Medium release |
| Snare | Boost 150-250Hz, Boost 3-5kHz | Fast attack, Fast release |
| Hi-Hats | Boost 10kHz, Cut below 200Hz | Medium attack, Fast release |
Balancing Levels
Balancing levels is crucial for a clear mix. Each drum element should sit well in the mix. Start with the kick and snare. These are the backbone of the drum kit. Adjust their levels until they blend well.
Next, bring in the hi-hats and cymbals. These add sparkle to your mix. Make sure they are not too loud. They should complement the kick and snare.
Finally, add the toms and other percussion. Pan them slightly to create a stereo image. This gives depth to your mix. Use the volume faders for fine adjustments. Your goal is a balanced, cohesive drum sound.
Advanced Techniques
Programming drums can be an exciting journey for any musician or producer. Once you have mastered the basics, it’s time to explore advanced techniques. These techniques can elevate your drum tracks, making them more dynamic and professional. In this section, we will discuss two key advanced techniques: Automation and Using Drum Samples.
Automation
Automation is a powerful tool in drum programming. It allows you to change parameters over time. This can create more dynamic and interesting drum patterns.
Volume Automation: Adjusting the volume of individual hits can add a human touch.
Pan Automation: Moving drums from left to right can make your track more immersive.
Here is a simple example of volume automation in a drum sequence:
Automation can also be used for effects like reverb and delay. Experiment with these to find your unique sound.
Using Drum Samples
Drum samples can greatly enhance your drum programming. They provide a wide range of sounds that you can use to create unique patterns.
Here are some tips for using drum samples effectively:
- Layering: Combine different samples to create a fuller sound. For example, layer a snare with a clap.
- Pitch Shifting: Adjust the pitch of a sample to fit your track better.
- EQ: Use equalization to remove unwanted frequencies and shape the sound.
Using high-quality samples is essential. Poor-quality samples can ruin an otherwise great track. Always choose samples that fit the style of your music.
Below is a simple table showing some popular drum sample packs and their characteristics:
| Sample Pack | Genre | Description |
|---|---|---|
| Goldbaby | Hip-Hop | Warm, vintage drum sounds. |
| Vengeance | EDM | Punchy, modern electronic drums. |
| Splice | Various | Wide range of high-quality samples. |
Experimenting with different samples and automation can lead to discovering your unique sound. Don’t be afraid to try new things and push the boundaries of your creativity.
Credit: blog.native-instruments.com
Frequently Asked Questions
What Is Drum Programming?
Drum programming is the process of creating drum patterns using software. It involves sequencing beats, rhythms, and percussion sounds digitally.
Why Program Drums Instead Of Recording?
Programming drums offers flexibility and precision. It allows you to experiment with different beats and styles without needing a physical drum kit.
Which Software Is Best For Drum Programming?
Popular software for drum programming includes Ableton Live, FL Studio, and Logic Pro X. They offer various tools and features for creating drum tracks.
How Do I Start Programming Drums?
Start by selecting a drum software. Then, create a basic beat using kick, snare, and hi-hat patterns.
Conclusion
Creating drum patterns can be both fun and rewarding. Experiment with different sounds. Practice regularly to improve your skills. Listen to various music genres for inspiration. Use the tips shared in this guide to get started. Always trust your creativity and instincts.

Happy drumming and programming!
{ “@context”: “https://schema.org”, “@type”: “FAQPage”, “mainEntity”: [ { “@type”: “Question”, “name”: “What is drum programming?”, “acceptedAnswer”: { “@type”: “Answer”, “text”: “Drum programming is the process of creating drum patterns using software. It involves sequencing beats, rhythms, and percussion sounds digitally.” } } , { “@type”: “Question”, “name”: “Why program drums instead of recording?”, “acceptedAnswer”: { “@type”: “Answer”, “text”: “Programming drums offers flexibility and precision. It allows you to experiment with different beats and styles without needing a physical drum kit.” } } , { “@type”: “Question”, “name”: “Which software is best for drum programming?”, “acceptedAnswer”: { “@type”: “Answer”, “text”: “Popular software for drum programming includes Ableton Live, FL Studio, and Logic Pro X. They offer various tools and features for creating drum tracks.” } } , { “@type”: “Question”, “name”: “How do I start programming drums?”, “acceptedAnswer”: { “@type”: “Answer”, “text”: “Start by selecting a drum software. Then, create a basic beat using kick, snare, and hi-hat patterns.” } } ] }As an Amazon Associate, Cleanestor earns from qualifying purchases at no additional cost to you.