Applying rosin to a violin bow is essential for producing sound. Without rosin, the bow will not grip the strings properly.
This simple step is crucial for all violin players. Rosin, a sticky substance from tree sap, helps the bow create friction with the strings. This friction is what produces the rich, beautiful sound of the violin. Applying rosin correctly can make a big difference in how your violin sounds and how easy it is to play.
If you are new to playing the violin or just need a refresher, knowing how to rosin your bow is a skill you must have. In this guide, we will walk you through the steps to ensure your bow is ready to play its best.

Credit: musicalinstrumenthire.com
Preparing Your Materials
Preparing your materials is the first step to putting rosin on a violin bow. Having the right materials on hand ensures a smooth process. Let’s dive into what you’ll need and how to prepare.
Choosing The Right Rosin
Choosing the right rosin is crucial. Rosin comes in different types. Light rosin is ideal for warmer climates. It produces less dust. Dark rosin is better for cooler climates. It provides a stickier grip. Your choice depends on your climate and playing style. Always keep your rosin clean and free from debris.
Gathering Necessary Tools
Gathering the necessary tools is simple. You will need your violin bow and rosin. A soft cloth is useful too. The cloth helps keep your bow clean. Ensure your rosin is not cracked. Cracked rosin can damage your bow. Check your bow for any loose hairs. Tighten the bow hairs slightly. A pencil can be used to mark the rosin surface gently. This helps the bow grip the rosin better. Now, you are ready to apply the rosin.
Credit: ricardbunnel.com
Checking The Bow Hair
Before you put rosin on a violin bow, it’s crucial to check the bow hair. This step ensures that your bow is in the best condition to produce a beautiful sound. Follow these steps to inspect the bow hair properly.
Inspecting For Cleanliness
First, look at the bow hair closely. Is it clean? Dirty bow hair can affect sound quality. Use a soft cloth to gently wipe away any dust or dirt.
| Clean Bow Hair | Dirty Bow Hair |
|---|---|
| Produces clear sound | Produces muffled sound |
| Looks bright and white | Looks dark and grimy |
Keeping the bow hair clean helps maintain a clear and crisp sound.
Determining Hair Condition
Next, check the condition of the bow hair. Is it frayed or broken? Damaged bow hair needs replacement. Run your fingers gently through the hair. Feel for rough or uneven spots.
- Healthy hair: Smooth and even
- Damaged hair: Rough and uneven
If you find many broken hairs, consider getting the bow rehaired. Regular maintenance ensures your bow performs well.
By inspecting the bow hair for cleanliness and condition, you ensure your violin produces the best sound possible. Clean and well-maintained bow hair is key to a great performance.
Starting The Rosin Application
Applying rosin to your violin bow is essential. It ensures a smooth and resonant sound. Without rosin, the bow hair won’t grip the violin strings properly. This section will guide you through the initial steps of the rosin application process.
Holding The Rosin
First, hold the rosin properly. Grasp it firmly but gently with your non-dominant hand. Ensure your fingers are not touching the rosin’s surface. This helps maintain its quality and prevents dirt from transferring.
Positioning The Bow
Next, position the bow correctly. Hold the bow in your dominant hand. Place the frog (the part you hold) near your body. The tip of the bow should point away from you. This positioning allows for even rosin distribution.
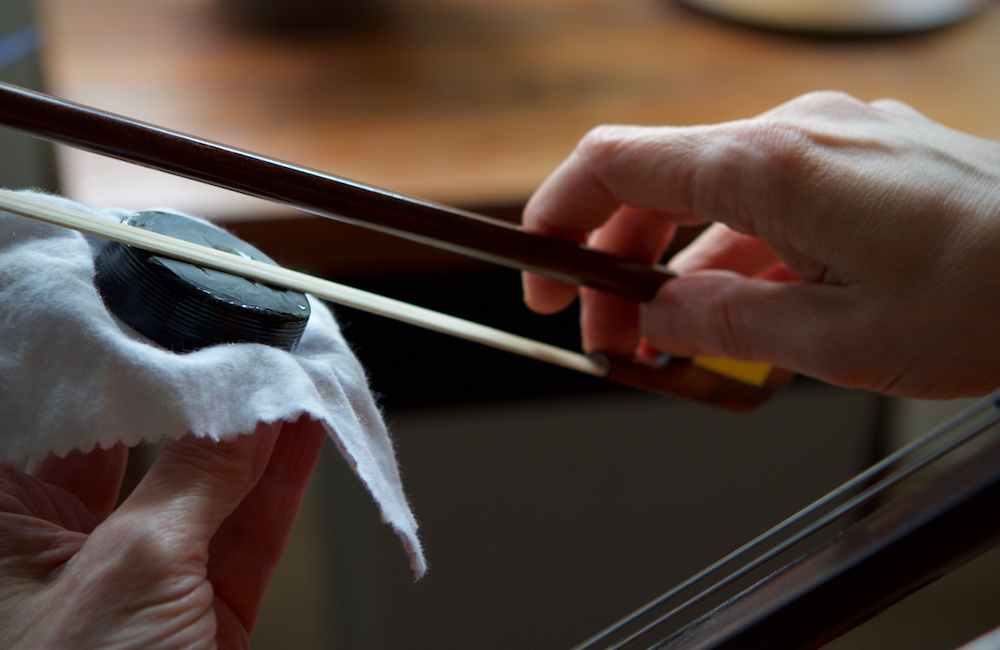
Applying Rosin To The Bow
Rosin helps the bow grip the violin strings for better sound. Gently rub rosin on the bow hairs. Repeat until the bow has enough rosin for smooth playing.
Applying rosin to a violin bow is a vital step. It ensures the bow grips the strings properly. This helps produce a clear, resonant sound. Whether you’re a beginner or a seasoned player, proper rosin application is key.
Initial Contact
Start by tightening the bow hair. Turn the screw at the end of the bow. Make sure the hair is firm but not too tight.
Next, hold the rosin in your left hand. Gently place the bow hair on the surface of the rosin.
Use a slight angle to make initial contact. Move the bow from the frog to the tip.
Consistent Pressure
Apply consistent pressure as you move the bow. Press firmly but not too hard. You want to avoid breaking the hair.
Move the bow back and forth along the rosin. Ensure even distribution of rosin on the hair.
Repeat this process 5-10 times. Make sure the entire bow hair gets covered.
### Tips for Applying Rosin
– Use a new rosin: Scratch the surface with a key for better grip.
– Check the bow: Ensure it’s not too tight or too loose.
– Apply regularly: Rosin the bow every few uses for optimal sound.
| Step | Action | Notes |
|——|—————————————|——————————|
| 1 | Tighten the bow hair | Firm but not too tight |
| 2 | Hold rosin and make initial contact | Use slight angle |
| 3 | Apply consistent pressure | Avoid breaking the hair |
| 4 | Move the bow back and forth | Even distribution |
| 5 | Repeat 5-10 times | Full coverage |
By following these steps, your violin will sound its best. Enjoy playing with a well-rosined bow!
“`
Ensuring Even Distribution
Ensuring even distribution of rosin on a violin bow is crucial for producing a balanced and clear sound. Proper rosin application allows the bow to grip the strings effectively, ensuring smooth and consistent play. Below, we will discuss how to check for coverage and correct any uneven spots.
Checking For Coverage
To check for coverage, you need to inspect the bow hair closely. Hold the bow up to the light and look for areas where the rosin is not evenly applied. These spots will appear glossy or less frosted compared to the rest of the bow hair.
Run your fingers lightly along the bow hair. A well-rosined bow should feel slightly sticky but not too tacky. If you notice any slippery sections, they need more rosin.
Correcting Uneven Spots
If you find uneven spots, reapply rosin to those specific areas. Start by gently rubbing the rosin cake back and forth on the bow hair, paying close attention to the spots that need more coverage.
Use short, controlled strokes to avoid over-applying rosin. Press the rosin cake lightly against the bow hair to ensure an even application.
After you have added more rosin, check the coverage again. If needed, repeat the process until the bow hair is uniformly covered.
Here is a quick recap in a table format to ensure clarity:
| Step | Action |
|---|---|
| 1 | Inspect the bow hair for glossy spots |
| 2 | Run fingers to check for stickiness |
| 3 | Reapply rosin to uneven areas |
| 4 | Use short strokes for even application |
| 5 | Check coverage again |

Credit: www.wikihow.com
Testing The Bow
Testing the bow is a crucial step after applying rosin. It helps you ensure that the bow produces a clear sound. This section will guide you on how to test the bow effectively.
Playing The Violin
Start by holding your violin in the usual playing position. Draw the bow across the strings from the frog to the tip. Do this slowly and listen carefully to the sound produced. Repeat this process a few times.
Pay attention to how the bow interacts with the strings. A properly rosined bow should grip the strings well. This grip helps produce a strong, clear sound.
Listening For Sound Quality
Listen for a smooth, even sound as you play. If the sound is scratchy or weak, the bow may need more rosin. If it sounds too harsh, there might be too much rosin.
Check each string individually. The bow should produce a consistent sound across all strings. This helps ensure that the rosin is evenly applied.
Make sure to test different dynamics. Play both softly and loudly. The bow should respond well at all volumes. This indicates that the rosin is well-distributed.
Additional Tips
- Always clean the strings after playing. This removes excess rosin.
- Reapply rosin as needed. Frequent players may need to do this daily.
- Store your violin and bow in a safe place. This helps maintain their condition.
Testing the bow is an ongoing process. Regular checks ensure your instrument sounds its best.
Maintaining The Bow
Maintaining your violin bow is crucial for achieving a beautiful sound. Proper care extends the bow’s life and ensures consistent performance. This section will guide you through the steps for regular rosin application and cleaning the bow.
Regular Rosin Application
Applying rosin to your violin bow is essential. It helps the bow grip the strings and produce sound. Follow these steps for regular rosin application:
- Hold the rosin cake in one hand and the bow in the other.
- Gently rub the rosin along the bow hair from frog to tip.
- Ensure even coverage by making several passes.
- Avoid applying too much rosin to prevent a scratchy sound.
Regular application of rosin ensures the bow grips the strings well. It also prevents slipping and enhances sound quality.
Cleaning The Bow
Cleaning the bow is as important as applying rosin. Over time, rosin can build up and affect performance. Here is how to clean your bow:
- Use a soft, dry cloth to wipe the bow hair after each use.
- Avoid using water or alcohol as it can damage the hair.
- Clean the stick of the bow with a separate cloth.
- Check for any loose hairs and trim them carefully.
Regular cleaning keeps the bow in good condition. It also prevents dust and rosin build-up, ensuring a smooth performance.
Troubleshooting Common Issues
Rosining your violin bow properly can be tricky. Sometimes, things don’t go as expected. You might face issues like too much rosin or too little. Both can affect your playing. Let’s look at these common problems and how to fix them.
Excessive Rosin
Too much rosin on your bow can cause a few issues. The bow might produce a scratchy sound. You could also see white dust on your instrument. This can be annoying and might affect your performance. To fix this, gently wipe the excess rosin off the strings. Use a clean, dry cloth for this.
Next, play your violin for a few minutes. This helps remove extra rosin from the bow. If the problem persists, you might need to clean the bow hair. This should be done with care. Use a small brush to gently remove the rosin build-up.
Insufficient Rosin
Not enough rosin can also be a problem. The bow might not grip the strings well. This can cause a weak or uneven sound. To solve this, apply more rosin to your bow. Make sure to cover the entire length of the bow hair. Use even strokes for a balanced application.
If the bow still slips, check your rosin quality. Old or poor-quality rosin might not work well. In this case, get a new rosin. Also, ensure your bow hair is in good condition. Worn-out bow hair might need replacing.
Frequently Asked Questions
How Often Should I Rosin My Violin Bow?
You should rosin your violin bow every 3-6 hours of play. This ensures optimal sound quality and bow performance.
What Type Of Rosin Is Best For Violin Bows?
The best rosin for violin bows is light or medium. It’s suitable for most playing conditions and provides good grip.
Can Too Much Rosin Damage My Bow?
Yes, too much rosin can make your bow sticky and hard to control. It can also damage the strings.
How Do I Clean Excess Rosin Off My Bow?
Wipe your bow gently with a clean cloth after each use. This prevents rosin buildup and maintains bow performance.
Conclusion
Properly applying rosin ensures a better sound from your violin. Follow the steps carefully. Clean your bow regularly to maintain its quality. Use the right amount of rosin for optimal performance. Practice makes perfect, so keep trying. Soon, you’ll notice the difference in your playing.

Your violin will thank you. Enjoy making beautiful music with your well-rosined bow. Happy playing!
As an Amazon Associate, Cleanestor earns from qualifying purchases at no additional cost to you.