Want to bring back the nostalgia of cassette tapes? Recording music onto a cassette tape is easier than you think.
This guide will take you through the steps to create your own mixtape. Cassette tapes once ruled the music world. They offer a tactile, vintage experience that digital formats can’t match. Whether you’re aiming to relive the past or try something new, recording music onto a cassette tape can be a fun and rewarding project.
This blog post will walk you through the entire process. You’ll learn how to prepare your equipment, select the right tape, and record your favorite tracks. Let’s dive into this retro journey and discover how to create your own cassette masterpiece.
Credit: www.youtube.com
Introduction To Cassette Tapes
Cassette tapes have a unique charm in the world of music. They offer a tangible way to record and enjoy music. For many, they are a nostalgic trip back in time. In this post, we will explore the basics of recording music onto a cassette tape. Let’s start with an introduction to cassette tapes.
Brief History
The cassette tape was invented in 1962 by Philips. It was first introduced to the public in 1963. This small, compact medium quickly gained popularity. By the 1970s, cassette tapes were a common household item. They allowed people to record and share music easily. Before digital music, cassette tapes were the main way to enjoy music on the go.
Popularity In Music Recording
Cassette tapes became widely popular for music recording. Bands and musicians used them to create and distribute demos. Fans recorded mixtapes to share favorite songs with friends. The personal touch of a handmade mixtape made it special. Even today, some artists release music on cassette tapes. They offer a unique, vintage experience that digital formats cannot match.
In this blog, we will guide you through the process of recording music onto a cassette tape. Stay tuned for practical tips and detailed steps to get started.
Required Equipment
Recording music onto a cassette tape can be a fun and rewarding hobby. To get started, you need some essential equipment. This section covers everything you need to begin.
Cassette Tape
First, you need a cassette tape. These tapes come in various lengths, such as 60, 90, or 120 minutes. Choose the length based on your recording needs. New tapes are recommended to ensure the best quality sound. You can find cassette tapes online or at specialty music stores.
Cassette Recorder
The next item is a cassette recorder. This device records audio onto your cassette tape. Look for a recorder with good reviews and the necessary features. Features to consider include:
- Recording level control
- Built-in microphone
- Input/output jacks
Make sure the recorder is in good working condition for the best results.
Audio Source
Your audio source is where the music comes from. This could be a CD player, smartphone, computer, or turntable. Ensure your audio source is compatible with your cassette recorder. Quality of the audio source affects the final recording.
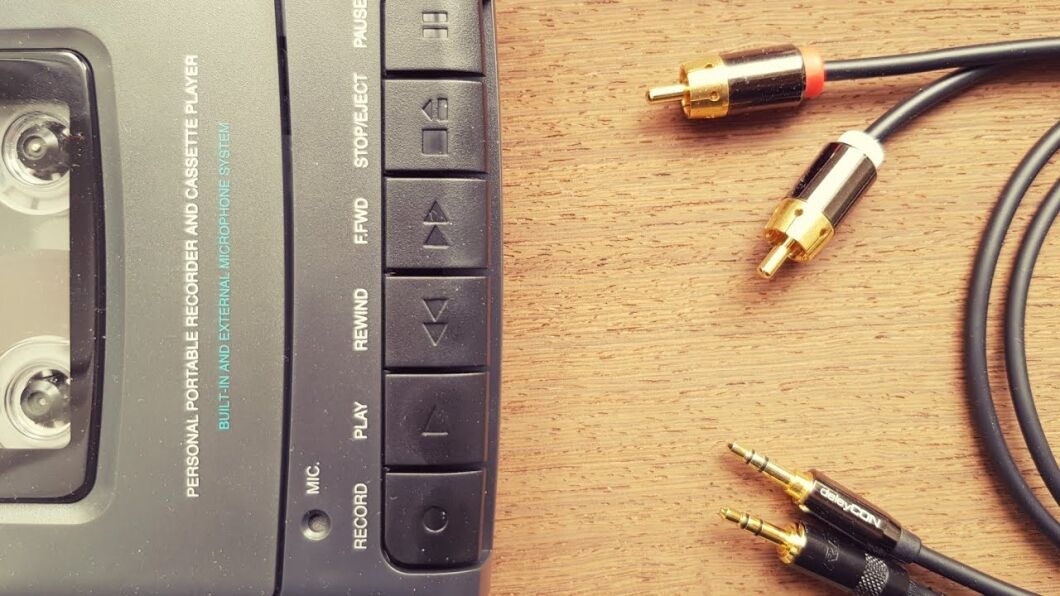
Cables And Adapters
To connect your audio source to the cassette recorder, you need cables and adapters. Common cables include:
- RCA cables
- 3.5mm audio cables
Adapters may be needed if your audio source and recorder have different input/output types. It’s important to have the right cables for a clear connection.
Choosing The Right Cassette Tape
Choosing the right cassette tape is crucial for a great recording. The quality of your music depends on the tape you use. In this section, we’ll discuss the types of tapes, their lengths, and quality considerations.
Tape Types
There are different types of cassette tapes. Type I tapes are standard and affordable. They are suitable for voice recordings and casual music. Type II tapes offer better sound quality. They are great for music with more detail. Type IV tapes are the best in quality. They provide clear and rich sound but are more expensive.
Tape Length
Cassette tapes come in various lengths. The length is measured in minutes. Common lengths are 60, 90, and 120 minutes. A 60-minute tape has 30 minutes per side. Longer tapes can hold more music. But they may be thinner and more prone to damage. Choose a length that fits your recording needs.
Quality Considerations
Quality is key for a good recording. Look for tapes from trusted brands. Avoid old or used tapes. They may have wear and tear. Store your tapes properly. Keep them away from heat and magnets. This will help maintain their quality. High-quality tapes will give you the best sound.
Setting Up Your Recorder
Recording music onto a cassette tape involves several key steps. The first and most crucial step is setting up your recorder. This process ensures that the audio source, power, and cassette tape are all correctly connected and ready to go. Let’s dive into the steps for setting up your recorder.
Connecting The Audio Source
First, you need to connect your audio source. This could be a CD player, a computer, or even a turntable.
- Locate the audio output on your audio source.
- Use the correct audio cables to connect to your recorder.
- Ensure the cables are securely plugged into the input jacks of the recorder.
Here is a table to help you understand different types of audio cables:
| Audio Source | Common Cables |
|---|---|
| Computer | 3.5mm Aux, USB |
| CD Player | RCA, 3.5mm Aux |
| Turntable | RCA |
Powering The Recorder
Make sure your recorder is powered on and ready to use.
- Locate the power cord of the recorder.
- Plug the power cord into a wall outlet.
- Turn on the power switch of the recorder.
Some recorders have battery options. If yours does, ensure the batteries are fresh and correctly installed.
Inserting The Cassette Tape
Insert the cassette tape properly to avoid damage.
- Press the eject button to open the tape compartment.
- Place the cassette tape into the compartment with the open edge facing inward.
- Close the tape compartment securely.
Once the tape is inserted, you are ready to record. Double-check all connections before you start the recording process.
Adjusting Recording Levels
Recording music onto a cassette tape involves various steps. One of the most crucial steps is adjusting the recording levels. Properly adjusted levels ensure your music sounds clear and vibrant. Incorrect levels can result in poor audio quality. Let’s delve into the specifics of adjusting these levels.
Volume Control
Setting the right volume control is essential. Start by playing your music source. This could be a CD player, computer, or smartphone. Gradually increase the volume until it reaches a moderate level. You want to avoid too much volume, as it can cause distortion. Use the volume knob on your cassette deck for fine adjustments.
Avoiding Distortion
Avoiding distortion is critical for high-quality recordings. Distortion occurs when the recording level is too high. This can make your music sound fuzzy and unclear. To prevent this, keep the recording level below the red zone. Most cassette decks have a meter. This meter shows the recording level. Keep an eye on it. Adjust the volume if the needle enters the red zone.
Testing Audio Levels
Before you start recording, you must test the audio levels. Play a sample of your music. Listen carefully. Check the meter on your cassette deck. Ensure the levels are consistent and do not peak into the red. Make small adjustments as needed. This step ensures your final recording sounds great.

Credit: www.reddit.com
Recording Your Music
Recording your music onto a cassette tape can be a fun and rewarding process. You get to experience the charm of analog recording. This section will guide you through the steps, from starting the recording to monitoring and finally stopping it.
Starting The Recording
First, gather all your equipment. You will need a cassette tape, a cassette player, and the music source. Insert your blank cassette tape into the player. Make sure it is rewound to the start. Connect your music source to the cassette player. This could be a CD player, a computer, or even a smartphone. Set the volume to a moderate level. This helps to avoid distortion.
Monitoring The Process
Once you start recording, keep an eye on the levels. Most cassette players have a level meter. This shows you the strength of the signal. Ensure the levels are not too high. High levels can cause distortion. If they are too low, the recording will be too quiet. Adjust the volume on your music source if needed. Listen through headphones to check the quality of the recording. Make sure the sound is clear.
Stopping The Recording
When your music is finished, stop the recording. Press the stop button on your cassette player. Rewind the tape a little to hear your work. Play back the recording to check the quality. If you are not happy, you can record again. Make any necessary adjustments to improve the sound. Finally, label your cassette tape. This helps you keep track of your recordings.
Post-recording Steps
After recording music onto a cassette tape, there are several important steps to ensure your tape stays in great condition. These steps will help preserve the quality of your recording and make it easy to find and listen to your favorite tracks.
Rewinding The Tape
Once your recording is complete, it’s a good practice to rewind the tape back to the beginning. This ensures that the tape is ready for the next time you want to listen to it. Use the rewind function on your cassette player or a dedicated tape rewinder for this purpose.
Labeling The Cassette
To keep your tapes organized, always label the cassette. Write down the artist, album, and tracklist on the cassette cover or a sticker. This makes it easy to identify what’s on the tape and prevents confusion with other tapes in your collection.
| Information | Example |
|---|---|
| Artist | The Beatles |
| Album | Abbey Road |
| Tracklist | 1. Come Together 2. Something 3. Maxwell’s Silver Hammer |
Storing The Tape
Proper storage is crucial to maintain the quality of your cassette tapes. Store your tapes in a cool, dry place away from direct sunlight. Avoid areas with high humidity or temperature fluctuations. Keep tapes in their cases to protect them from dust and physical damage.
Consider using a storage box or shelf specifically designed for cassettes. This will keep your collection organized and easily accessible. Regularly check your tapes for signs of wear and clean them with a soft cloth if needed.
Troubleshooting Common Issues
Recording music onto a cassette tape can be a nostalgic and rewarding experience. But, sometimes issues arise that can affect the quality of your recordings. Understanding and troubleshooting common issues can help ensure your recordings sound great and your equipment works well.
Poor Sound Quality
Poor sound quality can be frustrating. It may be due to dirty tape heads. Clean the heads with isopropyl alcohol and a cotton swab. Also, use a high-quality cassette tape. Low-quality tapes often produce muffled sound. Check the tape’s age too. Older tapes may degrade and affect sound quality. Adjusting the recording levels is crucial. Too high can cause distortion. Too low might result in a faint recording.
Tape Jams
Tape jams can damage your cassette and recorder. First, stop the recorder immediately. Carefully remove the cassette. Check for any visible damage. Straighten any twisted tape. If the cassette case is damaged, transfer the tape to a new case. Regularly clean the recorder to prevent jams. Dust and debris often cause tapes to jam. Avoid touching the tape’s magnetic surface. Your fingerprints can lead to jams and poor sound.
Recorder Malfunctions
Recorder malfunctions can halt your recording session. Common issues include power problems. Check the power source and cables. Ensure batteries are fresh if using a portable recorder. If the recorder doesn’t play or record, it might need servicing. Sometimes, the issue is with the motor. Listen for unusual sounds. A squeaky motor needs lubrication or repair. Regular maintenance can prevent many malfunctions. Keep your recorder clean and store it properly.
Tips For Best Results
Recording music onto a cassette tape can be a rewarding experience. For the best results, follow these tips. They will help you ensure your recordings are of the highest quality possible.
Maintaining Equipment
Keep your cassette player in good condition. Dust and dirt can affect the sound quality. Store your player in a cool, dry place. Avoid direct sunlight and humidity. Regular checks are important. Replace worn-out parts as needed.
Choosing Quality Tapes
Select high-quality cassette tapes. Cheap tapes may produce poor sound. Look for tapes with a good reputation. Metal and chrome tapes often perform best. They can handle higher recording levels. This results in clearer sound.
Regularly Cleaning The Recorder
Clean your cassette recorder often. Use a cleaning cassette or a cotton swab. Alcohol-based cleaners work well. Pay attention to the tape heads and capstans. This will prevent buildup of residue. Cleanliness ensures smooth operation and better sound.

Credit: www.youtube.com
Frequently Asked Questions
How Do I Record Music Onto A Cassette Tape?
To record music onto a cassette tape, you need a tape deck with recording capability. Insert a blank tape. Connect your music source. Press the record button and play the music.
What Equipment Do I Need To Record Tapes?
You need a tape deck with recording function, blank cassette tapes, and a music source. Ensure all connections are secure.
Can I Record Digital Music Onto A Cassette?
Yes, you can. Connect your digital music player to the tape deck. Press record on the deck and play on the player.
How Do I Improve Recording Quality On Cassette Tapes?
Use high-quality tapes and clean the tape heads regularly. Ensure your recording levels are balanced and avoid overloading.
Conclusion
Recording music onto a cassette tape is a fun process. Follow the steps carefully. Gather your equipment and choose your songs. Set up your cassette player properly. Press record and play your music. Enjoy the nostalgic sound of cassette tapes.

Share your creations with friends. This method brings back memories. Happy recording!
{ “@context”: “https://schema.org”, “@type”: “FAQPage”, “mainEntity”: [ { “@type”: “Question”, “name”: “How do I record music onto a cassette tape?”, “acceptedAnswer”: { “@type”: “Answer”, “text”: “To record music onto a cassette tape, you need a tape deck with recording capability. Insert a blank tape. Connect your music source. Press the record button and play the music.” } } , { “@type”: “Question”, “name”: “What equipment do I need to record tapes?”, “acceptedAnswer”: { “@type”: “Answer”, “text”: “You need a tape deck with recording function, blank cassette tapes, and a music source. Ensure all connections are secure.” } } , { “@type”: “Question”, “name”: “Can I record digital music onto a cassette?”, “acceptedAnswer”: { “@type”: “Answer”, “text”: “Yes, you can. Connect your digital music player to the tape deck. Press record on the deck and play on the player.” } } , { “@type”: “Question”, “name”: “How do I improve recording quality on cassette tapes?”, “acceptedAnswer”: { “@type”: “Answer”, “text”: “Use high-quality tapes and clean the tape heads regularly. Ensure your recording levels are balanced and avoid overloading.” } } ] }As an Amazon Associate, Cleanestor earns from qualifying purchases at no additional cost to you.
