
Want to record video with great audio? Using an audio interface can help.
It improves sound quality and gives a professional touch. Recording video with an audio interface might seem complex, but it’s quite simple. An audio interface bridges your microphone and computer, ensuring clear audio. Whether you’re a vlogger, musician, or content creator, good audio makes a big difference.
In this guide, we’ll explain how to connect your equipment and optimize settings. You’ll learn basic steps to start recording high-quality videos with perfect sound. So, get ready to enhance your video projects with crisp, clear audio. Let’s dive into the world of audio interfaces and make your recordings stand out.
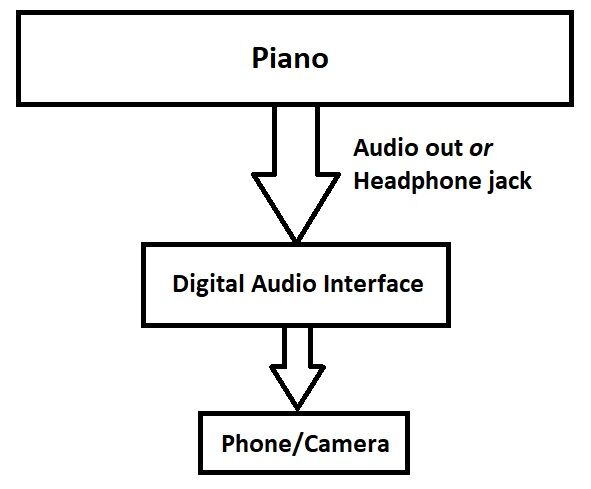
Credit: pianotone.ca
Introduction To Video Recording
Recording videos has become a vital part of content creation. Whether for YouTube, social media, or professional projects, quality video recording is essential. One key factor often overlooked is the quality of audio. Let’s delve into the importance of quality audio and the role of audio interfaces in video recording.
Importance Of Quality Audio
Audio quality can make or break a video. Poor audio can distract viewers and lower the overall quality of your content. Clear, crisp audio keeps your audience engaged and ensures your message is heard. It’s as important as the visual quality.
Consider a video with great visuals but muffled audio. Viewers will struggle to understand, leading to frustration. In contrast, good audio can enhance even average visuals, making the content more enjoyable.
| Aspect | Impact on Audience |
|---|---|
| Clear Audio | Engages viewers, ensures message clarity |
| Poor Audio | Distracts viewers, reduces content quality |
Role Of Audio Interfaces
An audio interface is a device that connects your microphone to your computer. It converts analog signals from the microphone into digital signals for the computer. This ensures high-quality audio recording.
Using an audio interface has several benefits:
- Improved sound quality
- Reduced background noise
- Better control over audio levels
An audio interface can have various input options. This includes XLR inputs for professional microphones and 1/4-inch inputs for instruments. Some interfaces also offer USB connections, making them versatile.
Here is a simple setup process:
- Connect the audio interface to your computer.
- Plug your microphone into the interface.
- Adjust the input levels to avoid distortion.
- Start recording your video with high-quality audio.
By using an audio interface, you ensure that your videos have professional-grade audio. This enhances the overall production value and keeps your audience engaged.
Choosing The Right Audio Interface
Recording video with an audio interface can enhance your content. The right audio interface will make your sound clearer and more professional. But how do you choose the right one? This guide will help you understand the types and key features of audio interfaces.
Types Of Audio Interfaces
Audio interfaces come in different types. Each type has unique features and uses. Here are the main types:
- USB Audio Interfaces: These are popular and easy to use. They connect via a USB port.
- Thunderbolt Audio Interfaces: These offer faster data transfer. They are great for high-quality recordings.
- FireWire Audio Interfaces: These are older but still reliable. They suit certain professional setups.
- PCIe Audio Interfaces: These are built into desktop computers. They offer low latency and high performance.
Key Features To Look For
Different audio interfaces offer different features. Here are key features to consider:
- Number of Inputs and Outputs: Choose based on how many devices you need to connect.
- Phantom Power: Needed if you use condenser microphones.
- Sample Rate and Bit Depth: Higher numbers mean better sound quality.
- Latency: Lower latency means less delay in sound.
- Compatibility: Ensure the interface works with your computer and recording software.
By understanding these types and features, you can choose the right audio interface. This will improve your video recordings and make them sound professional.
Setting Up Your Audio Interface
Recording video with an audio interface can enhance your production quality. But first, you need to set up your audio interface correctly. This involves connecting it to your computer and installing the necessary drivers. Follow these steps to ensure a smooth setup process.
Connecting To Your Computer
Start by connecting your audio interface to your computer. Use a USB, Thunderbolt, or FireWire cable, depending on your interface. Ensure the connection is secure. A loose connection can cause issues.
Power on your audio interface. Some models draw power from the computer. Others require an external power source. Check your device’s manual to confirm.
Installing Necessary Drivers
Next, install the necessary drivers for your audio interface. Drivers are software that helps your computer communicate with the interface. Visit the manufacturer’s website for the latest drivers.
Download and install the driver compatible with your operating system. Follow the installation instructions carefully. Restart your computer after installation. This step ensures the drivers function correctly.
Once installed, open your computer’s sound settings. Select your audio interface as the default input and output device. This step ensures your computer uses the interface for audio recording.

Credit: www.amazon.com
Configuring Audio Settings
Configuring audio settings is crucial for recording high-quality videos. Proper settings ensure clear and balanced sound. This section will guide you through the key steps.
Adjusting Input Levels
First, connect your microphone to the audio interface. Open your recording software. Find the input level controls. Adjust the input levels to avoid clipping. Clipping happens when the input is too loud. Aim for green or yellow levels on the meter. Avoid red levels, which indicate distortion. Test by speaking into the microphone. Make further adjustments if needed.
Selecting The Correct Output
Next, choose the right output settings. This ensures you hear what you record. Open the audio settings in your software. Select your audio interface as the output device. Test the output by playing back a recording. Use headphones to monitor the sound quality. Adjust the output volume if necessary. Ensure the sound is clear and balanced.
Integrating With Video Recording Software
Integrating an audio interface with video recording software can greatly improve your video’s sound quality. It helps you capture clear and professional audio. Let’s explore how to seamlessly combine audio interfaces with popular video recording software.
Popular Software Options
Many video recording software options are available. Each has its own features. Here are some of the most popular:
- OBS Studio: Free and open-source. It supports multiple audio and video sources.
- Adobe Premiere Pro: Advanced editing features. Ideal for professional projects.
- Final Cut Pro: Mac-exclusive. Known for its user-friendly interface.
- ScreenFlow: Great for screen recording. It offers powerful editing tools.
Setting Up Audio Inputs
Setting up your audio interface with your video recording software is crucial. Follow these steps:
- Install Drivers: Some audio interfaces need drivers. Download and install them from the manufacturer’s website.
- Connect the Interface: Use a USB or Thunderbolt cable to connect the audio interface to your computer.
- Open Software: Launch your video recording software. Go to the audio settings menu.
- Select Audio Interface: Find the input source option. Choose your connected audio interface.
- Configure Channels: Set the number of audio channels. Typically, you will use a mono or stereo setup.
- Test Audio: Speak into your microphone. Check the input levels in the software. Adjust the gain if needed.
By following these steps, you ensure your audio interface is correctly set up. This will help you achieve professional sound quality in your video recordings.
Recording Tips And Techniques
Recording video with an audio interface ensures high-quality sound. But, achieving perfect audio requires careful attention. Here are some essential tips and techniques to help you. Let’s start by exploring optimal microphone placement and monitoring audio levels.
Optimal Microphone Placement
Proper microphone placement is vital for clear sound. Place the microphone close to the sound source. This minimizes background noise and captures clear audio.
Here are a few tips for optimal placement:
- Distance: Keep the microphone 6-12 inches from your mouth.
- Angle: Position the microphone slightly off-axis to avoid plosive sounds.
- Height: Align the microphone with the sound source to maintain clarity.
These tips ensure high-quality sound capture.
Monitoring Audio Levels
Monitoring audio levels is essential to avoid distortion. Use headphones to listen to the audio in real-time. This helps identify any issues immediately.
Here’s how to monitor audio levels effectively:
- Check levels: Ensure the levels peak between -6 dB and -3 dB.
- Avoid clipping: If levels are too high, reduce the input gain.
- Consistency: Maintain consistent levels throughout the recording.
These steps help maintain clear and undistorted audio.
By following these tips and techniques, you can achieve professional-quality recordings. Remember to practice and experiment with different setups.
Troubleshooting Common Issues
When recording video with an audio interface, common issues can disrupt your flow. These problems often include latency and audio distortion. Understanding how to tackle these issues is crucial. Here are some tips to help you troubleshoot effectively.
Dealing With Latency
Latency can be a major problem during recording. It causes a delay between the input and output. This delay can make synchronization difficult. Here are some steps to reduce latency:
- Check your buffer size: Smaller buffer sizes can reduce latency. Adjust this in your audio interface settings.
- Close unnecessary applications: Running multiple programs can strain your CPU. Close any apps you do not need.
- Update drivers: Outdated drivers can cause latency issues. Ensure your audio interface drivers are up to date.
- Optimize your computer: Disable background processes. This can improve performance and reduce latency.
Fixing Audio Distortion
Audio distortion can ruin a recording. It often occurs due to incorrect settings or poor connections. Follow these tips to fix audio distortion:
- Check your levels: Ensure the input levels are not too high. Clipping can cause distortion. Adjust the gain on your audio interface.
- Inspect cables: Faulty cables can introduce noise. Check your connections and replace any damaged cables.
- Use a pop filter: This can reduce plosive sounds that cause distortion. Place it between your mouth and the microphone.
- Consider your environment: Background noise can cause distortion. Record in a quiet place.
By following these steps, you can mitigate latency and audio distortion. Understanding and addressing these issues will improve the quality of your recordings.
Editing And Finalizing Your Video
After recording your video with an audio interface, editing is the next step. The editing process will help you create a professional and engaging final product. You will sync the audio and video, enhance audio quality, and make final adjustments. Let’s dive deeper into each part.
Syncing Audio And Video
First, you need to sync your audio and video tracks. Use video editing software to align the audio with the video. Look for visual cues or use a clapperboard to match the sound and image. This step ensures that your audio matches the visuals perfectly.
Enhancing Audio Quality
Once synced, focus on improving the audio quality. Remove background noise and adjust the levels. Use equalization (EQ) to enhance the sound. This step makes your audio clearer and more pleasant to listen to. A good audio quality can make a huge difference in your video.
Conclusion And Final Thoughts
Recording video with an audio interface can seem complex at first. But with the right knowledge, it becomes much easier. In this section, we will recap the key points covered. We will also encourage you to experiment and find what works best for you.
Recap Of Key Points
Let’s summarize the main steps for recording video with an audio interface:
- Choose the right audio interface: Ensure it matches your recording needs.
- Connect your equipment: Properly connect your microphone, instruments, and camera.
- Set up your recording software: Configure the software to recognize your audio interface.
- Adjust audio settings: Ensure the levels are balanced and free of distortion.
- Test your setup: Perform a test recording to check for issues.
Encouragement To Experiment
Don’t be afraid to try new things. Experiment with different settings and equipment to find the best sound. Every recording setup is unique. What works for someone else might not work for you.
Here are a few tips to help you experiment:
- Try different microphone placements.
- Adjust the gain settings to see how it affects the sound.
- Use different recording environments to find the best acoustics.
Recording video with an audio interface can be rewarding. Take your time to learn and experiment. The more you practice, the better your recordings will become.

Credit: www.youtube.com
Frequently Asked Questions
How Do I Connect An Audio Interface?
To connect an audio interface, plug it into your computer via USB or Thunderbolt. Then, connect your microphone and headphones to the interface. Make sure to install any necessary drivers.
Can I Record Video With An Audio Interface?
Yes, you can record video with an audio interface. Connect the interface to your computer and use video recording software. Ensure your audio interface is selected as the audio input source.
What Software Do I Need For Recording?
You need video recording software that supports external audio interfaces. Popular options include OBS Studio, Adobe Premiere Pro, and Final Cut Pro. Ensure the software recognizes your audio interface.
Why Should I Use An Audio Interface For Video?
Using an audio interface improves the sound quality of your recordings. It provides better preamps and converters than built-in computer microphones. This results in clearer and more professional audio.
Conclusion
Recording video with an audio interface can be straightforward. Follow the steps in this guide, and you’ll improve your audio quality. Remember to check your settings and equipment before starting. Practice makes perfect, so keep experimenting. Soon, you’ll create videos with clear, professional sound.

Enjoy the process and have fun recording!
As an Amazon Associate, Cleanestor earns from qualifying purchases at no additional cost to you.