Recording vocals in FL Studio with headphones is easy and efficient. It’s essential for quality sound without distractions.
If you’re new to FL Studio, this guide will help you get started. Recording vocals can seem overwhelming, but with the right steps, you’ll achieve great results. Using headphones while recording ensures you capture clean vocals without background noise. Whether you’re a beginner or looking to improve your setup, this guide will offer clear, simple instructions.
You’ll learn how to set up your equipment, adjust settings, and record high-quality vocals. Let’s dive into the process and make your recordings sound professional and crisp.
Credit: productionden.com
Preparing Your Workspace
Recording vocals in FL Studio requires a well-prepared workspace. An organized setup helps you focus and achieve the best sound quality. Here are some steps to get your workspace ready.
Setting Up Fl Studio
Open FL Studio on your computer. Ensure you have the latest version installed. This ensures you have access to the latest features and bug fixes.
Next, configure your audio settings. Go to the options menu and select audio settings. Choose your audio interface from the list. Set the buffer size to a low value to reduce latency.
Now, create a new project. Save your project immediately to avoid losing any work. Organize your tracks by naming them clearly. This helps you stay organized during the recording process.
Choosing The Right Headphones
Selecting the right headphones is crucial. They help you hear your vocals clearly. Avoid using regular consumer headphones. Choose studio headphones instead. They provide a flat frequency response for accurate monitoring.
Check the comfort of the headphones. You might wear them for long periods. Ensure they fit well and do not cause discomfort. Over-ear headphones are usually more comfortable.
Test the headphones with some music. Ensure they deliver clear and accurate sound. This helps you make better recording decisions.
Keep your headphones clean and well-maintained. Dust and dirt can affect sound quality. Wipe them regularly with a soft cloth.

Credit: productionden.com
Selecting The Right Microphone
Choosing the right microphone is crucial for recording vocals in FL Studio. The microphone you select can make a significant difference in the quality of your recordings. Let’s explore the different types of microphones and discover which ones are best for vocals.
Types Of Microphones
There are various types of microphones available. Each type is suited for different recording needs.
Dynamic Microphones: These are sturdy and can handle high sound levels. They are less sensitive to background noise, making them ideal for live performances.
Condenser Microphones: These are more sensitive and can capture a wider range of frequencies. They are perfect for studio recordings where detail and clarity are important.
Ribbon Microphones: These provide a warm and vintage sound. They are delicate and best used in controlled studio environments.
Best Microphones For Vocals
Choosing the best microphone for vocals depends on your specific needs and budget.
Shure SM7B: This dynamic microphone is popular for its clear and natural sound. It’s great for both singing and spoken word recordings.
Audio-Technica AT2020: This condenser microphone offers excellent quality at an affordable price. It’s suitable for home studios and beginner recording artists.
Neumann U87: A high-end condenser microphone, known for its exceptional clarity and warmth. It is often used in professional studios for vocal recordings.
Selecting the right microphone is a vital step in achieving high-quality vocal recordings in FL Studio. Consider the types and best options to find what suits your needs.
Connecting Your Equipment
Recording vocals in FL Studio with headphones can be an exciting process. But before you start, you need to connect your equipment properly. This step-by-step guide will help you set up your audio interface, microphone, and headphones.
Audio Interface Setup
Your audio interface is a crucial part of your recording setup. It acts as a bridge between your microphone and computer. Follow these steps:
- Connect the audio interface to your computer using a USB or Thunderbolt cable.
- Install the necessary drivers for your audio interface. Check the manufacturer’s website for the latest versions.
- Launch FL Studio. Go to Options > Audio Settings.
- Select your audio interface from the Device dropdown menu.
- Set the buffer size to a low value for minimal latency.
Microphone And Headphone Connections
Now that your audio interface is set up, it’s time to connect your microphone and headphones. Here’s how:
- Connect your microphone to the audio interface using an XLR cable.
- Ensure the phantom power (48V) is on if you are using a condenser microphone.
- Plug your headphones into the headphone jack on the audio interface.
- Adjust the input gain on the audio interface to a suitable level. Make sure it’s not too high to avoid distortion.
- Set the output volume for your headphones to a comfortable level.
With everything connected, you are ready to record. Remember to check your levels in FL Studio to ensure clear and crisp vocal recordings.
Credit: www.image-line.com
Configuring Fl Studio
Before you start recording vocals in FL Studio, you need to configure it properly. This step ensures your recordings are clear and professional. Below, we will go through the essential settings for a smooth recording process.
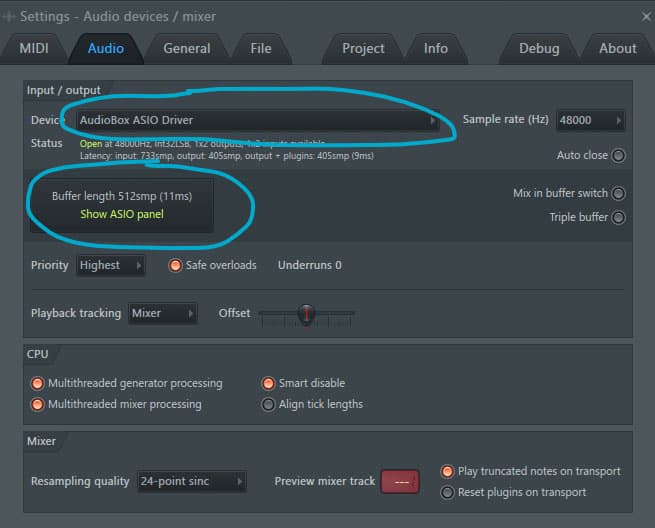
Audio Settings
First, you need to set up the audio settings in FL Studio. Here’s how you can do it:
- Open FL Studio and go to Options in the menu.
- Select Audio Settings from the dropdown list.
- Choose your Audio Device from the list. For most setups, you should use an ASIO driver.
- Set the Buffer Length to a lower value to reduce latency. A buffer length of 256 or 512 samples is ideal.
These settings ensure minimal delay between your vocal input and playback.
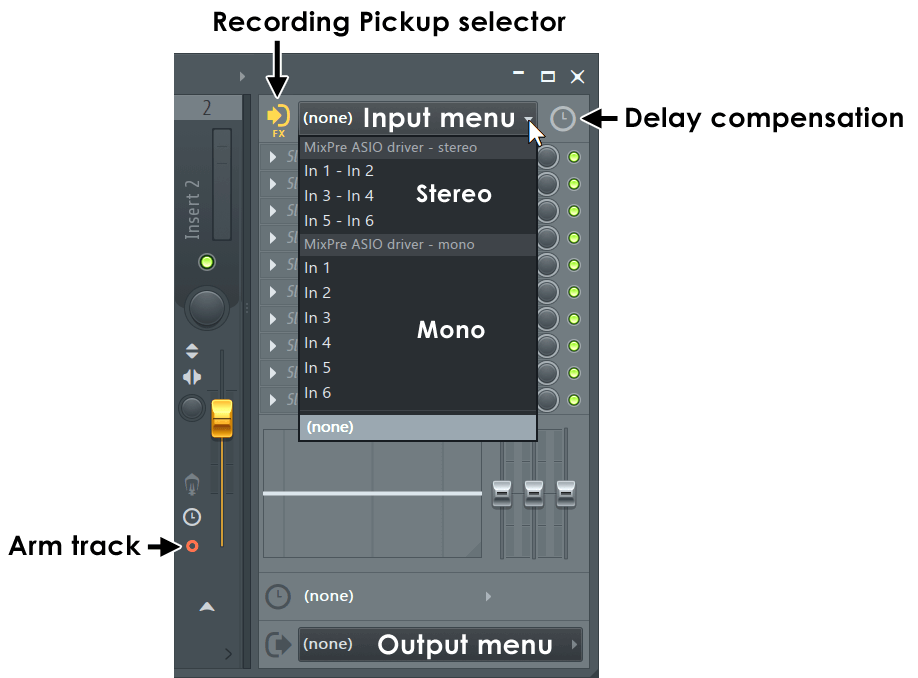
Input And Output Configuration
Next, configure the input and output settings for your microphone and headphones:
- Go back to the Audio Settings menu.
- In the Input/Output section, select your microphone as the input device.
- Choose your headphones or speakers as the output device.
This setup allows you to hear yourself while recording. It also ensures your vocals are recorded correctly.
Summary Table
| Step | Action |
|---|---|
| Audio Device | Select ASIO driver |
| Buffer Length | 256 or 512 samples |
| Input Device | Microphone |
| Output Device | Headphones/Speakers |
Now your FL Studio is configured. You are ready to record vocals with your headphones.
Setting Up A New Project
Recording vocals in FL Studio can seem daunting. But, with the right setup, it becomes straightforward. The first step is to set up a new project. This ensures you have a clean slate to work from. Let’s break it down into simple steps.
Creating A New Project
Open FL Studio and go to the File menu. Select New from template and choose a template that fits your needs. For recording vocals, a basic template is ideal.
You may prefer to start with an empty project. This gives you full control over the setup. Click File again, then select New. Now, you have a blank canvas to start your recording journey.
Organizing Your Tracks
Next, it’s crucial to organize your tracks. This helps keep your project tidy and easy to navigate. Start by creating separate tracks for vocals, instruments, and effects.
| Track Type | Purpose |
|---|---|
| Vocals | Record and process vocal tracks. |
| Instruments | Keep instrumentals separate from vocals. |
| Effects | Apply effects like reverb and delay. |
To add a new track, right-click in the playlist area and select Insert. Choose Audio Track for vocals. Name it clearly, such as “Lead Vocals” or “Backing Vocals”.
Repeat this process for instrument and effect tracks. Use clear, descriptive names. This helps you stay organized and focused while recording.
- Vocals – Lead, Backing
- Instruments – Guitar, Piano
- Effects – Reverb, Delay
By setting up and organizing your project, you create a smooth workflow. This makes the recording process easier and more efficient.
Recording Your Vocals
Recording vocals in FL Studio can be easy with the right approach. Using headphones is key to getting clear recordings without background noise. Let’s dive into some effective recording techniques and how to use headphones properly.
Recording Techniques
To record clear vocals, follow these steps:
- Set up your microphone at a proper distance from your mouth. Around 6 inches works best.
- Use a pop filter to reduce plosive sounds like “P” and “B”.
- Adjust the input gain on your audio interface. Ensure the levels are not too high to avoid clipping.
- Record in a quiet room. This minimizes background noise and ensures cleaner recordings.
Here are some tips to improve your recording quality:
- Warm-up: Do vocal exercises before recording to improve performance.
- Stay hydrated: Drink water to keep your vocal cords in good condition.
- Multiple takes: Record several takes and choose the best parts.
Using Headphones Effectively
Headphones are crucial for monitoring your recordings. Here’s how to use them effectively:
| Tip | Description |
|---|---|
| Closed-back headphones: | Use closed-back headphones to prevent sound leakage into the microphone. |
| Low volume: | Keep the headphone volume low to avoid bleed into the mic. |
| Comfort: | Wear comfortable headphones to ensure long recording sessions without discomfort. |
By following these steps, you can achieve high-quality vocal recordings in FL Studio. Happy recording!
Editing Your Vocals
Editing your vocals in FL Studio can transform a good recording into a great one. With the right tools and techniques, you can polish your vocals and make them shine. This section will guide you through both basic and advanced editing methods.
Basic Editing Tools
Start with the basic tools in FL Studio. The first tool is the cut tool. It helps you remove unwanted parts of your recording. Use it to trim the beginning and end of your vocal track.
Next, the slice tool is useful for splitting your vocals. This tool lets you divide the recording into smaller sections. You can then move these sections around or edit them separately.
Another essential tool is the fade feature. This helps you smooth out the start and end of your vocal track. Use it to avoid abrupt starts or stops.
Advanced Editing Techniques
For more refined editing, explore advanced techniques. One useful method is pitch correction. FL Studio offers tools like Newtone and Pitcher. These tools help correct off-key notes and ensure your vocals are in tune.
Time-stretching is another advanced technique. This adjusts the timing of your vocals without changing the pitch. It can help fit your vocals perfectly with the beat.
Lastly, consider using effects like reverb and delay. These effects add depth and space to your vocals. They can make your recording sound more professional and polished.
Mixing And Mastering
Mixing and mastering are crucial steps in recording vocals in FL Studio. These processes ensure your vocals sound polished and professional. Mixing involves balancing different elements of your track. Mastering finalizes the track, making it ready for release.
Applying Effects
Applying effects to your vocals can enhance their quality. Use EQ to remove unwanted frequencies. Add reverb for a sense of space. Compression can control dynamic range, making vocals consistent. Delay adds depth and can create interesting effects.
Finalizing Your Track
Finalizing your track involves mastering. Start by setting the final volume levels. Use a limiter to prevent clipping. Add some final EQ to balance the overall sound. Listen through different devices to ensure consistent quality.
Check for any last-minute adjustments. Make sure your track sounds polished and professional. Save your project and export it in the desired format.
Frequently Asked Questions
How Do I Record Vocals In Fl Studio?
To record vocals in FL Studio, set up your microphone and headphones. Create an audio track and arm it for recording. Click the record button and start singing.
Can I Use Headphones To Record Vocals?
Yes, using headphones to record vocals is recommended. They help prevent audio bleed and provide clear monitoring of your performance.
What Settings Should I Use For Vocal Recording?
For vocal recording, use a sample rate of 44. 1 kHz and a bit depth of 24-bit. Adjust your input levels to avoid clipping.
How Do I Reduce Background Noise In Recordings?
To reduce background noise, use a pop filter and record in a quiet environment. Employ noise reduction plugins during post-production.
Conclusion
Recording vocals in FL Studio with headphones is easy and fun. Follow the steps outlined above for the best results. Remember to adjust your settings and monitor levels. Practice makes perfect, so keep experimenting. With patience, your recordings will sound professional.

Always aim for clarity and quality. Happy recording!
As an Amazon Associate, Cleanestor earns from qualifying purchases at no additional cost to you.