Replacing a violin string is a simple but crucial skill. It keeps your instrument sounding great.
Strings can break or wear out over time. Knowing how to replace them yourself saves money and hassle. This guide will walk you through the process step-by-step. You don’t need to be a professional to do it. With a little patience and care, you can have your violin sounding its best again.
Let’s get started on learning this essential violin maintenance task.
Credit: store.fisherviolins.com
Gathering Necessary Tools
Replacing a violin string can seem daunting at first. But, with the right tools and a bit of preparation, the process becomes straightforward. Before you begin, gather all necessary tools and prepare your workspace. This will make the task smoother and more enjoyable.
Tools Needed
Start by gathering the tools you need. Having everything at hand will save you time and frustration.
- New violin string: Make sure it matches the string you’re replacing.
- Violin tuner: Essential for getting the string to the correct pitch.
- String winder: Speeds up the winding process.
- Microfiber cloth: Keeps the violin clean during the process.
- Peg compound: Helps pegs turn smoothly and stay in place.
Preparing Your Workspace
Once you have your tools, prepare your workspace. A good setup makes all the difference.
- Find a flat surface: A table or desk is ideal.
- Good lighting: Ensures you can see what you are doing.
- Quiet environment: Helps you focus on the task at hand.
- Soft cloth or towel: Place this under your violin to protect it.
With these preparations, you’re ready to start replacing your violin string. Having everything in place makes the process easier and more enjoyable.
Selecting The Right Strings
Replacing a violin string can be simple if you select the right strings. The right strings will enhance your violin’s sound and make playing easier. This section will guide you through the process of choosing the best strings for your instrument.
Types Of Violin Strings
Violin strings come in three main types: gut, synthetic, and steel. Each type has its own characteristics and benefits.
- Gut Strings: Made from sheep intestines, gut strings produce a warm, rich sound. They are sensitive to humidity and temperature changes. Ideal for classical music.
- Synthetic Strings: Made from synthetic materials like nylon, these strings mimic gut strings’ sound. They are more stable in different climates. Suitable for various music styles.
- Steel Strings: Made from steel, these strings provide a bright, clear sound. They are durable and stable. Perfect for folk and rock music.
Choosing The Right Gauge
Choosing the right gauge, or thickness, of your violin strings affects the sound and playability of your instrument. Gauges come in light, medium, and heavy.
| Gauge | Characteristics | Best For |
|---|---|---|
| Light | Easy to press, produce a soft sound | Beginners, delicate playing |
| Medium | Balance between playability and sound | Most players, versatile use |
| Heavy | Require more pressure, produce a loud sound | Advanced players, strong playing |
Consider your playing style, skill level, and music type when choosing the gauge. A medium gauge is a good starting point for most players.
Removing The Old String
Replacing a violin string may seem daunting, but it’s quite simple. First, we need to remove the old string. This step is crucial for a smooth and successful string replacement. Below, we’ll guide you through the process of removing the old string with ease and care.
Loosening The Peg
Before removing the string, you must loosen the peg. The peg holds the string tight. Turn it slowly to the left. This action will reduce the tension. Do not force it as this can damage the peg or the violin.
Safely Removing The String
Once the peg is loose, gently pull the string out. Start from the peg and move towards the tailpiece. Be careful not to yank or tug. This can harm your violin. If the string is stuck, check for knots or tangles. Use your fingers to carefully untangle them. After removing the string, dispose of it properly. Old strings can be sharp and dangerous.
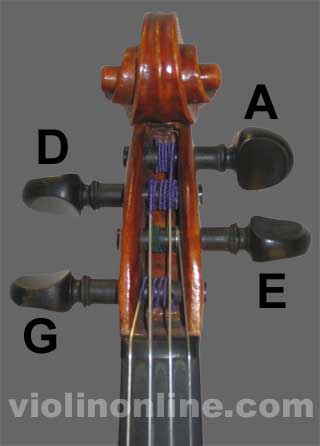
Credit: www.violinonline.com
Installing The New String
Replacing a violin string can seem daunting. But with a bit of patience, it becomes easier. This guide will help you install the new string on your violin. Follow these steps to ensure your instrument sounds perfect.
Attaching To The Tailpiece
First, locate the tailpiece on your violin. It is the black part near the bridge. Insert the ball end of the new string into the hole in the tailpiece. Ensure it is secure and does not slip out. Pull gently to check.
Next, check the fine tuner if your violin has one. Slide the string through the fine tuner. Make sure it fits snugly. This will help in tuning the string later.
Winding The String On The Peg
Now, focus on the pegbox. Insert the other end of the string into the correct peg hole. Push it in about half an inch. Begin winding the string around the peg. Turn the peg away from you. This ensures it tightens properly.
Ensure the string winds neatly. Avoid overlapping. Wind until the string is taut but not too tight. Check the tension by plucking the string. It should produce a sound.
Once wound, adjust the peg. Make sure it holds the string in place. Tune the string to the correct pitch using the fine tuner. Enjoy your freshly strung violin!
Tuning The New String
Replacing a violin string can be a daunting task. Once the new string is in place, tuning it correctly is crucial. Proper tuning ensures a harmonious sound and prevents damage to the instrument. This section will guide you through the process of tuning the new string.
Initial Tuning
Start by tightening the peg gently. Turn it clockwise to raise the pitch. Pluck the string while turning to monitor the sound. Aim for a sound that is close to the target pitch. Avoid overtightening, as this can break the string.
Use a reference pitch from a tuner or another instrument. Match the new string’s pitch with this reference. Listen carefully to ensure the pitch is close but not perfect yet. The fine-tuning stage will make it precise.
Fine-tuning Techniques
Once the initial pitch is set, use the fine tuners. These are located on the tailpiece of the violin. Turn the fine tuner clockwise to raise the pitch slightly. Turn it counterclockwise to lower the pitch.
Pluck or bow the string while adjusting the fine tuner. Listen to the sound and make small adjustments. Repeat this process until the string is perfectly in tune. Fine-tuning ensures the string holds its pitch longer and sounds better.
Remember, new strings stretch and may go out of tune quickly. Check the tuning regularly for the first few days. This will help maintain a consistent sound and prolong the life of your new string.
Checking String Tension
When learning to replace a violin string, understanding proper string tension is key. Proper tension ensures your violin produces the right sound. It also keeps the strings from breaking too soon. This guide will help you check and adjust the tension of your violin strings.
Proper Tension Levels
The correct tension for a violin string is crucial. If the tension is too high, the string could snap. If it is too low, the sound will be off. You should aim for a balance.
To check the tension, press the string at the midpoint. It should feel firm but not overly tight. Use a tuner to ensure the string is at the right pitch. Here is a simple guide:
| String | Pitch |
|---|---|
| G | 196 Hz |
| D | 293.66 Hz |
| A | 440 Hz |
| E | 659.26 Hz |
Adjusting For Comfort
Comfort while playing is essential. If the strings are too tight, playing can be painful. If too loose, controlling the sound becomes difficult.
You can adjust tension using the fine tuners or pegs. Here are steps for each method:
- Use the fine tuners for small adjustments. Turn clockwise to tighten. Turn counterclockwise to loosen.
- If more adjustment is needed, use the pegs. Turn slowly and check the tension often.
Regular checks can help maintain the right tension. This ensures both comfort and quality sound.
Maintaining Your Violin
Keeping your violin in good shape is crucial. Regular maintenance ensures optimal sound and longevity. This practice helps you stay in tune and play better. One key aspect involves taking care of the strings.
Regular String Checks
Inspect your strings often. Look for fraying or signs of wear. Old strings can break during a performance. Keep an eye on the sound quality too. Dull or muted tones may indicate worn strings. Replace them as needed to maintain a clear sound.
Cleaning And Care
Clean your violin regularly. Use a soft cloth to remove rosin dust after each play. Avoid using water or harsh chemicals. They can damage the wood. Also, check the pegs and fine tuners. Ensure they are tight and functioning well.
Store your violin in a case when not in use. This prevents dust buildup and protects it from damage. Keep it in a cool, dry place. Extreme temperatures can harm the wood and affect sound quality.
Troubleshooting Common Issues
Replacing a violin string can sometimes lead to unexpected issues. Understanding these common problems can help you troubleshoot effectively. Below, we discuss some frequent issues and their solutions.
String Slipping
One common issue is a slipping string. This can make tuning difficult. Ensure the string is properly wound around the peg. The peg should fit snugly in the pegbox. If the peg slips, apply some peg compound. This increases friction and holds the peg in place.
Buzzing Sounds
Another issue is buzzing sounds. These can come from various sources. Check the string’s seating in the nut and bridge. The string should sit firmly in the grooves. If not, adjust the string’s position. Also, inspect the tailpiece. Loose fine tuners can cause buzzing. Tighten them if needed. Finally, check for any loose parts on the violin. Even a loose chin rest can cause unwanted sounds.

Credit: violinspiration.com
Frequently Asked Questions
How Do You Know When To Replace A Violin String?
When the string sounds dull or frayed, it’s time to replace it. Regular inspection helps maintain sound quality.
What Tools Are Needed To Replace A Violin String?
You’ll need a new string, fine tuners, and a tuner. Ensure you have these ready before starting.
Can Beginners Replace A Violin String?
Yes, beginners can replace a violin string with practice. Follow step-by-step guides for best results.
How Often Should Violin Strings Be Replaced?
Replace violin strings every 6-12 months. Frequent players might need to replace them more often.
Conclusion
Replacing a violin string is straightforward with practice. Follow the steps carefully. Gather all necessary tools before starting. Always handle your violin gently. Secure the string tightly, but avoid excessive tension. Tune the new string slowly and accurately. Enjoy the clear, beautiful sound of your freshly strung violin.

With time, this task will become second nature. Keep your violin well-maintained for the best performance. Happy playing!
As an Amazon Associate, Cleanestor earns from qualifying purchases at no additional cost to you.